FX4M MOTORIZED TREADMILL
Visit us at:
www.evofitness.com
18
ASSEMBLY
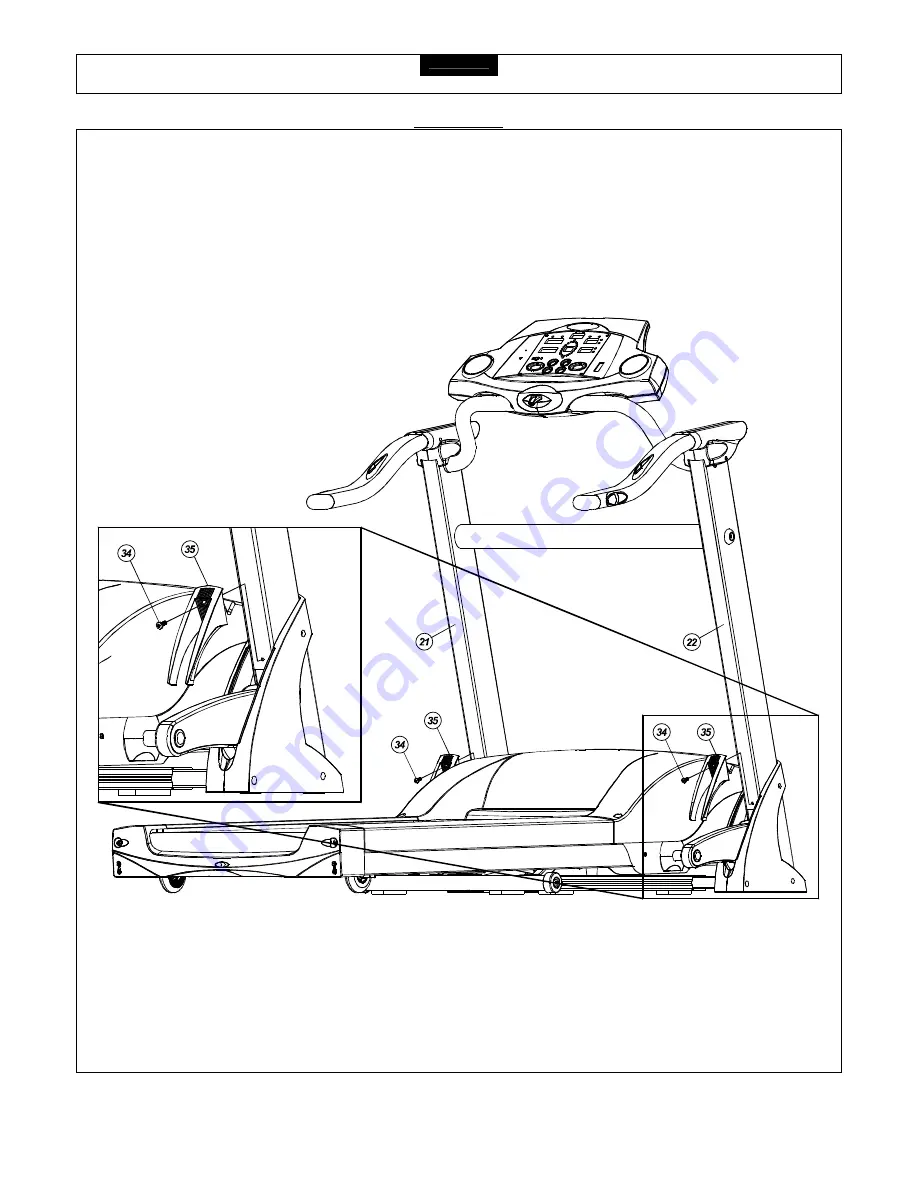
STEP 8
:
Attach the Base Frame End Caps (35) to the Left and Right Handle Upright (21 and 22) and secure using the M6 x 20mm Screws (34).
Page 1: ...USER S MANUAL FX4 MOTORIZED TREADMILL MODEL NUMBER FX4M USER WEIGHT LIMITATION 350lbs TOLL FREE CUSTOMER SERVICE NUMBER 1 888 800 1167 SERIAL NUMBER found on frame...
Page 2: ...under the age of 12 and pets away from the treadmill at all times The treadmill should not be used by persons weighing more than 350lbs Never allow more than one person on the treadmill at a time Wea...
Page 3: ...urge protector not included with your treadmill Surge protectors can be purchased at most hardware stores The manufacturer recommends a single outlet surge protector with a UL 1449 rating as a Transie...
Page 4: ...time and make the assembly quick and hassle free Clear your work area Make sure that you have cleared away a large enough space to properly assemble the unit Make sure the space is free from anything...
Page 5: ...his product This chart is provided to help you identify those items that may be unfamiliar to you NO DESCRIPTION QTY 2 Safety Key 1 4 M6 x 15mm Console Screw 2 11 8 x 15mm Screw 4 12 4 x 19mm Screw 4...
Page 6: ...40 M14 Nut 2 FX4M 40 12 4 x 19mm Screw 9 FX4M 12 41 Cushion 4 FX4M 41 13 Hand Pulse Sensor 2 FX4M 13 42 Bushing 6 FX4M 42 14 End Cap 2 FX4M 14 43 Caster Bracket 2 FX4M 43 15 Left Handlebar 1 FX4M 15 4...
Page 7: ...M10 x 63mm Screw 1 FX4M 72 102 Rear Roller 1 FX4M 102 73 M8 x 15mm Screw 2 FX4M 73 103 Rear Roller Shaft 1 FX4M 103 74 6 x 13mm Washer 2 FX4M 74 104 Motor Hood Bottom 1 FX4M 104 75 M10 x Nylon Nut 1 F...
Page 8: ...Description Qty Order No 119 22 x 10 Washer 2 FX4M 119 120 14 x 10 x 8 Bushing 2 FX4M 120 121 Pivot Shaft 1 FX4M 121 122 Shock 1 FX4M 122 123 14 x 10 x 18 5 Bushing 2 FX4M 123 124 M10 x 120mm Screw 1...
Page 9: ...FX4M MOTORIZED TREADMILL Visit us at www evofitness com 9 PARTS DIAGRAM A MAJORITY OF THE PARTS SHOWN HERE HAVE BEEN PREASSEMBLED AT THE FACTORY...
Page 10: ...FX4M MOTORIZED TREADMILL Visit us at www evofitness com 10 PARTS DIAGRAM A MAJORITY OF THE PARTS SHOWN HERE HAVE BEEN PREASSEMBLED AT THE FACTORY...
Page 11: ...ill from the carton and place it on the floor in an open area as shown in FIG 1 First make sure to connect the wires Then insert the Left and Right Handle Uprights 21 and 22 into the base Frame 46 and...
Page 12: ...OTORIZED TREADMILL Visit us at www evofitness com 12 ASSEMBLY STEP 2 Remove the M5 x 10mm Screw 6 then rotate the Computer Support 3 up to the correct position as shown and secure with the M5 x 10mm S...
Page 13: ...FX4M MOTORIZED TREADMILL Visit us at www evofitness com 13 ASSEMBLY STEP 3 Rotate the Computer 1 up to its proper angle and secure with M6 x 15mm Console Screws 4...
Page 14: ...SSEMBLY STEP 4 Attach the Cross Tube 48 to the Left and Right Handle Uprights 21 and 22 and secure with the Metal Caps 20 and M8 x 78mm Bolts 19 Secure the Computer Support 3 to the Left and Right Han...
Page 15: ...FX4M MOTORIZED TREADMILL Visit us at www evofitness com 15 ASSEMBLY STEP 5 Fully tighten M5 x 10mm Screws 6 M8 x 25mm Screws 17 and M8 x 78mm Bolts 19 at this time...
Page 16: ...ADMILL Visit us at www evofitness com 16 ASSEMBLY STEP 6 Connect the Sensor Wires then attach the Right and Left Handlebars 16 and 15 to the Right and Left Handle Uprights 22 and 21 and secure using M...
Page 17: ...le Cover Right 1 10 and the Handle Cover Right 2 9 to the Right Handle Upright 22 and secure with 8 x 15mm Screws 11 and 4 x 19mm Screws 12 Mount the Handle Cover Left 1 7 and the Handle Cover Left 2...
Page 18: ...FX4M MOTORIZED TREADMILL Visit us at www evofitness com 18 ASSEMBLY STEP 8 Attach the Base Frame End Caps 35 to the Left and Right Handle Upright 21 and 22 and secure using the M6 x 20mm Screws 34...
Page 19: ...n be folded up for space saving storage To do this first be sure that the deck is at the lowest incline level Simply lift the deck up from the rear of the treadmill and fold up until it locks in place...
Page 20: ...he help of a friend reach under the Base Frame 46 and pull down the Caster Bracket 43 Repeat this procedure on the other side Then to roll away for storage simply grab the handlebars and push as shown...
Page 21: ...unfold the treadmill for use begin by standing behind and supporting the deck with your hands Next release the lock with your foot by stepping on the release lever TO PREVENT INJURY BE SURE YOU HAVE A...
Page 22: ...OWER SWITCH Insert the Safety Key and press the START button to quick start the treadmill Press the INCLINE UP button until Level 12 shows on the console This is the highest incline level Now press th...
Page 23: ...back towards the center Repeat the above procedure until the walking belt is centered It may be necessary to set walking belt tension once you have completed this procedure if the belt feels like it i...
Page 24: ...uld not have to be lubricated usually within the first year or 500 hours of use For service call your local EVO dealer or contact us directly at 888 800 1167 Every 3 months of operation lift the sides...
Page 25: ...he following information ready Model name or number from the cover of the manual Serial number located on the frame of the unit and The part description and the order number Limitations on Warranty Th...
Page 26: ...ou may be able to exercise only for a few minutes in your target zone However your aerobic fitness will improve over the next six to eight weeks Don t be discouraged if it takes longer It s important...
Page 27: ...our age and physical condition To determine your target zone consult the chart we have provided FIND YOUR TARGET HEART RATE 200 180 160 140 120 100 HEART RATE in beats per minute 80 20 25 30 35 40 45...
Page 28: ...his product will develop primarily lower body muscle groups These muscle groups are shown in gray color on the chart below Shoulder muscles A B Pectoral muscles Bicep muscle C D Abdominal muscles Fore...
Page 29: ...more oxygen to your muscles At the end of your workout repeat these exercises to reduce sore muscle problems We suggest the warm up and cool down exercises on the following pages Toe Touch Slowly bend...
Page 30: ...ur groin as possible Gently push your knees towards the floor Hold for 15 counts Side Stretch Open your arms to the side and continue lifting them until they are over your head Reach your right arm as...
Page 31: ...ng use 1 Check the circuit breaker reset switch located on the front of the treadmill Turn the power off wait 5 minutes then press the rest switch If the treadmill still will not operate please call y...
Page 32: ...Copyright 2003 Smooth Fitness 112 Gaither Drive Mt Laurel NJ 08054 Toll Free Customer Service 1 888 800 1167 Website www evofitness com...