background image

EVISTR VOICE RECORDER

http://blog.evistr.com

[email protected]

Page - 12 - of -14 -

successfully connected, we will see the connection icon, see as following picture

After we successfully connected to computer, we could delete the files in the recorder, copy file from
the recorder out to our computer disk, copy file into our voice recorder, it just like a normal flash
drive

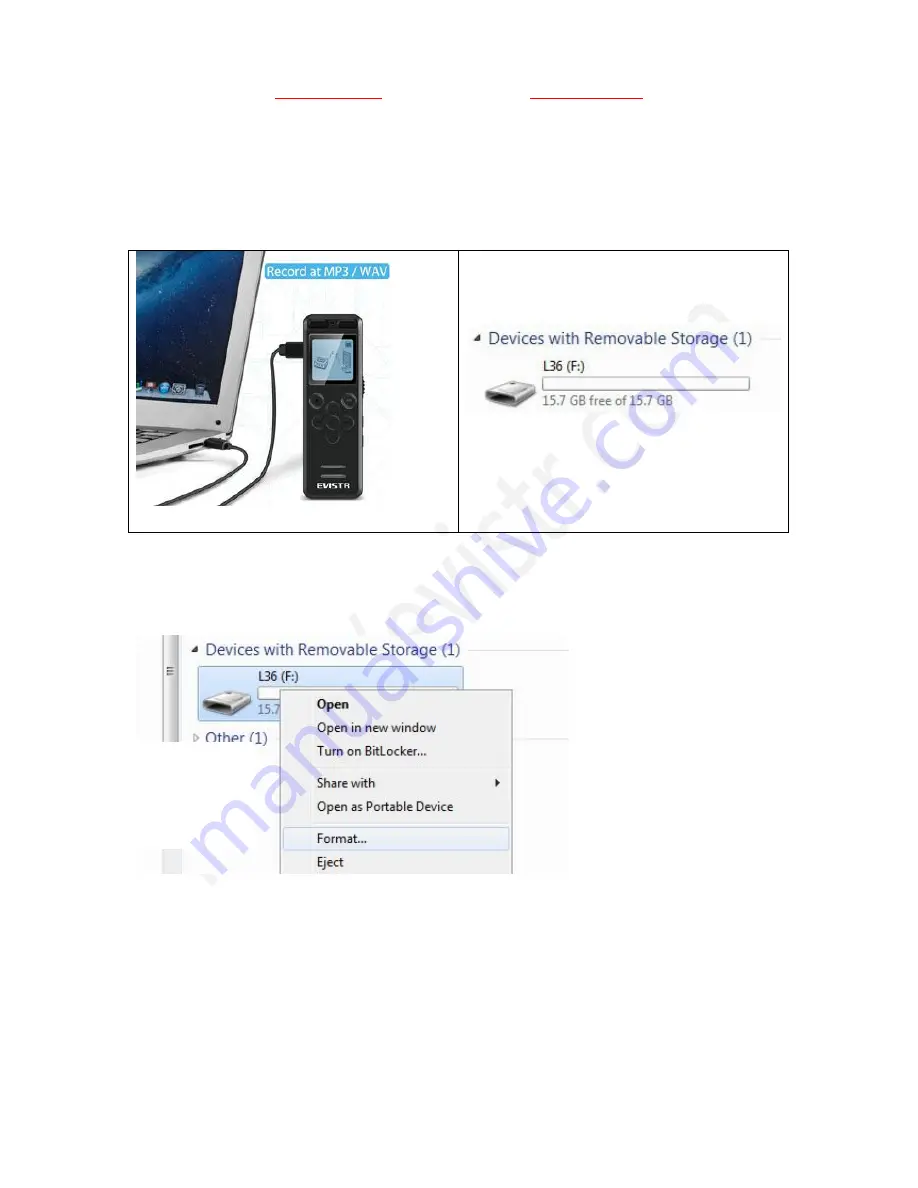
1) Successfully connected to our computer

2) We will see EVISTR L36 on our computer

15) Format EVISTR L36 Drive on Computer Directly

After we successfully connected to our computer, we click the mouse right button, and format it

Notice:
Once we format the disk, all data on the device will be erased utterly, and cannot be restored, so we
need to

16) System Time & Date Setting

Turn on your voice recorder
Press M (menu), find & select " SET"
Press PLAY, enter SET, find & select "Date and time"

Summary of Contents for L36

Page 1: ...effectively Thanks for purchasing EVISTR Digital Voice Recorder EVISTR to be the leading voice recorder brand We hear from our user do all our efforts to make better service L36 Digital Voice Recorde...

Page 2: ...e Recorder 6 3 How to Recording 6 4 How to Pause and Resume Recording 8 5 How to Playback Recording 8 6 How to Fast Forward Rewind 9 7 How to Move to Next Previous 9 8 How to Adjust Speaker Volume 9 9...

Page 3: ...ne 1 x Earphone 1 x LINE IN Cable 1 x External Microphone 1 x USB Cable for data transfer and charging 1 x VIP Card We highly suggest you register from our BRAND site to get extended warranty verify t...

Page 4: ...L VOL Vol Adjust up down selection 3 Important Notice Before Using The Device DOs Turn ON OFF the recorder by press and hold PLAY button this device also could press and hold REC button to fast boot u...

Page 5: ...e device microphone it is very sensitive all this small noise will be capture very clear and loud Do not format the device unless the file had backup Do not cut off its power during format device Do n...

Page 6: ...ecorder Simply press and hold down the PLAY button the device will turn on screen light up Turn off the device by press and hold down PLAY button again See below picture ON Turn on the device by press...

Page 7: ...N 2 Press REC to record 3 Press STOP save recordings NOTE During Recordings you should press STOP to save your recordings before turn off your voice recorder If for example we press REC and STOP 3 tim...

Page 8: ...ur Minute Seconds See the right side picture shows 4 How to Pause and Resume Recording During recording press PLAY pause recording Press PLAY again resume your recording 5 How to Playback Recording Pr...

Page 9: ...drive on your WINDOWS computer directly B Go to your EVISTR L36 DRIVE find folder RECORD select the recordings you want to delete on computer C Format the recorder on the device directly D Delete sin...

Page 10: ...eted Remember to back up all recordings before delete a file When it reads music folder press delete it will delete songs 10 Download File to Computer Connect the recorder to computer via USB cable 1...

Page 11: ...ul All settings will be restored to default same like the first day we just saw the device Here are the steps to restore to factory settings Turn on the voice recorder Press M menu find select Set Pre...

Page 12: ...oice recorder it just like a normal flash drive 1 Successfully connected to our computer 2 We will see EVISTR L36 on our computer 15 Format EVISTR L36 Drive on Computer Directly After we successfully...

Page 13: ...Date settings Press PLAY enter it 2 Set Date format 3 Press PLAY confirm setting and then select Set Date 4 Press PLAY enter set date 5 Press adjust Year and the press Move Month 6 Press adjust Month...

Page 14: ...ce recorder don t worry don t give up just yet and assume that it is defective At Chapter Four we offered some very common trouble shooting just have a quick view based on our customer feedback mostly...

Reviews: