background image

9

4: Software for AxiDraw

4.1 Installing software

You will need to install software on your computer to operate the AxiDraw. 

Current instructions and download links are available at:  

http://axidraw.com/sw

From there, follow the directions specific for your operating system. 

• For Mac and Windows computers, there are easy installers that you can download.

• For Linux, one or more manual steps are required.

Installation instructions are updated from time to time as operating systems change.

The software that you will install includes Inkscape, the superb (and free) drawing pro-

gram, and a set of extensions that operate the AxiDraw from within Inkscape. 

4.2 Inkscape and the extensions

Once you have installed the software, launch Inkscape.

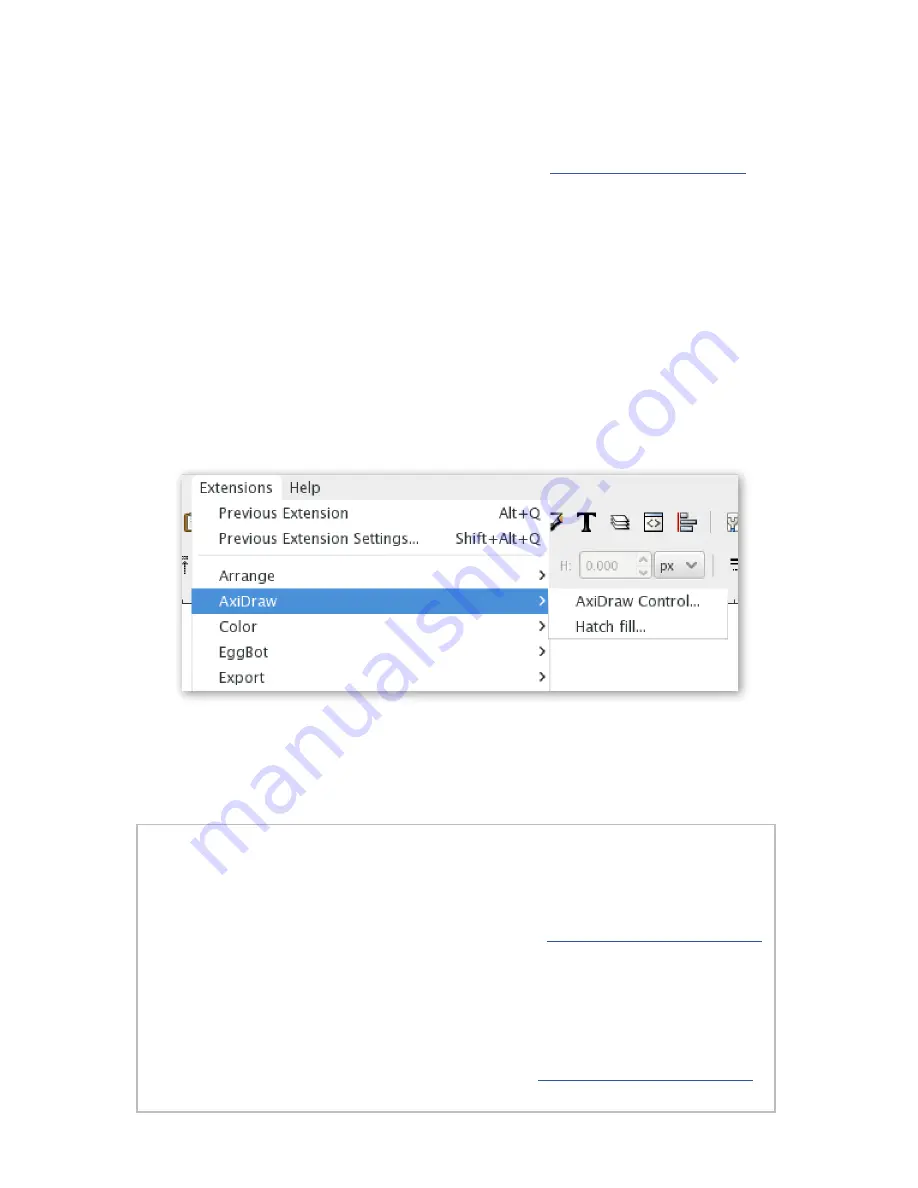
The AxiDraw software may be found in the Extensions > AxiDraw submenu of Inkscape.  

All machine control is performed from within the “AxiDraw Control” panel. (A second 

extension, Hatch Fill, is provided as well, to help with filling in shapes.)

4.3 Aside: Alternative software and APIs

RoboPaint is an alternative driver software available for painting and drawing robots. 

It currently requires a separate install process, but does support AxiDraw.

For more, please see information about RoboPaint at 

http://axidraw.com/docs

Programming is not required to operate the AxiDraw. However, all of our software 

is open source. And, if you would like to program it or remotely send data to it, we 

do have interfaces and documentation available. 

For more, see the section titled “For Developers” at 

http://axidraw.com/docs

Summary of Contents for axidraw

Page 1: ...User Guide Personal Writing and Drawing Machine AxiDraw Version 2 0 Guide Revision 2 1 June 30 2016 ...

Page 2: ...tions to this guide in the coming months both adding clar ifications in response to feedback and adding some additional sections that are already planned We are planning additional sections on performance tuning specific work flows and hope to add more concrete examples and videos as well We are also likely to have a new software version or two in the next month as we get more reports from the fie...

Page 3: ...d the Clip Easel 12 7 Connecting Power and USB 13 8 Pens and Getting Ready for Printing 14 8 1 Pen choices 14 8 2 Setting the pen angle 14 8 3 Inserting a pen 15 8 4 Pen up and pen down positions 16 8 5 Positioning your paper 18 8 6 Summary 20 9 Plotting with the AxiDraw 20 9 1 Making your first plot 20 9 2 Pausing resuming and canceling plots 23 9 3 Plotting with multiple layers and colors 24 9 4...

Page 4: ...illing 36 11 Maintenance and troubleshooting 37 11 1 The hex wrenches 37 11 2 Lubrication 37 11 3 Belt tension 37 11 4 Loss of position 37 11 5 Service repair and parts support 38 12 AxiDraw Tips and Tricks 38 ...

Page 5: ...t never gets tired 1 1 Credits and History While new to most of the world the AxiDraw project has been active since 2014 when it was first created by Dr Lindsay Robert Wilson of IJ Instruments Ltd in the UK Early AxiDraw units had a different design It was a smaller format pen plotter with a chassis made from machined Delrin plastic It had two indepen dent timing belts one driven by a stepper moto...

Page 6: ...t shown Rubber bands Let s also look at what the different parts of the machine are called We will refer to many of these parts by their names elsewhere 5 Power supply 3 USB Cable 2 Clip Easel Binder clips 1 AxiDraw 4 Hex drivers Pen holder Base left Base right Cable Guides not handles Carriage X axis part 2 2 AxiDraw Anatomy 2 1 What comes with the machine Here are the parts that come with the Ax...

Page 7: ... continued Top View Detail Left Base Carriage Y axis part X Shafts Wire conduit Wire conduit Base Block left Rubber Feet USB Port Pause Button aka PRG button Power Jack Stepper motor EBB Control board Y Shafts Timing belt Y Tail Block ...

Page 8: ...th AxiDraw In brief here are the steps to getting started with the AxiDraw 1 Install the software 2 Open or create the artwork that you would like to print 3 By hand move the carriage to the upper left Home Corner 4 Connect power and USB cables 5 Check pen up and pen down heights 6 Set up your pen and paper 7 Begin plotting from within the AxiDraw software Part 4 of this guide goes through the fir...

Page 9: ...d the extensions Once you have installed the software launch Inkscape The AxiDraw software may be found in the Extensions AxiDraw submenu of Inkscape All machine control is performed from within the AxiDraw Control panel A second extension Hatch Fill is provided as well to help with filling in shapes 4 3 Aside Alternative software and APIs RoboPaint is an alternative driver software available for ...

Page 10: ...ng it ready for the next plot Slide the carriage to the Home Corner by hand You can move it diagonally by holding the Y Tie Block which is the black block just behind the pen holder Do not push the pen holder directly The carriage can only be moved when the power to the motors is off If it does not move easily turn off the motors so that you are not trying to force them To do so use the Raise pen ...

Page 11: ...ike this you may need to prop up the base of AxiDraw to make it tall enough to reach 6 2 Workholding with the Clip Easel A simple board with clips the Clip Easel is included with the AxiDraw for holding smaller workpieces principally different shapes and sizes of paper that are not large enough to be held down by the AxiDraw itself This is a great way to mount paper when getting started with the A...

Page 12: ...r paper sideways as in examples C and D above This default behavior can be overridden See 9 6 Advanced options on page 28 6 3 Moving beyond the Clip Easel While the Clip Easel is versatile its use is entirely optional Paper can be also held in place with tape clamps tacks other types of clipboards and by other means as necessary If your AxiDraw is used as a single purpose machine that is if you us...

Page 13: ...to any available USB port on your computer The plug in power adapter included with the AxiDraw 9 V dc regulated center positive works with worldwide mains power 100 240 V ac Outside of the US it may require an inexpensive plug shape adapter Once your cables are connected make sure that the AxiDraw has room to move As the carriage moves it s important that it cannot get caught on stray cables USB C...

Page 14: ...significant downward pressure While we will refer to writing and drawing instruments as pens to be concise other instruments such as automatic pencils chalk charcoal and brushes can also work well in many cases Ball point pens and perhaps certain other writing instruments may work inconsistently because they require a substantial amount of downward pressure to operate 8 2 Setting the pen angle The...

Page 15: ... ink based pen whether rollerball fountain pen or permanent maker it is helpful to bleed out the tip before writing Try it by hand on a piece of paper and make sure that ink is actually flowing Note on fragile or delicate pens If you choose to use fragile pens such as high end foun tain pens with celluloid barrels exercise great care when inserting the pen You may wish to wrap the barrel in a thin...

Page 16: ...e open up AxiDraw Control You can find it in the menu bar at Extensions AxiDraw AxiDraw Control Click on the Setup tab Select the Toggle pen between UP DOWN action and click the Apply button If your software is all installed correctly and everything is hooked up correctly the pen lift motor will alternately move to the up or down positions each time that you press Apply Pen up Pen down ...

Page 17: ...d be approximately 1 8 to 1 4 inch 3 6 mm above the surface of the paper You can physically adjust the position of the pen with the thumbscrew and or change the positions from the Setup tab of AxiDraw Control Toggle also to the pen down position With the pen down the pen should rest on the paper by its weight If it does not you may need to lower the pen down position While testing you can protect ...

Page 18: ...eat the corner of the page in your Inkscape doc ument as Home Corner for the purpose of plotting Here is how the page printed above looks from within Inkscape 8 5 Positioning your paper With your pen at the HOME Corner and the pen at an appropriate height it is time to position the paper with respect to the AxiDraw The printable area starts at the HOME Corner and extends down and to the right from...

Page 19: ...er vertical or horizontal it is always the cor ner of the paper closest to the Home Corner that one aligns below the tip of the pen For comparison here are how those two documents look on the computer when setting up to print The absolute position of your paper with respect to the AxiDraw will vary depending on the paper the pen that you use as well as the pen length if it is mounted at 45 However...

Page 20: ... unzip and from within Ink scape open up the file called AxiDraw_First svg Once open the document should look approximately like this If you cannot see the full page outline when you first open the file select from the menu View Zoom Page or type the number 5 on your keyboard 8 6 Summary Your AxiDraw is now ready to print To recap the steps in getting ready are 1 Move the pen holder to the Home Co...

Page 21: ...ip Easel 6 2 Align the paper to the upper left of the Clip Easel closest to Home 3 Plug in the power cable and connect the USB 7 4 Using the software toggle the pen down and back up leaving it up 8 4 From the menu select Extensions AxiDraw AxiDraw Control In the Basic Setup tab use the Toggle Up Down option 5 Clip in your pen with height just above the paper 8 4 6 Position your paper with its uppe...

Page 22: ...d the AxiDraw and make sure that the carriage has room to move both in front of and behind the base Finally switch to the Plot first tab of AxiDraw Control and click Apply to begin The AxiDraw should now begin printing your document and will return back to the Home Corner with pen up when it finishes ...

Page 23: ...want to cancel the plot To resume a plot underway use the Resume tab in AxiDraw control and select the Re sume action and Apply To return the carriage to the home corner instead select the Return to Home Corner option and Apply The plot can still be resumed after moving back to HOME if and only if moved by this command If you are canceling to start a new plot from the Plot or Layers tab you must r...

Page 24: ...le different speeds When you click Apply with the Layers tab open the AxiDraw will plot only the layer or layers that have a name beginning with the number selected there The only requirement for using this feature is that you begin each layer name with an integer in the range 0 through 100 For example if you have three layers with the names 1 Red swirls 1 Red zig zags 2 Blue circles Then you can ...

Page 25: ...ent colors is for the party invitation example shown below You can see below how it appears in Inkscape as well as printed on the page using six ul tra fine point Sharpie markers One concern when swapping between pens is to get consistent registration such that each pen is mounted consis tently in the same place It is easiest to do so when using multiple pens of the same type and when mounted in t...

Page 26: ...ad marks one might go as high as Writing Drawing speed 50 Pen up movement speed 90 Everyday use Most of our sample drawings and tests are made with a medium speed that is a com promise between speed and precision This is a good balance for fine point permanent markers and wide nibbed fountain pens Writing Drawing speed 20 Pen up movement speed 75 Working with precision When working with fine point...

Page 27: ...al range first and look at the delays next Slower movements however are more gentle and will both lead to neater writing and prolong the life of the motor The AxiDraw will pause its horizontal motion while raising or lowering the pen until the vertical movement is complete These pauses are meant to prevent the machine from making pen up movements until the pen is actually clear of the paper and to...

Page 28: ...nly at a constant speed when it is down This will give neater performance for certain types of paths but creates more vibration when going around curves It gives more uniform but less natural ink flow Report time elapsed after each plot Default off When checked a dialog box will show elapsed time after each plot finishes Motor resolution Default Super 2000 DPI The two options are for native resolu...

Page 29: ...hing Default 10 0 The curve smoothing factor affects the precision with which curves are interpolated for plotting The default value of 10 is a good choice for almost all circumstances Low values below about 5 may cause smooth curves to appear as a series of straight segments Cornering speed factor Default 10 0 When not in constant speed mode this factor controls how much the machine slows down wh...

Page 30: ...d Enable Motors Disable Motors These two commands either energize the two stepper motors or turn power off to them The carriage can only be moved by hand when the power to these motors is off Check EBB Version Query the EBB the AxiDraw control board and request its firmware version number AxiDraw is currently shipping with firmware version 2 4 0 This is one of very few com mands that directly repo...

Page 31: ...a of the document where you wish to print right underneath the tip of the pen For signing the valentine card above where the entire text consists of two words one could position the position to start writing the upper left corner of the word me directly beneath the pen tip Extending this idea further you can even plot away from home by starting out not at the home corner but from some midway point...

Page 32: ...to paths before plotting That is straightforward in some cases and not in others For example solid fills are easy using the Hatch Fill extension included with the AxiDraw software Importing graphics The native file format of the AxiDraw is SVG scalable vector graphics a standard interchange format You can create artwork directly in Inkscape However many other graphics programs including Adobe Illu...

Page 33: ...procedure generally provides a good preview of how the AxiDraw will view your page It is only a preview however it shows the outlines around objects even if they are not for example with text converted to paths yet 10 3 Working with standard fonts Most fonts e g truetype opentype fonts that are installed on your computer will be accessible from the text layout tools directly from within Inkscape Y...

Page 34: ...able particularly when using wider pen tips that produce wider lines If you instead desire filled in text for example that Trebuchet MS example filled in fully black you will need to fill it in using the Hatch Fill extension See 10 5 on page 36 When trying to achieve an effect closer to that of natural handwriting an outlined ef fect is generally not acceptable Pick handwriting like fonts that hav...

Page 35: ...by the stroke itself not the area enclosed by it Fonts like these are the best possible choice for pen plotters However most graphics programs are only capable of understanding outline fonts and so these are relatively rare Inkscape includes an extension that we developed called Hershey Text which can create stroke based text in a few different fonts The text is created directly as vector paths ra...

Page 36: ...els px and the default value of 5 0 is appropriate for wide permanent markers A lower spacing will produce a more uniform fill and a higher spacing will produce a more traditional hatch fill for shading You can use the Live preview option to see the effects of different choices without actually applying them to your shapes and text The Connect nearby ends option enabled by default connects the end...

Page 37: ...the shaft until the carriage moves freely Only a very small amount is needed Do not lubricate the pen lift vertical slide mechanism Its stainless steel shafts do not require corrosion protection and the vertical bearings plain bearings machined from a Teflon acetal composite will not slide freely if oiled 11 3 Belt tension The AxiDraw uses a single timing belt looped in an X around the two motors ...

Page 38: ...s to rest the tip of the pen on a spacer when tightening the pen in place Use a small flat piece of wood plastic or metal A good example might be a thin bottle cap or a stack of two coins 7 Clean the AxiDraw pro only with a soft clean cloth The non electronic metal parts may be cleaned with a cloth moistened with soap and water if needed Avoid other cleaners and solvents The X and Y shafts and bea...

Page 39: ...espan of the pen lift servo motor Example rubber bands are included with the AxiDraw but will degrade over time Online documentation resources for AxiDraw axidraw com docs Blog www evilmadscientist com Store shop evilmadscientist com Support forum evilmadscientist com Humans contact evilmadscientist com 10 If your motor wires should become disconnected at some point here is where they go Left moto...

Reviews:

Related manuals for axidraw