background image


2.  Installation 

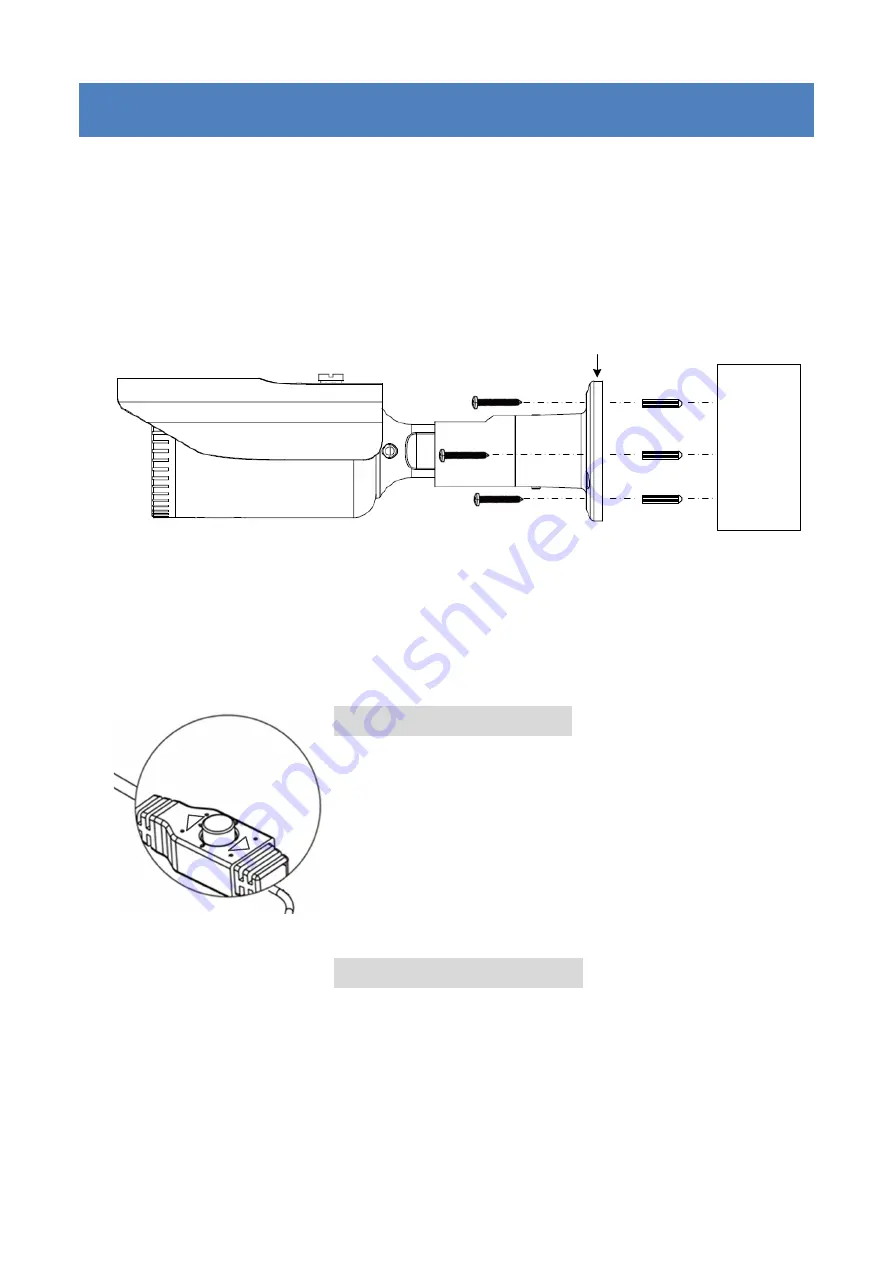
1.


Stick the supplied 

Mounting Sticker

 to the surface to mark the 3 screw 

positions. Drill 3 holes on the surface and insert the supplied 3 

Screw 

Anchors 

into the screw holes. If you want to run the cable through the 

surface, drill a hole within the 3 screw area. 

2.


To mount the camera to the surface, screw the 

Camera Base

 to the 

surface using the supplied 3

 Screws

Mounting 

Surface

Screws

Screw Anchors

Camera Base


3.


Connect the 

Power Cable

 to a 12VDC / 24VAC power source. Connect 

the

 Video Output Cable

 to a monitor or DVR. 

4.


You can use the

 Joystick

 on the cable to configure camera OSD settings 

or switch to different video formats. Remove the Protection Cap from 
the Joystick before using it. 

UP

DN


Switching Video Format: 


Push the joystick up for 5 sec. to switch to 

AHD.   


Push the joystick right for 5 sec. to switch to 

TVI.   


Push the joystick down for 5 sec. to switch to 

CVI. 


Push the joystick left for 5 sec. to switch to 
CVBS. 

Configuring OSD Settings: 


Push the Joystick up / down to select among 

menu items. 


Push the Joystick left / right to adjust the level 

of the selected item. 


Press the Joystick to enter the submenu or 

exit the OSD Setup Menu. 

Summary of Contents for EZA1280 eZ.HD Series

Page 1: ...roduct pictures or screen shots in this document are for example only The images may vary depending on the product and software version Information contained in this document is subject to change with...

Page 2: ...scanning systems 1 1 Packing List Camera x 1 Mounting Sticker x 1 L Type Wrench x 1 Screw Screw Anchor x 3 User Manual x 1 1 2 Features 1080p Sony STARVIS CMOS sensor delivering amazing high sensitiv...

Page 3: ...Size 138 x 54 H mm 5 43 x2 16 Weight 700g 1 87lb Material Metal 1 5 Cable Description Power Cable Video Output Cable 1 2 No Name Descriptions 1 Power Cable Connects to a 12VDC 24VAC power source 2 Vid...

Page 4: ...r source Connect the Video Output Cable to a monitor or DVR 4 You can use the Joystick on the cable to configure camera OSD settings or switch to different video formats Remove the Protection Cap from...

Page 5: ...camera angles To do so loosen the Tilt Screw or Rotate Screw on the bracket using the supplied L Type Wrench to adjust camera angles After adjusting camera angles tightly screw back the Tilt Rotate sc...

Page 6: ...al ROI Window Zone 0 3 Window Use On Off H POS 0 1920 V POS 0 1080 H Size 0 1920 V Size 0 1080 Weight Middle High Low 5 Day Night Auto Mode Auto IR LED On Off Anti Sat 0 20 LED Power Dimming AGC Thres...

Page 7: ...Low Middle High Defog Off On Mode Manual Auto Level Low Middle High Privacy Off On Zone Num 0 15 Zone DISP On Off H POS 0 60 V POS 0 34 H Size 0 60 V Size 0 34 Y Level 0 20 CB Level 0 20 CR Level 0 20...

Page 8: ...25P 30P 720 25P 30P 720 50P 60P Freq 50HZ 60HZ Confirm YES Image Range Full Comp User Offset 0 32 Color Space HD CbCr YUV SD CbCr Color Bar On Off Language ENG CHN CHN S JPN KOR POR Cam Title Off Rig...

Reviews: