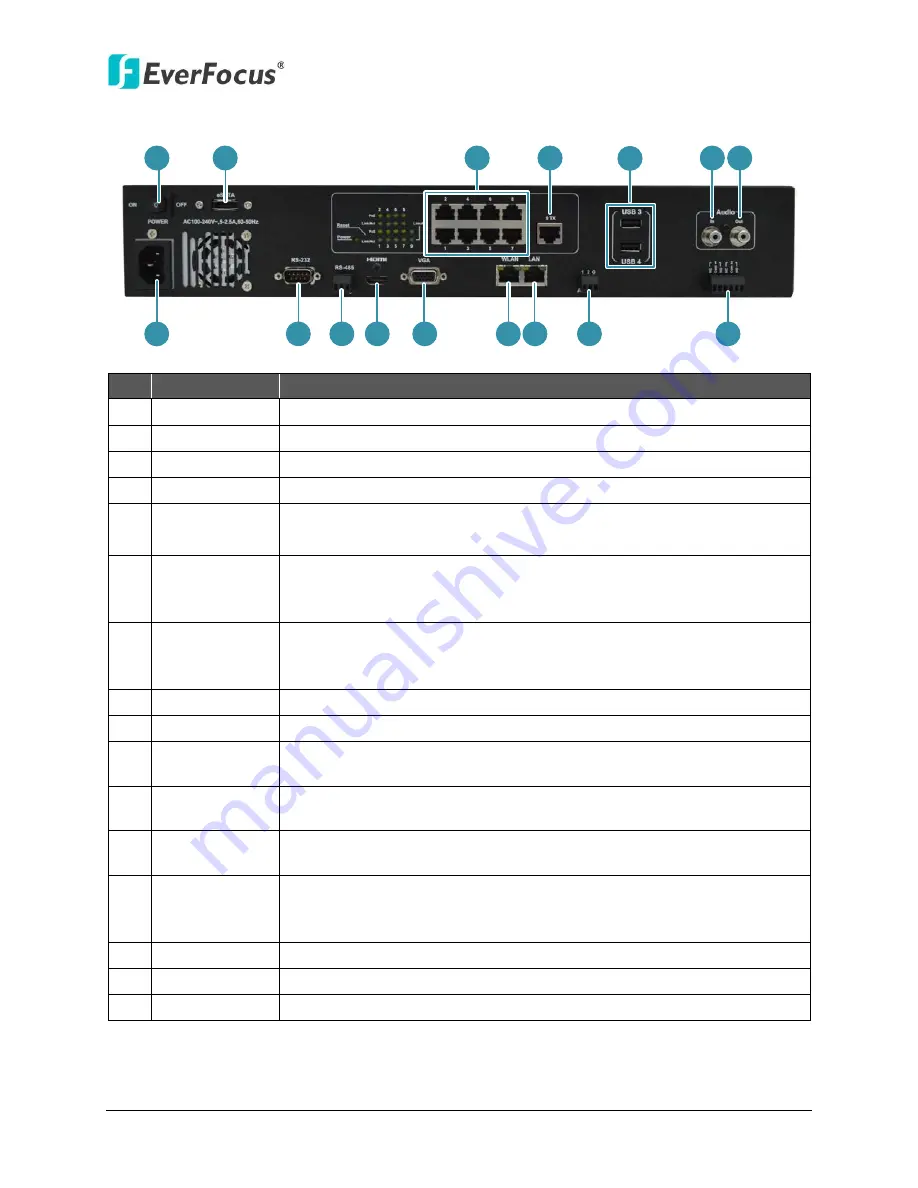
EverFocus ENVR8304E-8CH Quick Installation Manual Download Page 7

                                             ENVR8304E-8CH


Rear Panel   

1

2

3

4

8

5

6 7

9

10 11

12

13

15

14

16


No.  Name 

Description 

Power 

Press to turn On / Off the NVR. 

eSATA Port 

Connects to an external eSATA storage device. (EDA450) 

PoE Port 1~8 

Connects to 8 IP cameras without extra power supply. 

Uplink Port 

Connects to the LAN port of the NVR using the supplied RJ-45 Cable. 

USB3 / USB4 

The USB2.0 ports for connecting to a mouse, external storage device 
or EKB200 keyboard. 

Audio Input 
(RCA socket) 

Connects to the audio input devices, such as microphones. Note that 
the microphone with a (built-in) amplifier and external power supply 
are required.   

Audio Output 
(RCA socket) 

Connects to the audio output devices, such as speakers. Note that the 
speaker with a (built-in) amplifier and external power supply are 
required.   

Power Port 

Connects to the 100-240 VAC~ power using the supplied Power Cord. 

RS-232 Port 

Connects to the RS-232 device. Please refer to 

2.3.7 RS-232 Port

10 

RS-485 Port 

Connects to the RS-485 device, such as EverFocus’ EKB-500 keyboard. 
Please refer to 

2.3.6 RS-485 Port

11 

HDMI Port 

Connects to the Main monitor using a HDMI cable. Please refer to 

2.3.3 Monitor Connection

12 

VGA Port 

Connects to the Main monitor using a VGA cable. Please refer to 

2.3.3 

Monitor Connection

13 

WLAN 

Connects to the network using a standard RJ-45 CAT5 10/100Mb 
Ethernet cable. Please refer to 

2.5 Connecting the NVR to the 

Network.


14 

LAN 

Connects to the Uplink port using the supplied RJ-45 Cable.   

15 

Alarm Input 

Connects up to 2 alarm inputs. Please refer to 

2.3.5 Alarm IO

16 

Alarm Output 

Connects to 2 alarm output devices. Please refer to 

2.3.5 Alarm IO


Summary of Contents for ENVR8304E-8CH

Page 1: ...ii ENVR8304E 8CH 8 Channel Plug Play NVR Quick Installation Guide Copyright EverFocus Electronics Corp Release Date December 2013 Notice This content is subject to be changed without notice...

Page 2: ...software to operate the system When paired with our powerful EverFocus PowerVideo Plus CMS the ENVR8304E 8CH can be used in complex multi site installations with centralized management The ENVR8304E...

Page 3: ...r Dome 10 56W 13 11W 802 3at Class 4 EDN1320 V 1 2 2 V1 0 0 H 264 O X O Mini Dome 12W 4 8W 802 3af Class 3 EDN1220 V 1 2 2 V1 0 0 H 264 O X O Mini Dome 12W 5 28W 802 3af Class 3 EDN1120 V 1 2 2 V1 0 0...

Page 4: ...0 0 H 264 O O O Speed Dome X 24W 802 3af Class 4 EPN4222pi V 1 0 9 V1 0 0 H 264 O O O Speed Dome X 24W 802 3af Class 4 EPN4220 V 1 0 9 V1 0 0 H 264 O O O Speed Dome 30W 24 VAC X X EPN4220i V 1 0 9 V1...

Page 5: ...verFocus office or agents for more information Please also keep the shipping carton for possible future use 2 Contact the shipper if any items appear to have been damaged in the shipping process 3 The...

Page 6: ...e ENVR8304E 8CH Front Panel 1 2 3 4 5 8 7 6 No Name Description 1 Power Indicates the power is on 2 REC Indicates the NVR is recording 3 LAN Indicates the NVR is connected to the network 4 Alarm Indic...

Page 7: ...aker with a built in amplifier and external power supply are required 8 Power Port Connects to the 100 240 VAC power using the supplied Power Cord 9 RS 232 Port Connects to the RS 232 device Please re...

Page 8: ...screws on the NVR and open the housing 3 Screw two HDD brackets on both sides of the HDDs using the Sliver Screws Silver Screw HDD Bracket 4 Use the SATA Cable and connect one end to the SATA port on...

Page 9: ...two connectors which can be used to connect to two HDDs 6 Screw the HDDs with the brackets inside the NVR using the Washer Head Screws 7 Screw back the housing to the NVR 2 2 Rack Mount To install rac...

Page 10: ...ease see 2 3 1 Camera Connection for more details 4 To manage the NVR over network use a standard RJ 45 CAT5 10 100 1000Mb Ethernet cable to connect the WLAN port of the NVR to the network Please refe...

Page 11: ...e LAN The default network values of the IP devices will be displayed By default the network protocol of the IP device is DHCP 3 To configure the network settings select an IP device and then click Log...

Page 12: ...You may need to turn User Account Control off if you still can t see the Remote Live View please see the step below 8 On the computer click Start Control Panel System and Security Action Center click...

Page 13: ...ate to go to the JAVA website http www java com en and download the latest version of the JAVA software 3 Please go to the Control Panel JAVA Control Panel to change settings 4 If you can t find the J...

Page 14: ...tificate Status Protocol OCSP Also check Place JAVA icon in system tray in Miscellaneous option 7 Scroll to Default JAVA for Browser and check Mozilla family 8 Connect the NVR s IP address again and t...

Page 15: ...ecurity settings may be too high If so go to Section 6 2 Enabling ActiveX Controls 1 You may also prompt to install the MSXML file Please right click the yellow bar and select Run Add on 2 Install the...

Page 16: ...u DO NOT see the image in step 1 of the 6 1 Installing ActiveX Controls popping up when you first connect to the NVR 1 At the top of the Internet Explorer Window click on Tools and then select Interne...

Page 17: ...controls Binary and script behaviors Display video and animation on a webpage that does not use external media player IE7 only Run ActiveX controls and plug ins Script ActiveX controls marked safe fo...

Page 18: ...ad the page 7 You may need to run the EverFocusViewer application when prompted to do so 8 The login page will show up Type in the user name and password and click Login to view the cameras The defaul...

Page 19: ...9 www everfocus co jp info everfocus co jp EverFocus Europe UK Unit 12 Spitfire Business Park Hawker Road Croydon Surrey CR0 4WD UK TEL 44 20 8649 9757 44 845 430 9999 FAX 44 20 8649 9907 www everfocu...

Reviews: