background image


d.


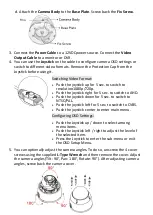
Attach the 

Camera Body

 to the 

Base Plate

. Screw back the 

Fix Screw

3.


Connect the 

Power Cable

 to a 12VDCpower source. Connect the

 Video 

Output Cable

 to a monitor or DVR. 

4.


You can use the

 Joystick

 on the cable to configure camera OSD settings or 

switch to different video formats. Remove the Protection Cap from the 
Joystick before using it. 

UP

DN


Switching Video Format: 


Push the joystick up for 5 sec. to switch to 

resolution1080p/720p.   


Push the joystick right for 5 sec. to switch to AHD.   


Push the joystick down for 5 sec. to switch to 

NTSC/PAL. 


Push the joystick left for 5 sec. to switch to CVBS. 


Push the joystick center to enter main menu. 

Configuring OSD Settings: 


Push the Joystick up / down to select among 
menu items. 


Push the Joystick left / right to adjust the level of 

the selected item. 


Press the Joystick to enter the sub-menu or exit 

the OSD Setup Menu. 

5.


You can optionally adjust the camera angles. To do so, unscrew the 4 cover 
screws using the supplied 

L-Type Wrench

 and then remove the cover. Adjust 

the camera angles (Tilt: 90°, Pan: 180°, Rotate: 90°). After adjusting camera 
angles, screw back the camera cover. 


Summary of Contents for EHA1281 eZ.HD Series

Page 1: ...product pictures or screen shots in this document are for example only The images may vary depending on the product and software version Information contained in this document is subject to change wi...

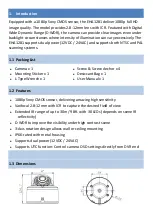
Page 2: ...1 1 Packing List Camera x 1 Mounting Sticker x 1 L Type Wrench x 1 Screw Screw Anchor x 4 Desiccant Bag x 1 User Manual x 1 1 2 Features 1080p Sony CMOS sensor delivering amazing high sensitivity Var...

Page 3: ...B3B A Color White Metal White Metal Size WxDxH 135 7mm 135 7mm Weight 155g 346g 1 5 Cable Description 12VDC 24VAC Power Cable Video Output Cable BNC 75Ohm 2 Installation 1 Stick the supplied Mounting...

Page 4: ...bag from the Camera Body and stick the supplied Desiccant Bag inside the Camera Body It s highly recommended to replace the desiccant bag every time when you open the Camera Cover c For the first time...

Page 5: ...k right for 5 sec to switch to AHD Push the joystick down for 5 sec to switch to NTSC PAL Push the joystick left for 5 sec to switch to CVBS Push the joystick center to enter main menu Configuring OSD...

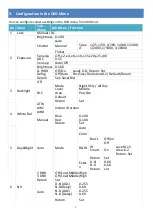
Page 6: ...f On Level 0 8 Return Set Defog Off Auto Pos Size Gradation 0 2 Default Return Return Set Save End 3 Backlight Off BLC Mode Night Only All Day Level Middle Area Pos Size Default Return Set 4 White Bal...

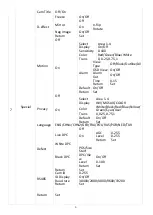
Page 7: ...Time 0 15 Return Set Default On Off Return Set Privacy Off On Select Area 1 4 Display INV MOSAIC COLOR Color White Black Red Blue Yellow Green Cyan User Trans 0 0 25 0 75 1 Default On Off Return Set...

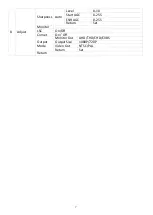
Page 8: ...djust Sharpness Auto Level 0 10 Start AGC 0 255 ENR AGC 0 255 Return Set Monitor LSC On Off Comet On Off Output Mode Monitor Out AHD THD CHD CVBS Output Size 1080P 720P Video Out NTSC PAL Return Set R...

Page 9: ...Your EverFocus product is designed and manufactured with high quality materials and components which can be recycled and reused This symbol means that electrical and electronic equipment at their end...

Reviews: