EverFocus EEPPRR--11220 User Manual Download Page 11

EPR120 User’s Manual 


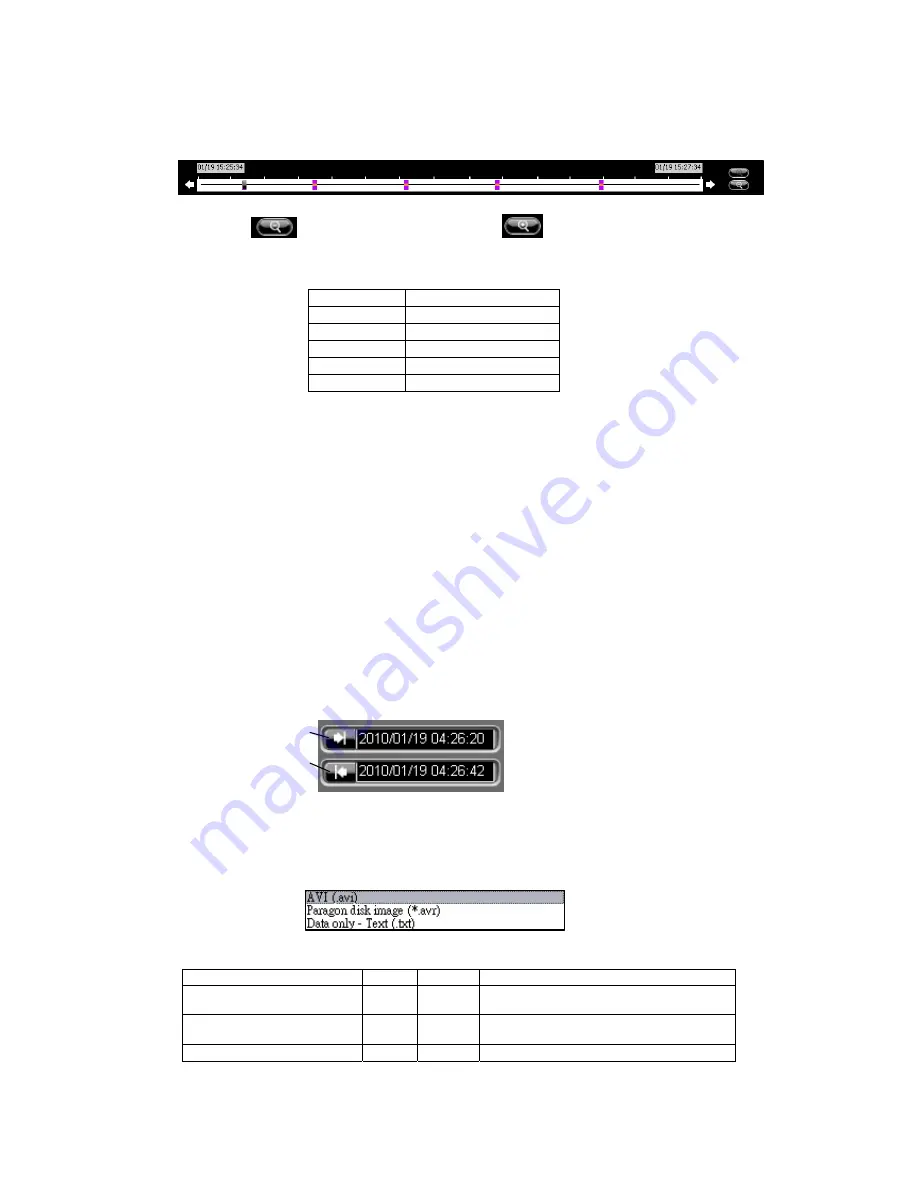
3.4.2 Search by Video Slide Bar 

1. Grab 

Video Slide Bar

 cursor to move to desired position. 


2. Click 

 to magnify the time frame. Click 

 to reduce the time frame. Event 

types are represented by different colors. Please refer to the following chart for the 
meaning of events.   


Color Event 

Type 

Gray No 

event 

Blue Video 

Loss 

Orange Motion 
Red Alarm 
Yellow Other 

event 


Note:


When searching a video, if file size of the disk is large, the searching action will 

take time and has no response, nor any notification will be given. 


3.5 Snapshot and Archive 

3.5.1 Archive Video from Video Window 

DVR Reader can archive video into AVI file or disk image. However, archive functions are not 
designed to save long time video. Archive to AVI file should always be limited to the minimum 
time range. Archive AVI file over 4GB is not supported. 
 

1.  To set archive in/out points, click on 

Archive In

 button or 

Archive Out

 button when 

video playback at the point you wish to set. 
Note: for 

Disk Image (.edr) 

format, the actual 

Archive In

 time will be equal or earlier 

than specified time, and 

Archive Out

 time will be equal or later.


2.  Right click on 

Video Window 

to bring up

 Function Menu

3. Click 

on 

Archive

 to bring up 

Save As

 dialog box. 

4.  Type in file name. 

5.

  Choose file type.


Type Video

Data 


Motion JPEG Full Size (.avi) 


Stretched and recompressed single 
channel video. Slow.  

Disk Image (.avr) 


Complete multi-channel archive. Fast. Can 
only be read by DVR Reader software 

Data only - Text (.txt) 


Data saved in text mode (reserved) 

Archive Out

Archive In


10 

Summary of Contents for EEPPRR--11220

Page 1: ...User s Manual E EP PR R 1 12 20 0 USB Hard Disk Reader for EverFocus Digital Recorder ...

Page 2: ...s A digital apparatus meets all requirements of the Canadian Interference Causing Equipment Regulations ATTENTION This is a class A product which may cause radio interference in a domestic environment in this case the user may be urged to take adequate measures Your EverFocus product is designed and manufactured with high quality materials and components which can be recycled and reused This symbo...

Page 3: ...m DVR Reader 6 3 USING DVR READER SOFTWARE 7 3 1 Start DVR Reader Software 7 3 2 Understand User Interfaces 7 3 3 Basic Operations 7 3 3 1 Open DVR HDD File 7 3 3 2 Playback Controls 8 3 3 3 Set Playback Channel 8 3 3 4 Select Display Mode 9 3 4 Search Video 9 3 4 1 Search by Date Time 9 3 4 2 Search by Video Slide Bar 10 3 5 Snapshot and Archive 10 3 5 1 Archive Video from Video Window 10 3 5 2 A...

Page 4: ...nual 1 Understand DVR Reader 1 1 Package Content The package includes EPR120 HDD Reader power adapter and CD with application software and documentation 1 2 Connectors USB plug Status LED SATA interface 12 VDC socket 3 ...

Page 5: ...g type A Power 12V DC 2A max via power adapter 110 230 VAC 5 5mm socket Software Functions Operations 1 4 9 16 multi channel playback Playback forward backward at 0 1 16x speed Audio playback for 1 60FPS recordings MPEG4 4CH 8CH 16CH will not support audio function Pause Step forward backward Jump to beginning or end of a segment Search Search video by segment list date time and alarm list Slide b...

Page 6: ...s the minimum system requirements 1 Turn on your PC 2 Insert DVR Reader CD ROM 3 Run the file setup exe on CD if the program does not automatically run 4 Click Next and follow the instructions to install DVR Reader software 2 2 Connect DVR Reader to PC Step 1 Connect the USB cable to DVR Reader and your PC Step 2 Connect power adapter s cable to DVR Reader Keep the power switch in OFF position Con...

Page 7: ...tch The LED at EPR120 lights red 4 Connect the USB plug to a free USB 2 0 3 0 port of the PC 5 Wait until the Remove Eject icon shows up in System Tray The LED at EPR120 lights purple 2 4 Remove HDD carrier from DVR Reader 1 Exit from DVR Reader application 2 Click on Remove Eject icon in System Tray to stop the USB Mass Storage Device 3 Turn off the power of the EPR120 4 Remove HDD carrier from E...

Page 8: ... Time frame Adjustment Video Slide bar Playback Control Buttons Start Date Time HDD File Menu Archive Time Setting Minimize window Close window Display Mode Snapshot button 3 3 Basic Operations 3 3 1 Open DVR HDD File 1 Press Menu button and select File then Load Drive The PC will automatically detect all the DVR models available Choose the proper DVR model to be viewed Or select Open File to load...

Page 9: ...ck Pause reverse play forward reverse single step fast forward rewind and increase decrease playback speed Play Pause Reverse single step Forward single step Fast rewind Decrease Playback Speed Reverse play Increase Playback Speed Fast forward Note Playback speed range is 0 1 16x and they are approximate speeds 3 3 3 Set Playback Channel 1 Right click on Video Window where playback channel is to b...

Page 10: ...set will show video correctly 3 3 4 Select Display Mode 1 Right click on Video Window to bring up Function Menu 2 Click on Display Mode and choose desired display mode 3 4 Search Video 3 4 1 Search by Date Time 1 Set desired Date Time on Date Time search drop down box Click on the value to be adjusted first then click 2 Click on GO button 9 ...

Page 11: ... archive functions are not designed to save long time video Archive to AVI file should always be limited to the minimum time range Archive AVI file over 4GB is not supported 1 To set archive in out points click on Archive In button or Archive Out button when video playback at the point you wish to set Note for Disk Image edr format the actual Archive In time will be equal or earlier than specified...

Page 12: ...een mode 7 Check Capture Data and choose Text or Binary if data capture is desired 8 Select Archiving Encoder 9 Text Overlay select the color of Date Time and Channel that will be shown on the archived video 10 Check Add Text if you wish to add text you can select the text color as well 11 Select Interlaced for the text interlaced 12 Click Save to start archiving Archive Encoder Selection dialog b...

Page 13: ...st 1 2 Right click on Video Window to bring up Function Menu 1 3 Click on Snapshot and browse the destination folder where the snapshot image will be saved to 2 1 Click on the desired channel first 2 2 Press Menu button and select Tool 2 3 Click on Snapshot and browse the destination folder where the snapshot image will be saved to 3 1 Click on the desired channel first 3 2 Click on Snapshot butto...

Page 14: ...lect Tools then Audio Click on ON OFF to switch between audio on and audio off mode Click on the channel number for the camera to be set 3 8 Help If you need to get any assistance press Menu button and select Help then Contact Us to get help information 13 ...

Page 15: ...EPR120 User s Manual 3 9 Exit To exit from EPR120 press Menu button and select Exit Or press the X button located beside Menu button OR 14 ...

Page 16: ... 3 5625 8189 www everfocus co jp info everfocus co jp EverFocus Europe UK Unit 12 Spitfire Business Park Hawker Road Croydon Surrey CR0 4WD UK TEL 44 20 8649 9757 44 845 430 9999 FAX 44 20 8649 9907 www everfocusuk co uk salesuk everfocus com EverFocus India Suite 803 Housefin Bhavan C 21 Bandra Kurla Complex Bandra East Mumbai 400051 India TEL 91 22 6128 8700 FAX 91 22 6128 8705 www everfocus in ...

Reviews: