EverFocus ECOR264-4D1 User Manual Download Page 12


21 

To playback: 

By mouse: Right-click to bring up the menu bar and click on 

 to enter 

Playback Menu

By front panel: Press 

  key to enter 

Playback Menu


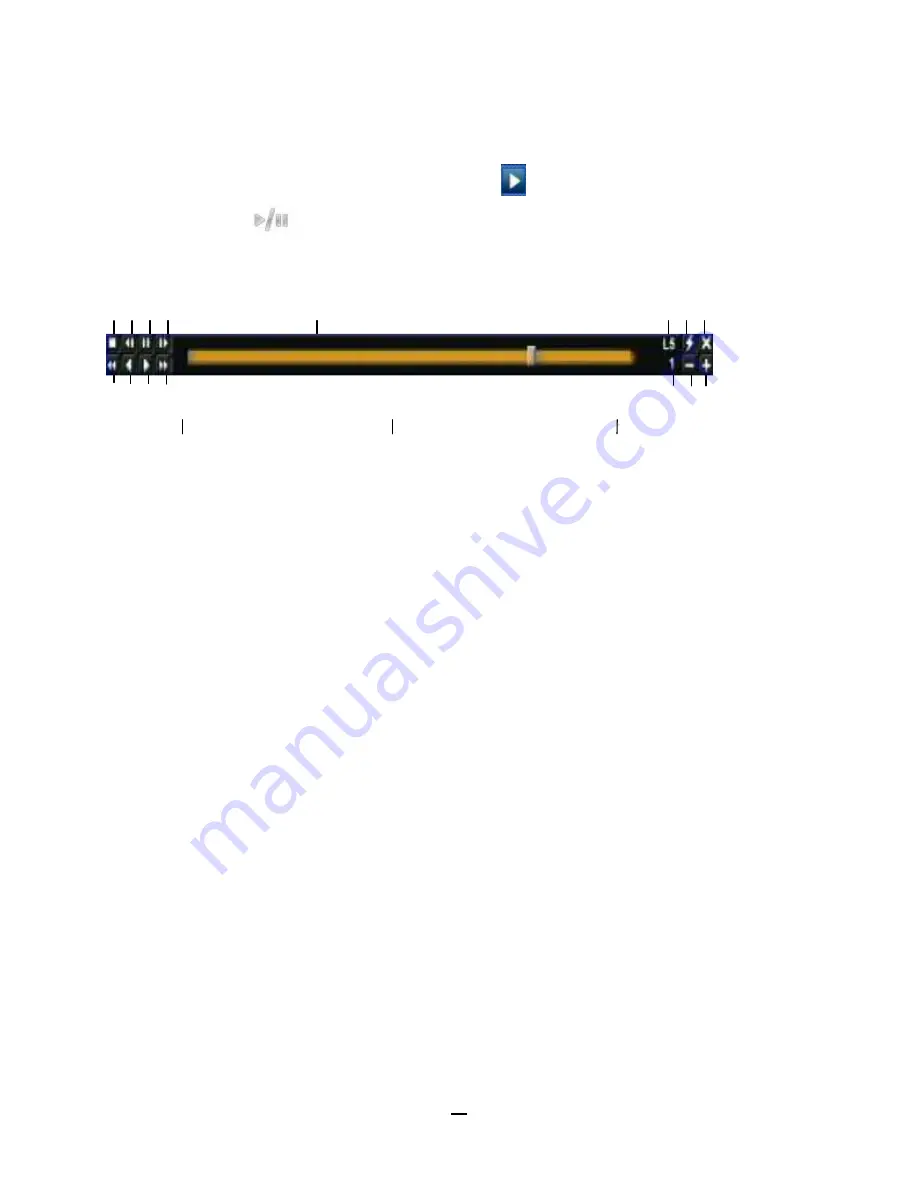
The playback bar will show (see figure below): 


2009/05/25 09:09:30PM  

2009/05/25 09:09:40PM  

2009/05/25 09:10:30PM 

 
1.


Stop key: press to stop playback 

2.


Slow Reverse key: press to start slow reverse playback 

3.


Pause key: press to pause playback 

4.


Slow Forward key: press to start slow forward playback 

5.


Fast Reverse key: press to start fast reverse playback 

6.


Reverse key: press to start reverse playback 

7.


Forward key: press to start forward playback 

8.


Fast Forward key: press to start fast forward playback 

9.


Time bar: Move the slider on the time bar to the select time to playback (The start time and end time for 
time bar appears below the bar). The status of each camera is represented by different colors on the 
time bar. Green means normal; orange indicates a Motion; blue indicates Video Loss, red indicates an 
alarm event.   

10.


“+” and “-“ signs are used to adjust the time scale range for the bar. Press “+” or “-“ to select between 
scale levels L1 ~ L5. When changing level, the start time and end time of the time bar will change) 

L1: Entire time bar is 2 days 
L2: Entire time bar is 30 hours. 

L3: Entire time bar is 1 hour. 
L4: Entire time bar is 10 minutes. 
L5: Entire time bar is 1 minute. 

11. Express copy: Press to start express copy when camera during playback (only one camera)  

12. Playback speed indicator 
13. Press “X” to close the playback bar. 

1  2  3  4 

5  6  7  8 

10 11 13 

12 10 10 


14 

15 

16 

Summary of Contents for ECOR264-4D1

Page 1: ...User Manual E EC CO OR R2 26 64 4 4 4F F1 1 E EC CO OR R2 26 64 4 4 4D D1 1 E EC CO OR R2 26 64 4 8 8F F1 1 E EC CO OR R2 26 64 4 8 8D D1 1...

Page 2: ...3 View Press this key to switch between 4x PiP Picture In Picture and full screen and 9x Examples of four different views are listed below 4x PiP Full screen 9x Note1 PIP display is not available in p...

Page 3: ...LED This LED ON indicates HDD active 14 Net LED This LED ON indicates Network active 15 18 Channel keys 1 4 1 8 Press channel key CH1 CH4 CH1 CH8 to display that channel in full screen view 19 MENU P...

Page 4: ...ighlighted by a white frame 2 Double clicking on a channel screen will display full screen for this channel 3 To enable audio out click the audio icon ex at lower side of the screen This system has on...

Page 5: ...t it 3 In section 3 all the options for the selected choice will be available Click on a field to make changes 2 1 4 Field Input Options The following are examples of different types of fields availab...

Page 6: ...keyboard Click on a button to input that character The buttons on the right and bottom have the following functions Delete Delete the letter Done Confirm the selection All Caps Switch to capital lett...

Page 7: ...trol bar 2 Press Enter key on any icon to perform that action These actions are covered in detail in Chapter 3 3 Press Menu to close the DVR control bar 2 2 3 Front Panel Key Review The basic principl...

Page 8: ...vailable here Use arrow keys to move between items and press Enter to make changes Note press Menu button to go back to the previous menu section 2 2 5 Field Input Options Textbox Press Enter key and...

Page 9: ...changes Note about on screen keyboard Click on a button to input that character The buttons on the right and bottom have the following functions Delete Delete the letter Done Confirm the selection Al...

Page 10: ...R264 8 options users may be asked to log in for authority identification To log in follow these steps 1 Right click on the screen or press the Menu Key to display the Main Menu 2 Choose or click or pr...

Page 11: ...menu to select all four cameras 4 Front panel Use the arrows to change the selection Pressing the right arrow when the last camera 4 or 8 is highlighted will select all cameras 3 4 CHANGE AUDIO OUTPU...

Page 12: ...e bar Move the slider on the time bar to the select time to playback The start time and end time for time bar appears below the bar The status of each camera is represented by different colors on the...

Page 13: ...ease it by clicking I 5 To program a preset position if supported by the camera a Move PTZ camera to the specified position b Click Preset button c Click the number of the desired position This will b...

Page 14: ...ol The mouse cursor will change to different icons in different areas of the screen With Quick Mouse Control the user can control PTZ direction zoom and focus by clicking directly on screen The screen...

Page 15: ...her 7 Zoom in 11 Zoom out REMEMBER Click X at the top right corner to hide the PTZ menu see Express control below Click Exit to leave PTZ function X only HIDES the PTZ control panel EXIT closes the pa...

Page 16: ...Note 9 screen view available only on 8 camera unit 3 7 1 Bring to full screen mode By mouse Double left click on the selected channel to put that camera in full screen mode By front panel Press any c...

Page 17: ...for status representation Alarm Audio Event HDD failure HD temp too high Seq Motion Video loss No network 4 Press again to show both status information and camera information 5 Press again to hide al...

Page 18: ...oom Express Control The screen is divided into a 4x4 grid The function of each section is defined as below 1 Left and up 2 3 Up 4 Right and up 5 9 Left 8 12 Right 13 Left and down 14 15 Down 16 Right...

Page 19: ...the search by choosing the Date and Time Click on the Play button to start the search The DVR will automatically play the video being searched The DVR will play the nearest time if there is no data i...

Page 20: ...date and time To Select ending date and time Camera Select which cameras to search for Event Select which event type s to search for Choose from Alarm Motion Video Loss or Others Click on the Search...

Page 21: ...k on to enter Copy Menu By front panel Press the Copy key to enter Copy Menu directly Figure 3 7 Copy Menu Camera Select which camera will be archived Choose Select All to select all the cameras Playe...

Page 22: ...Eject Press Eject button to eject the CD DVD Eject button will only appear if media type is CD DVD 3 14 LOGOUT Right click to bring up the menu bar and click the button to bring up the Logout Confirma...

Reviews: