background image


OSD MENU


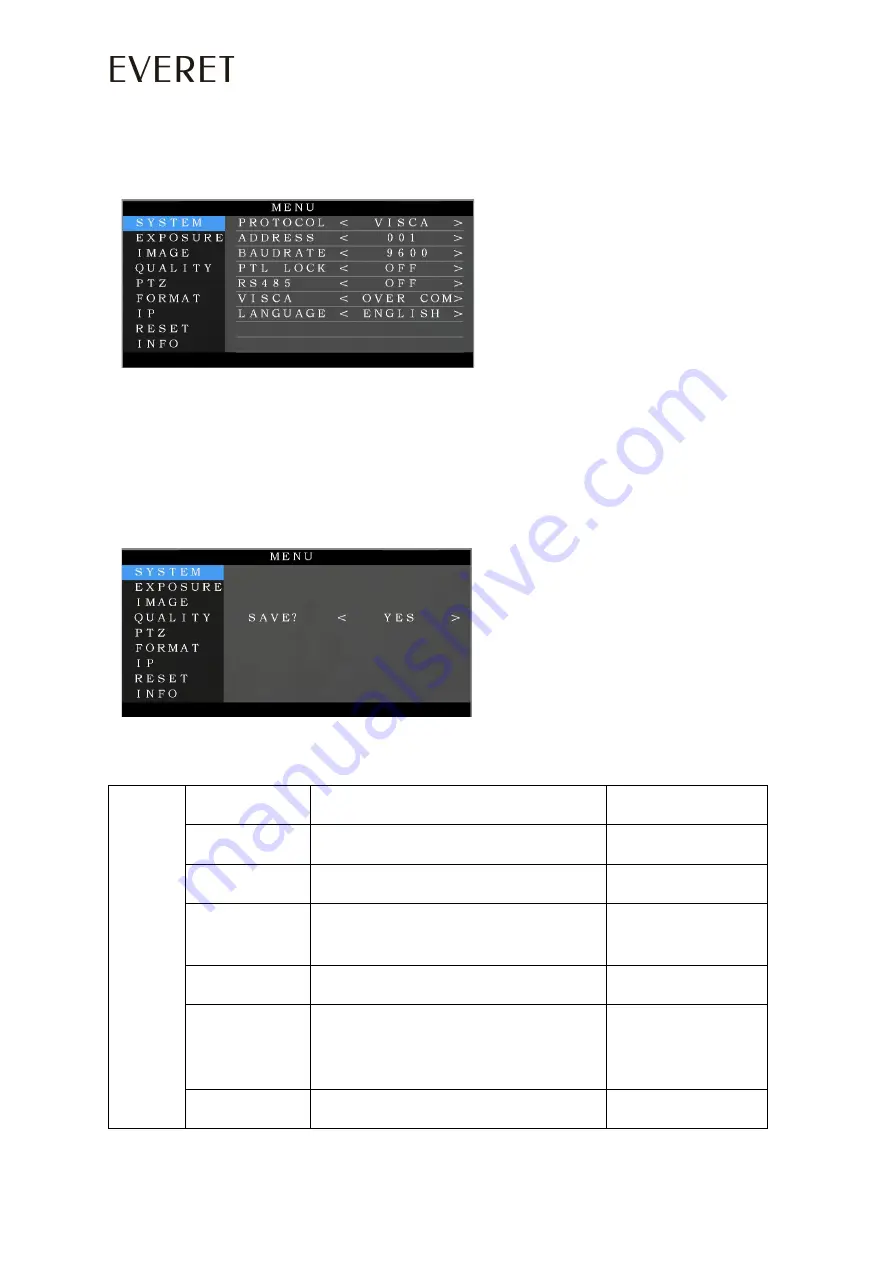
1. Press the MENU key on the IR remote controller, to enter the OSD menu as bellow: 

 
 2. After enter the main menu, use the navigate UP/DOWN key to select the main menu. Once selected, 
the main menu will change to blue background, and the right side will show all sub menu options.   
3. Press the navigate RIGHT key to enter sub menu; use UP/DOWN key to select the sub menu;  
use the LEFT/RIGHT key to select parameter. 
4. Press the MENU key again to return to previous menu. Press the MENU key continuously to exit the 
OSD menu. Before exit you are asked to save all settings (use LEFT/RIGHT key to set). As bellow: 


5. OSD Menu Setting List


SYSTEM 

PROTOCOL 

VISCA,PELCO-P,PELCO-D 

Default

VISCA 

ADDRESS 

VISCA:1~7 

PELCO-P/D:1~255 

Default

BAUD RATE 

2400,4800,9600,115200 

Default

9600 

PTL LOCK 

Protocol lock: once set, above protocol 
setting will be locked 

Default

OFF 

RS485 

RS485 ON/OFF 

Default

OFF 

VISCA 

To select VISCA sources 
  
via COM and via IP

VISCA over IP


Default


OVER ALL 

LANGUAGE 

Chinese, English 

Default

English 


26 

WWW.EVERETIMAGING.COM 

Summary of Contents for EVP230N

Page 1: ...EVERET EVP230N FHD NDI PTZ Video Camera 30X zoom User Manual Version V1 0 English...

Page 2: ...LLER 9 VISCA IN RS232 PORT 11 VISCA PROTOCOL 13 PART1 CAMERA RETURN COMMAND 13 PART2 CAMERA CONTROL COMMAND 13 PART3 CAMERA CONTROL COMMAND 19 VISCA PAN TILT ABSOLUTE POSITION VALUE 22 VISCA PAN TILT...

Page 3: ...r For any service please contact authorized Everet technicians 9 Video cable and control cable should be individually shielded and cannot be substituted with other cables 10 Do not direct the camera l...

Page 4: ...all bellow items when open the package Camera 1 Power Adapter 1 Power Cable 1 RS232 Control Cable 1 USB 3 0 Cable 1 Remote Controller 1 QUICK START 1 Check all cable connections before power on 3 WWW...

Page 5: ...2 ON OFF Debugging mode 3 OFF ON Undefined 4 ON ON Working mode Dial Switch SW 3 SW 4 Instruction 1 OFF OFF reserve 2 ON OFF reserve 3 OFF ON reserve 4 ON ON reserve Dial Switch USB SW 5 SW 6 Instruc...

Page 6: ...ing Algorithm fast and precise focusing performance when zooming or moving Smooth PTZ mechanical design accurate pan tilt motor control 128 presets supported Standard Sony VISCA VISCA over IP PELCO P...

Page 7: ...1 7 12 4MP Zoom F5 8 203mm 35X F1 5 4 8 View Angle 60 Far 2 02 Near Rotation Angle Pan 170 170 Tilt 30 90 Rotation Speed Pan 0 120 s Tilt 0 80 s Preset Remote controller 10 RS232 128 Accuracy 0 1 Cont...

Page 8: ...Electric Shutter Auto Manual Gamma Supported WDR Supported BLC Supported 2D Noise Reduction Supported 3D Noise Reduction Supported Anti Flicker OFF 50Hz 60Hz PanTilt Flip Supported Input Voltage DC12V...

Page 9: ...anel 4 Power Indicator Light 5 Dial Switch 6 Tripod Screw Hole 7 Installation Hole 8 RS232 control port input 9 RS232 control port output 10 HDMI port 11 3G SDI port 12 3 5mm Audio In 13 RJ45 port IP...

Page 10: ...IR pass function Once press the IRT key the camera will receive and Pass the IR remote control signal to the codec terminal via VISCA IN port SET 1 SET4 ADDRESS SETTING Long press for 3 seconds until...

Page 11: ...D AF Auto Focus MF Manual Focus RESET Press 3 seconds to reset camera MENU Enter OSD menu LEARN LIMIT L key Set the pan tilt left limit position LEARN LIMIT R key Set the pan tilt right limit position...

Page 12: ...GND 5 RXD 3 TXD 6 A 6 NC 7 IR OUT 7 NC 8 B 8 NC No V_IN V_OUT 1 DTR DTR 2 DSR DSR 3 TXD TXD 4 GND GND 5 RXD RXD 6 A 7 IR OUT 8 B VISCA IN RS485 6 A 7 IR OUT 8 B VISCA IN DB9 Connection Camera VISCA I...

Page 13: ...VISCA NETWORK SETUP SERIAL PORT CONFIGURATION Parameter Value Parameter Value Baud rate 2400 4800 9600 115 200 Stop Bit 1bit Start Bit 1 bit Check Bit None Date Bit 8 bit 12 WWW EVERETIMAGING COM...

Page 14: ...ng the focus manually are received during auto focus PART2 CAMERA CONTROL COMMAND Command type function Command packet Note AddressSet Broadcast 88 30 01 FF Address setting IF_Clear Broadcast 88 01 00...

Page 15: ...gh Near Variable 81 01 04 08 3p FF p 0 Low to 7 High Direct 8x 01 04 48 0p 0q 0r 0s FF pqrs Focus Position Auto Focus 81 01 04 38 02 FF Manual Focus 81 01 04 38 03 FF One Push AF 8x 01 04 18 01 FF CAM...

Page 16: ...l CAM_Shutter Reset 8x 01 04 0A 00 FF Shutter Setting Up 8x 01 04 0A 02 FF Down 8x 01 04 0A 03 FF Direct 8x 01 04 4A 00 00 0p 0q FF pq Shutter Position 0 0x15 CAM_Iris Reset 8x 01 04 0B 00 FF Iris Set...

Page 17: ...zontal ON OFF Off 8x 01 04 61 03 FF CAM_PictureFlip On 8x 01 04 66 02 FF Image Flip Vertical ON OFF Off 8x 01 04 66 03 FF CAM_RS485Ctl On 8x 01 06 A5 02 FF Off 8x 01 06 A5 03 FF CAM_Saturation Saturat...

Page 18: ...30 0x 04 1080P25 0x05 720P60 0x 06 720P50 0x07 720P30 0x08 720P25 0x09 1080P5994 0x0E 1080I5994 0x0F 1080P2997 0x10 720P5994 0x13 720P2997 0x14 1080P24 0x11 1080P2398 0x12 VideoSystem Set Sony 81 01 0...

Page 19: ...to pq rs mn xy Gateway set 8x 01 04 AD 0p 0q 0r 0s 0m 0n 0x 0y FF Set gateway to pq rs mn xy Color adjust Color adjust OFF 8x 01 04 B6 00 FF Color adjust off Color adjust ON 8x 01 04 B6 01 FF Color ad...

Page 20: ...0Y 0Y 0Y 0Z 0Z 0Z 0Z FF Home 8x 01 06 04 FF Reset 8x 01 06 05 FF Pan tiltLimitSet Set 8x 01 06 07 00 0W 0Y 0Y 0Y 0Y 0Z 0Z 0Z 0Z FF W 1 UpRight 0 DownLeft YYYY Pan Limit Position TBD ZZZZ Tilt Limit Po...

Page 21: ...p 0q FF pq B Gain CAM_SaturationInq 8x 09 04 A1 FF y0 50 00 00 0p 0q FF pq saturation CAM_ContrastInq 8x 09 04 A2 FF y0 50 00 00 0p 0q FF pq contrast CAM_AEModeInq 8x 09 04 39 FF y0 50 00 FF Full Auto...

Page 22: ...09 04 B8 FF y0 50 pp FF CAM_FlareGreen 8x 09 04 B9 FF y0 50 pp FF CAM_FlareBlue 8x 09 04 BA FF y0 50 pp FF CAM_VersionInq 8x 09 00 02 FF y0 50 ab cd mn pq rs tu vw FF VideoSystemInq Telycam 8x 09 06...

Page 23: ...3 01 FF y0 50 0p 0q 0r 0s 0m 0n 0x 0y FF pqrsmnxy bitrate 1024 20480 kbps SubEncodeModeInq 8x 09 04 C3 02 FF y0 50 pp FF Mode sel 0xpp 0x00 h264 0x01 h265 SubFrameRateInq 8x 09 04 C3 03 FF y0 50 pp FF...

Page 24: ...3 1 1 1 1 2 1 5 2 1 5 3 2 2 3 2 2 4 2 4 4 3 6 5 2 6 5 4 7 6 2 8 6 6 7 3 0 7 8 8 3 2 8 10 9 3 4 9 12 10 3 8 10 15 11 4 5 11 18 12 6 12 23 13 9 13 30 14 15 14 39 15 19 15 48 16 25 16 59 17 32 17 69 18...

Page 25: ...00 0x40 0x00 0x00 SUM Focus Far 0xFF Address 0x00 0x80 0x00 0x00 SUM Focus Near 0xFF Address 0x01 0x00 0x00 0x00 SUM Set Preset 0xFF Address 0x00 0x03 0x00 Preset ID SUM Stop 0xFF Address 0x00 0x00 Pa...

Page 26: ...0x00 0x00 0Xaf XOR Focus Far 0Xa0 Address 0x00 0x80 0x00 0x00 0Xaf XOR Focus Near 0Xa0 Address 0x01 0x00 0x00 0x00 0Xaf XOR Stop 0Xa0 Address 0x00 0x00 Pan Speed Tilt Speed 0Xaf XOR Set Preset 0xA0 A...

Page 27: ...Press the MENU key again to return to previous menu Press the MENU key continuously to exit the OSD menu Before exit you are asked to save all settings use LEFT RIGHT key to set As bellow 5 OSD Menu...

Page 28: ...mode Default 8 WDR ON OFF Default OFF WDR Level WDR Level Default 1 BLC ON OFF Default OFF IMAGE WB MODE AUTO INDOOR OUTDOOR MANUAL PUSH S ODIUM LAMP AUTO SODIUM LAMP Default ATW R GAIN Red gain level...

Page 29: ...ill be sharpen Default AUTO CONTRAS T Set contrast level Default 50HZ SATURATI ON Set saturation Default 8 GAMMA Select gammar level Default 0 AF SENSITIVI TY Optional LOW NORMAL HIGH Default NOR MAL...

Page 30: ...080P25 1080I60 720P59 94 1080P24 IP DHCP ON OFF Using up down left right navigation button to select item to set and using number button to set parameter Press menu button to return IP 192 168 001 188...

Page 31: ...b interface UVC CONTROL 1 Only run the client software after the USB3 0 camera has completed self configuration the LED will light up in blue no flashing 2 Make sure the USB3 0 camera is recognized by...

Page 32: ...x 01 06 02 VV WW 0Y 0Y 0Y 0Y 0Z 0Z 0Z 0Z F CT_PANTILT_RELATIVE_CONTROL 8x 01 06 01 pp qq rr ss FF CT_ZOOM_RELATIVE_CONTROL 8x 01 04 07 pp FF WEB SETTINGS Login Run browser input IP address default IP...

Page 33: ...above image Video Transmission RTMP Enable RTMP streaming for e g YouTube or Facebook or any other RTMP address if needed combine with RTMP adress yourstreamingkey NDI Enable NDI video transmission w...

Page 34: ...cus mode default focal distance digital zoom etc Exposure includes exposure mode shutter speed gain iris brightness and anti flicker White Balance includes white balance mode red gain blue gain 33 WWW...

Page 35: ...udes brightness sharpness contrast saturation Noise reduction includes 2D 3D reduction There is an on off option for 2D and off auto 1 4 options Ethernet includes DHCP mode IP address subnet mask defa...

Page 36: ...a upgrades currently only for ISP part updates HOW TO UPDATE Click select file icon to open dialog box select to open the file Click upgrade to start the upgrade process Only use upgrade files from ev...

Page 37: ...efault RTSP main streaming address rtsp 192 168 1 188 stream main Default RTSP sub streaming address rtsp 192 168 1 188 stream sub Default RTMP main streaming address rtmp 192 168 1 188 1935 app rtmps...

Page 38: ...NDI Tool available The NDI Studio Monitor will allow you to open multiple instances in a single computer NDI remote control PTZ Cameras and supports multi monitor video wall digital signage applicati...

Page 39: ...Gigabit LAN IP protocol IPv4 Transmit protocol UDP IP address set via web frontend or OSD menu Port address 52381 Confirm send transmission control depending on applied program Range in the same segme...

Page 40: ...yte 0 VISCA command 0x01 0x00 Stores the VISCA command VISCA inquiry 0x01 0x10 Stores the VISCA inquiry VISCA reply 0x01 0x11 Stores the reply for the VISCA command and VISCA inquiry or VISCA device s...

Page 41: ...and packet VISCA inquiry Save VISCA message packet VISCA reply Save VISCA return packet VISCA device setting command Save VISCA equipment setting command packet Control command The following data is s...

Page 42: ...check peripheral s status The resent command sequence number is same as last command the following chart will list the received message and status after resending the commands Sequence chart as specif...

Reviews: