background image


776-3703 

 5  

09/13/10

SPRAY GUN

1.  Submerge the front end of the gun in solvent just until the fluid  
 

connection is covered.

2.  Paint that has built up on the gun should be removed using a  
 

bristle brush and solvent.

3.  Never submerge all of the spray gun in sol vent be cause:
 

•  This will dissolve the lubricant in the packings and  


  on wear surfaces, causing them to dry out and resulting in  


  difficult operation and faster wear.


•  Air passages in the gun will become clogged with dirty  


  solvent.

4.  Using a rag moistened with solvent, wipe down the outside  
 

of the gun.

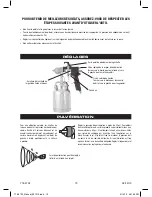
5.  Oil gun daily. Use a drop of lightweight machine oil on:
 

A.  fluid needle packing


B.  air valve packing


C.  trigger pivot point 


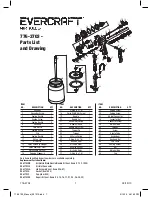
See Fig. 1 for Location of  


Above Points.

6.  NOTE: Do not soak rubber  
 

o-ringsor seals in paint thinner.  


O-rings and seals can be wiped  


clean with paint thinner but soaking  


can cause these items to deteriorate  


over time.

7.  Caution: Do not use lubricants which 
 

contain sil i cone. Sil i cone may cause 


defects in the finish ap pli ca tion.

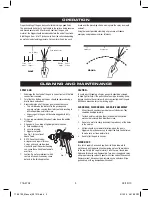
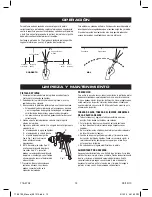
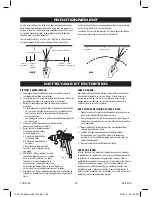
stroke over the pre ced ing stroke, making sure the spray is smooth 
and wet.

Using the lowest possible atomizing air pres sure will reduce  
overspray and provide max i mum ef fi cien cy.

Proper han dling of the gun is essential for ob tain ing a good finish. 
The gun should be held at a right angle to the sur face being cov ered, 
and moved par al lel with it. For precise con trol of the gun and  
material, the trigger should be re leased before the end of the stroke. 
Hold the gun from  6 to 12 inches away from the surface depending 
on ma te ri al and at om iz ing pres sure. For a uniform finish, lap each 

OpErATiON

ClEANiNg ANd mAiNTENANCE

Light Coat

Heavy Coat

WRONG

Start

stroke

Pull
trig ger

Release 

trigger

End of 
Stroke

RIGHT

Even and wet coat

6 to 12 inches

CAUTION…

To avoid cross-threading, all spray gun parts should be screwed 
in hand tight initially. If the parts can not easily be turned by hand, 
be sure you have the correct parts, un screw, re align, and try again. 
NEVER use excessive force in match ing parts.

AIR NOZZLE, FLUID NOZZLE, AIR VALVE ASSEMBLY

1.  All nozzles and needles are made to exact stan dards. They  
 

should be han dled carefully.

2.  To clean nozzles, immerse them in sol vent until any dried 
 

material is dissolved, then blow them clean. 

3.  Do not use metal or sharp instrument to probe any of the holes  
 

in the nozzles. 

4.  Air flow should occur before fluid-flow when the gun is  
 

triggered. It may be necessary to adjust the fluid control screw   


to make sure air flows before fluid.

5.  Do not alter the gun in any way.

SIPHON CUP

Turn off air supply. Disconnect cup from lid. Raise tube out of 
material and pull trigger to allow remaining material to drain back 
to the cup. Empty the cup of material. Clean the cup, lid and tube. 
Add some thinner to cup. Reassemble. Turn on air sup ply and spray 
with proper cleaning solvent. Repeat with clean solvent if nec es sary. 
Remove solvent, dis con nect gun, re move air cap and clean. Wipe 
gun and cup with rag dampened with sol vent.

Fig. 1

C

A

B

776-3703_Manual_091310.indd   5

9/13/10   4:41:38 PM

Summary of Contents for 776-3703

Page 1: ...AND OTHER MASONRY PRODUCTS AND ARSENIC AND CHROMIUM FROM CHEMICALLY TREATED LUMBER YOUR RISK FROM THESE EXPOSURES VARIES DEPENDING ON HOW OFTEN YOU DO THIS TYPE OF WORK TO REDUCE YOUR EXPOSURE TO THESE CHEMICALS WORK IN A WELL VENTILATED AREA AND WORK WITH APPROVED SAFETY EQUIPMENT SUCH AS THOSE DUST MASKS THAT ARE SPECIALLY DESIGNED TO FILTER OUT MICROSCOPIC PARTICLES Specifications Fluid Orifice...

Page 2: ...and safer at the rate for which it was de signed Do not abuse hoses or con nec tors Never carry tool by the hose or yank hose to dis con nect from air sup ply Keep hoses from heat oil and sharp edg es Check hoses for weak or worn condition before each use mak ing cer tain that all con nec tions are se cure When possible secure work with clamps or vise so both hands are free to op er ate tool Avoid...

Page 3: ... value The life of this product and the efficiency of its operation depend upon a knowledge of its construction use and maintenance Air supply Oil Water Extractor Drain Oil and Water Extractor should be at least 25 ft from the compressor farther if possible 25 Feet or More Install drain at each low point Compressor Unit Pitch pipe back toward air receiver Drain TYPES OF INSTALLATION HVLP Cup Regul...

Page 4: ...gun is moved back and forth par al lel to the sur face being fin ished Spray pattern may be in fi nite ly adjusted from round to flat Set inlet pressure at no more than 50 PSI For op ti mum per for mance some ma te ri als may spray better at PSI ratings below 50 PSI If unsure always test at PSI ratings before using on final production Try spray If it is too fine de crease the air pres sure or open...

Page 5: ...hould be re leased before the end of the stroke Hold the gun from 6 to 12 inches away from the surface depending on ma te ri al and at om iz ing pres sure For a uniform finish lap each Operation Cleaning and Maintenance Light Coat Heavy Coat WRONG Start stroke Pull trig ger Release trigger End of Stroke RIGHT Even and wet coat 6 to 12 inches CAUTION To avoid cross threading all spray gun parts sho...

Page 6: ...ut on siphon cup Fluid leakage from packing nut A Packing nut loose B Packing worn or dry A Tighten but not so tight as to grip needle B Replace packing or lubricate Dripping from fluid tip A Dry packing B Sluggish needle C Tight packing nut D Worn fluid nozzle or needle A Lubricate B Lubricate C Adjust D For pressure feed replace with new fluid nozzle and needle Thin sandy coarse finish Thick dim...

Page 7: ...3 Needle Adj Screw 1 24 Trigger Pin 1 25 Trigger 1 26 Air Valve Spring 1 27 O Ring 4 5 x 1 8 1 28 Air Valve Seat 1 29 Air Valve Stem 1 30 Air Valve Gasket 1 31 Air Valve Body 1 32 O Ring 8 x 1 8 1 Only items identified by part numbers are available separately Replacement Parts Available RS63703NK Air Nozzle Fluid Nozzle Needle Kit incl items 7 12 19 20 RS6370335 Air Inlet Connector RS63703LA Lid A...

Page 8: ...CE 315 Hawkins Road Travelers Rest SC 29690 To obtain service after the 90 day limited warranty please return the tool to Air and Hydraulic Service listed above for a repair estimate Any repair cost incurred along with freight will be the sole responsibility of the consumer The foregoing obligation is Balkamp Inc s sole liability under this or any implied warranty and under no circumstances will B...

Page 9: ...CTOS DE MAMPOSTERÍA Y ARSÉNICO Y CROMO DE MADERAS TRATADAS QUÍMICAMENTE EL RIESGO ANTE ESTAS EXPOSICIONES VARÍA DEPENDIENDO DE CUAN FRECUENTE USTED HAGA ESTE TIPO DE TRABAJO PARA REDUCIR LA EXPOSICIÓN A ESTOS QUÍMICOS TRABAJE EN ESPACIOS BIEN VENTILADOS Y TRABAJE CON EQUIPOS DE SEGURIDAD APROBADOS TALES COMO LAS MASCARILLAS CONTRA EL POLVO DISEÑADAS ESPECÍFICAMENTE PARA DETENER PARTÍCULAS MICROSCÓ...

Page 10: ...icie de trabajo No fuerce la herramienta Ésta funcionará mejor y en forma más segura a la velocidad de trabajo para la cual fue diseñada No maltrate las mangueras ni los conectores No transporte nunca la herramienta por la manguera ni tire la manguera para desconectarla del suministro de aire Mantenga las mangueras lejos del calor de aceite y de los bordes afilados Antes de cada uso verifique que ...

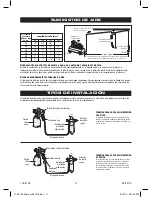
Page 11: ... flujo de aire 50 100 150 200 10 20 30 40 50 70 1 2 3 4 3 4 1 1 1 3 4 3 4 3 4 1 1 1 3 4 1 1 1 1 1 4 3 4 3 4 1 1 1 1 1 4 Suministro de aire Aceite y agua Extractor Drenaje El extractor de aceite y agua debe estar a una distancia de al menos 25 pies del compresor más lejos si es posible 25 pies o más Instale drenaje en cada punto bajo Unidad de compresión Arroje el tubo hacia el receptor de aire Dre...

Page 12: ... de forma paralela a la superficie que se está acabando El patrón de rociado puede ajustarse infini tamente de redondo a plano Ajuste la presión de admisión a no más de 50 PSI Para un rendimiento óptimo algunos materiales podrán rociarse a una capacidad menor a las 50 PSI Si usted no está seguro siempre haga prueba a las capacidades de PSI antes de usarla en la producción final Pruebe el rociado S...

Page 13: ...a ubicación de los puntos anteriores mencionados 6 NOTA No remoje los sellos tipo O o sellos en el diluyente de pintura Los sellos tipo O y los sellos pueden ser enjuagados con diluyente de pintura sin embargo con el tiempo el remojo puede causar el deterioro de estos artículos 7 Precaución No use lubricantes que contienen siliconas Las siliconas pueden causar defectos en la aplicación del acabado...

Page 14: ... líquido desde la tuerca de empaque A La tuerca del empaque está suelta B El empaque está desgastado o reseco A Ajústela pero no tan firmemente que se agarre la aguja B Sustituya el empaque o lubrique la tuerca Goteo de la punta para líquidos A Empaque reseco B Aguja lenta C Tuerca del empaque muy ajustado D Tobera o aguja de líquidos desgastada A Lubrique B Lubrique C Ajuste D Para la alimentació...

Page 15: ...elers Rest SC 29690 Para recibir mantenimiento después del periodo limitado de garantía de 90 días por favor devuelva la herramienta al centro de servicio hidráulico y de aire alistado anteriormente por un estimado de reparación Cualquier costo de reparación incurrido junto con el flete será de la responsabilidad exclusiva del consumidor La obligación precedente es la única responsabilidad de Balk...

Page 16: ... LA SILICE CRISTALLISÉE CONTENUE DANS LES BRIQUES LE CIMENT ET D AUTRES PRODUITS DE MAÇONNERIE L ARSENIC ET LE CHROME CONTENUS DANS LE BOIS DE SCIAGE TRAITÉ AVEC DES PRODUITS CHIMIQUES LES RISQUES D EXPOSITION À CES PRODUITS CHIMIQUES VARIENT SELON LA FRÉQUENCE D UTILISATION DE CERTAINS MATÉRIAUX POUR RÉDUIRE L EXPOSITION IL EST RECOMMANDÉ DE TRAVAILLER DANS UN ENDROIT BIEN AÉRÉ ET DE PORTER DE L ...

Page 17: ...comme il se doit Ne pas faire mauvais usage des boyaux et des raccords Ne jamais transporter l outil en tenant le boyau ou tirer dessus pour le débrancher de l alimentation électrique Tenir les boyaux loin des sources de chaleur de l huile et des bords tranchants Avant chaque utilistion rechercher les signes de bris ou d usure des boyaux assurez vous que tous les raccords sont bien fixés Lorsque c...

Page 18: ... fonctionnement dépendent des connaissances de sa construction son utilisation et son entretien alimentation d air Séparateur eau huile Drain Le séparateur eau huile doit être à une distance d au moins 7 6 m 25pi et même plus loin du compresseur si possible 7 6 m 25 pi ou plus Installer un drain à chaque point bas Compresseur Placer le tuyau versle réservoir d air comprimé Drain types d installati...

Page 19: ...dre Le jet de pulvérisation peut être réglé à l infini d un jet rond à un jet plat Régler la pression de pulvérisation à moins de 50 psi Pour obtenir des résultats optimums certains produits se pulvérisent mieux à un niveau inférieur à 50 psi Il faut toujours faire un essai si vous n êtes pas certain du calibrage psi avant de faire l application sur la pièce Essayer le jet Si le jet est trop fin d...

Page 20: ...olet d aucune façon GODET DU SIPHON Fermez l entrée d air Débranchez le godet du couvercle Soulevez le tube hors de la substance et tirez sur la gâchette pour permettre le restant de la substance de s écouler jusqu au godet Videz le godet Nettoyez le godet le couvercle et le tube Ajoutez du solvant au godet Assemblez de nouveau Ouvrez l alimentation d air et pulvérisez avec le solvant de nettoyage...

Page 21: ...écrou de presse garniture n est pas assez vissé B La garniture d étanchéité est sèche ou usée A Resserrer mais pas trop pour ne pas endommager le pointeau B Remplacer ou lubrifier la garniture d étanchéité La pointe du liquide fuit A Garniture d étanchéité sèche B Le pointeau bouge lentement C L égout de presse garniture est trop serré D La buse de liquide ou le pointeau sont usés A Lubrifier B Lu...

Page 22: ... obtenir du service après la garantie limitée de 90 jours veuillez retourner l outil à Air and Hydraulic Service à l adresse indiquée ci dessus pour obtenir une estimation des coûts de réparation Le consommateur assumera la responsabilité de payer les coûts de réparation engagés en plus des frais de transport Cette obligation est la seule responsabilité de Balkamp Inc en vertu de la présente garan...

Reviews: