background image

Appendix F  WheatNet-IP 

BD600+ Profanity Delay 

Appendix F WheatNet-IP     

Page 51 

Document Version 2.1 


Connecting Audio between the and WheatNet-IP 

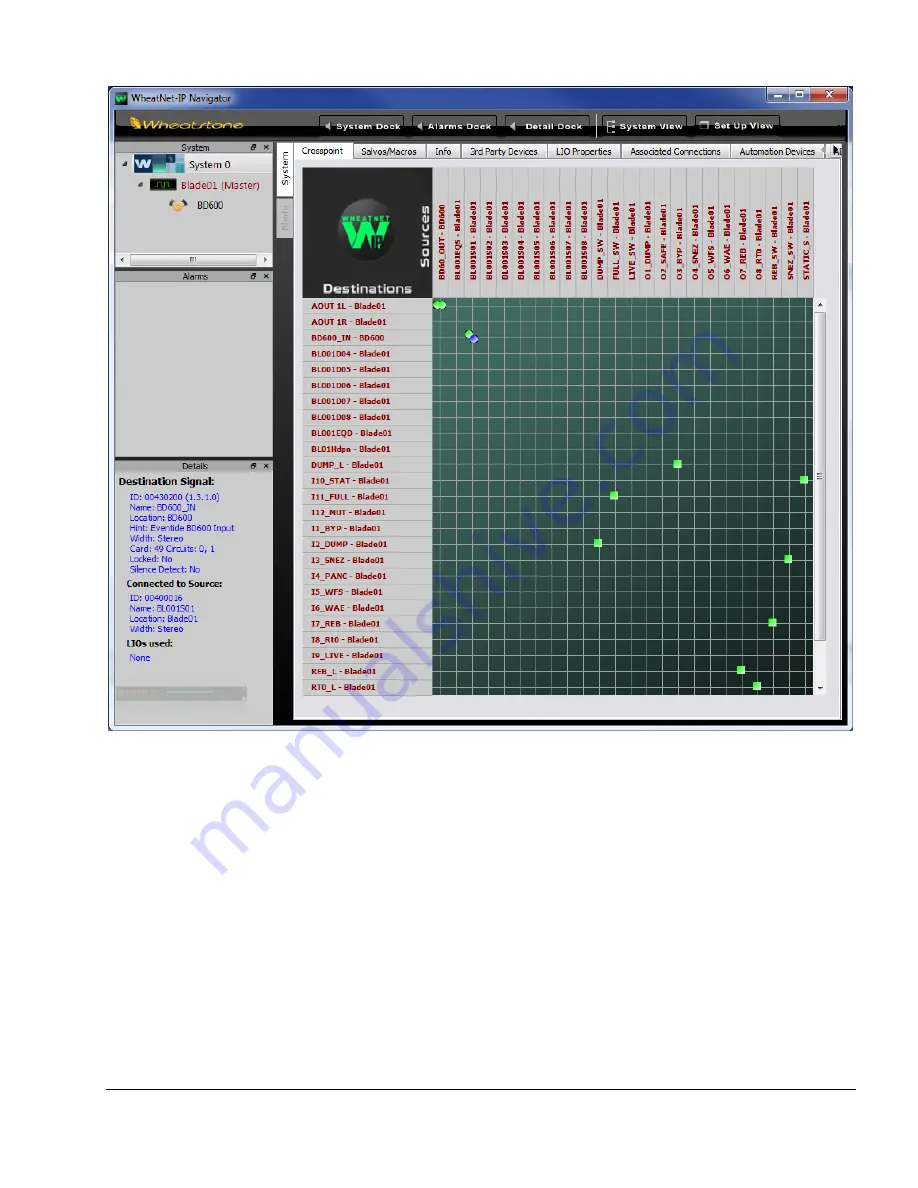
The BD600+W's audio inputs and outputs will appear on the Navigator Crosspoint screen, shown 
above. They can be identified by right-clicking on the Source or Destinations list and choosing 
Show/Name-Location. The BD600+ sends a stereo output and receives a stereo input from the net-
work, shown as Location BD600+ (assuming BD600+ was the name given on the "Third Party De-
vices" tab). 

Note that the BD600+ audio output is always sent to the network, while its audio input is only received 
from the network when 

INPT

 is set to 

WNET. 

In this case, 

SYNC 

can only be set to 

DIG, 

as the BD600+ must 

run at the same sample rate as the network. 

Summary of Contents for BD600+

Page 1: ...le Ferry NJ USA All specifications and details subject to change without notice or obligation Eventide is a registered trademark of Eventide Inc Compact Flash is a trademark of Sandisk Corporation WheatNet IP is a trademark of Wheatstone Corporation BD600 BROADCAST PROFANITY DELAY OPERATOR S MANUAL ...

Page 2: ......

Page 3: ...WAIT FOR SAFE Bring delay from live to 4 seconds quickly 12 WAIT AND EXIT Decrease the delay to 0 seconds quickly 12 SNEEZE Edit the delay before a bad noise happens 12 DUMP Edit the delay after a bad noise happens 12 PANIC lose all delayed audio and play a jingle while delay is rebuilt 12 Insert or Station Break Insert insert another audio source into the program material 13 Operating as a Profan...

Page 4: ...tore Factory Defaults PANIC button 46 Clear all Memory RAMP TO ZERO button 46 Perform Production Self Test SNEEZE button 46 Other Functions 46 Parallel Outputs 47 Appendix E Extended Remote Connections 47 Parallel Inputs 48 A simple circuit for triggering DUMP 48 Serial Delay Inputs 49 Serial Delay Outputs 49 Appendix F Using BD600W with WheatNet IP 50 Connecting the BD600W to a WheatNet IP Networ...

Page 5: ...600 It is similar in most ways to its predecessor the main differ ences being that the BD600 has considerably better audio quality and a USB serial port as well as RS232 BD600 Features Up to 80 seconds of stereo audio delay Allows multiple DUMP operations The DUMP function may be configured to delete a portion of delayed audio between 1 and 10 seconds in length REBUILD catch up provides fast recov...

Page 6: ...rent timing conditions including status of all processes bypass mode or a delayed version of the inputs Station Break and other Insert operations Additional BD600W Features Stereo audio output to WheatNet IP network Stereo audio input from WheatNet IP network 16 programmable Logic control Inputs from WheatNet IP network to drive internal func tions or act as source for delayed outputs 16 programma...

Page 7: ...S Button Toggles the unit in and out of bypass While bypassed the LED flashes and the audio path through the BD600 is bypassed either electronically or by a relay Pressing this button while bypassed will take the unit out of by pass This button is also used to exit from configuration mode 2 Input Status These LEDs indicate whether the BD600 is configured for analog or digital input If the digital ...

Page 8: ...es current delay as a fraction of maximum delay or in preci sion delay configuration mode indicates which digit of the delay value is selected This display is also used for visual cues during configuration mode The right hand segment also flashes to indicate card and serial remote control activity 12 4 Character Display The 4 character LED shows delay amount values text information and configurabl...

Page 9: ...CH2 ANALOG OUT CH1 CH2 ANALOG IN CH1 USB BD600W WheatNet IP 1 AC Power 19 Network 5 Wordclock In 7 RS232 Control 8 AES EBU in 10 Channel 1 out 12 Channel 1 in 1 AC Power IEC standard 3 prong connector The center post is chassis ground When power is not con nected the unit is bypassed the analog and digital inputs are connected to their respective outputs through a relay 2 Power Switch This control...

Page 10: ...and two output chan nels 10 Channel 1 Output 11 Channel 2 Output Male XLR connectors 12 Channel 1 Input 13 Channel 2 Input Female XLR connectors Remote and other Connectors 14 Delayed RS232 in 15 Delayed RS232 out These are 9 pin DB9 connectors where the in put is delayed by the amount of the delay and fed to the output usually to drive a clock indi cator showing the time of the delayed mate rial ...

Page 11: ...d at all times Analog Inputs These female XLR connectors provide differential bal anced audio input The input level has a maximum value of 24dBu and nominal level of 4dBu Pin 1 is grounded Pin 2 is phase and pin 3 is phase Although the inputs of the BD600 are balanced you can still use them with an unbalanced line The BD600 XLR analog audio input connectors are female Pin 1 and pin 3 would be grou...

Page 12: ...ower is to be disconnected Immediately after the unit is switched on the front panel will be fully illuminated After a second the display will change to show LOAD followed by the software version number At this time the unit will read the front panel buttons If any buttons are pressed the unit will perform a special start up function see Appendix D If no buttons are pressed the unit will complete ...

Page 13: ...AMP TO ZERO to select ANA or DIG as desired After changing the input format you should also set the SYNC variable as appropriate see below Note that these were set automatically prior to software V1 4 Connect digital audio outputs Connect digital audio output from the male XLR connector on the rear panel It is safe to connect and discon nect to the rear panel while the power is turned on There is ...

Page 14: ...r cable is disconnected the BD600 may play out audio with a significant pitch shift If the unit falls back from AES EBU to analog input at a different sample rate there will be a pitch change in the audio already delayed through the unit Your digital system must be set very close to either 44100 or 48000 samples per second or using the fallback option in the BD600 will allow several seconds of pit...

Page 15: ...ltiple destinations only the one at the end of the cable needs to be termi nated intermediate destinations need not and should not be terminated These should be connected by the use of a BNC T connector or splitter attached di rectly to their inputs so as to ensure the shortest possible stub length Using mul tiple terminations is must be avoided because for example twice 75 Ohm in parallel gives 3...

Page 16: ...ed to start a show coming from a network news feed traffic report or other non delayed program WAIT AND EXIT Decrease the delay to 0 seconds quickly This front panel feature is a method of quickly reducing the delay to 0 00 seconds This process marks where on the tape the record head was when wait and exit is started When that piece of tape reaches the play head the record head is moved to the pla...

Page 17: ...ecord head at the speed of the tape This means that new audio continues to be stored into the delay while the inserted material is playing and none of the material already on the tape is lost Once the insert operation is over the playback head stops moving and the oldest audio from the tape starts to play out The amount of delay in use will be increased by the length of the insert Clearly in this ...

Page 18: ...y is filling with audio but outputs are seeing input audio without delay Unit switches to rebuild mode when safe delay time is reached If wait for safe is cancelled the unit will return to live mode wait and exit bypass relays are open unit is in line input audio is not going into delay but out put audio is coming from the delay The delay length is reducing rapidly The unit will go into live mode ...

Page 19: ...button illuminates The WAIT FOR SAFE process has completed The SAFE relay output is enabled The engineer or host fades the output of the BD600 into the transmitter See note below The host may begin taking dial in callers The BD600 drops into rebuild mode and slowly completes building up to maximum delay Note During the 4 second period that wait for safe is running and the WAIT FOR SAFE button s in...

Page 20: ...subtracted from the current delay If the displayed delay is lower than the dump amount the delay is reduced all the way to 0 00 After DUMP is released the unit continues with the previous mode Note even if the unit is no longer rebuilding having already reached full delay the unit will still return to rebuild mode after DUMP is released In wait for safe DUMP will cancel the wait for safe operation...

Page 21: ...erminate with the delay filled to the configured PANIC time See Chapter 3 to configure this Once the panic mode has terminated the unit will go to rebuild and the delay will play out starting with the audio immediately after the PANIC button was hit A panic operation may be ended early by hitting the PANIC button again Prior to V1 4 this would mute the audio until the operation com pleted If the P...

Page 22: ...JBAD status be displayed BD600E W only as this gives advance warning of possible problems These may occur for the following reasons The card is not present or not readable No jingle is selected See Chapter 3 to configure jingle selection The selected jingle is not on the card The selected jingle has the wrong format The selected jingle is being prepared for use about one second is needed after ins...

Page 23: ...t setting of the run pa rameter Now press BYPASS to get out of configuration mode The second way to enter precision delay mode is to select MPD as the maximum delay time DLAY Then the maximum delay is determined by the fixed delay settings and normal broadcast delay func tions may be used to enter and exit precision delay mode For example if you REBUILD to maximum once the fixed delay value is rea...

Page 24: ...tal inputs or outputs are being used Broadcast profanity delay functions such as rebuild dump or sneeze are only operative in pre cision delay mode at delay values of 100 milliseconds and above The fixed delay writes data continuously into the 20 second buffer Changes in delay value changes the position of the play head not the record head That means that if the delay length is adjusted by ear the...

Page 25: ...means that the REB variable is set to the factory de fault Use the RAMP TO ZERO button to change the value Notice that the SNEEZE button lights up Press the SNEEZE button to reset the parameter back to fac tory default Another Example If the BYPASS button is not illuminated press BYPASS Next press CONFIG Once the display shows CONF press the RAMP TO ZERO button The display changes to 1 ON Now pres...

Page 26: ...ntil the display shows Return to factory defaults The message text will be scrolled marquee fashion across the display All buttons will be off except WAIT AND EXIT which will be flashing indicating yes and REBUILD which will be lit steadily indicating no Press WAIT AND EXIT to answer yes Individual configuration values may be set to factory default by using the SNEEZE button while the value is sel...

Page 27: ...ts which mode the unit goes to after power up mode INLN BYP PREV BYP BYP Bypass Mode Selects the bypass mode mode RLA DSP MUTE RLA DISP Display Digits Selects the number of digits after the decimal point in profanity de lay mode of digits OFF 0 1 1 2 22 2 22 LITE Display Brightness Sets the display brightness level LOW MID HIGH MID PASS Password Allows a password to be selected which would limit a...

Page 28: ...ressed seconds OFF 2 0 2 5 3 0 6 5 7 0 7 5 8 0 4 0 FRAM MPD Frame Display Show MPD display in frames f p s OFF 24 25 29 30 OFF PULS Heartbeat Indication Pulse CONFIG led to show life seconds OFF 1 0 2 0 5 0 10 0 OFF SBR Station Break Duration The duration of a Station Break In sert BD600E W only seconds 2 0 2 5 3 0 6 5 7 0 7 5 8 0 JING 4 0 TIM1 1st Time Indication A time marker that may be used to...

Page 29: ... to vary in order to im prove the quality of audio pro cessing percentage change al lowed 0 10 190 200 0 SRCE Source for Processing Left right mix of channels to be used in determining the best times to do audio processing during re build or ramp to zero channel LEFT LCEN CENT RCEN RITE CENT 5REM Remote Control Parameters AUX1 Function of AUX1 input not present on BD600E W OFF BYP CNF WFS WAE REB ...

Page 30: ...tate during which RLA1 is energized not present on BD600E W OFF ON BYP CNF WFS WAE REB RMP0 SAFE SNEZ DUMP LIVE STAT PANC FULL MUTE SBRK DUMP RLA2 RLA2 Relay Function The state during which RLA2 is energized Note that this also con trols the DUMP button light not present on BD600E W OFF ON BYP CNF WFS WAE REB RMP0 SAFE SNEZ DUMP LIVE STAT PANC FULL MUTE SBRK SAFE BAUD Baud Rate The Baud Rate for t...

Page 31: ... TWO THRE FOUR INS DUMP IN3 Remote Input Function The functions of remote input 3 If the function is set to OFF the input may still be used as a source for the delayed remote output NONE BYP CNF WFS WAE REB RMP0 SNEZ DUMP LIVE STAT PANC FULL MUTE SBRK RTB D R W R 0 R ONE TWO THRE FOUR INS SNEZ IN4 Remote Input Function The functions of remote input 4 If the function is set to OFF the input may sti...

Page 32: ...function of remote output 2 OFF ON DLIN BYP CNF WFS WAE REB RMP0 SAFE SNEZ DUMP LIVE STAT PANC FULL MUTE SBRK TIM1 TIM2 INS JBAD MAX TOP UNLK SAFE OUT3 OU16 Remote Output Function The functions of remote outputs 3 to 16 OFF ON DLIN BYP CNF WFS WAE REB RMP0 SAFE SNEZ DUMP LIVE STAT PANC FULL MUTE SBRK TIM1 TIM2 INS JBAD MAX TOP UNLK various ...

Page 33: ...s without impairing operator efficiency A length which is too short will not allow the operator enough time to delete offending speech while a length that is too long increases the amount of time required to exit from the delay at the start of a break or end of a show This delay length may be ex ceeded by the use of an Insert or Station Break operation If MPD is selected the maximum delay is deter...

Page 34: ...e card on page 17 for more information LOCK Lock Front Panel V1 4 and above The front panel lockout feature allows most front panel buttons to be disabled allowing protection against undesired operations when the unit is to be exclusively remote controlled When LOCK is ON all keys except for BYPASS and CONFIG will be disabled PANC Panic Mute Time If no suitable jingle is found on the Compact Flash...

Page 35: ...slightly different depending on the audio content and the settings of sev eral other configuration parameters Values above 9999 seconds will be displayed in minutes for ex ample instead of 12000 seconds you will see 200M The displayed time for this variable will change in proportion if DLAY is changed in order to keep the same quality of signal during rebuild or ramp to zero This value should be s...

Page 36: ... times to process artifacts will be introduced into the output audio This value may be set to one of five values from left to right LEFT LCEN CENTR RCEN RITE LEFT indicates all of channel 1 and none of channel 2 RITE right indicates all of channel 2 CENTR center indicates an even sample of both LCEN indicates a blend of mostly left chan nel 1 and some right channel 2 This adjustment does not affec...

Page 37: ...ses or silence The default value has been optimized for normal usage It may be necessary to adjust this value if the level of ambient noise is high Great care should be taken when adjusting this value as setting the threshold too high or too low may impair the catchup operation The effects of changing this setting are best observed while re building This will normally be set to the default value ...

Page 38: ...nd one normally open contact both rated at 1A 30V DC or 125V AC Note that RLA2 is driven in common with the DUMP light so if its source is changed from the default SAFE value the DUMP light will not operate as described in this manual These outputs can be configured by using normal configuration mode operations to get to 5REM and then selecting RLA1 or RLA2 as appropriate The relays may be activat...

Page 39: ...ive go to REBUILD else WAIT AND EXIT 0 R if live go to REBUILD else RAMP TO ZERO ONE make jingle ONE the current jingle TWO make jingle TWO the current jingle THRE make jingle THREE the current jingle FOUR make jingle FOUR the current jingle The factory defaults are AUX1 BYP AUX2 DUMP AUX3 SNEZ AUX4 PANC A simple circuit for triggering DUMP With factory default settings connect your push button be...

Page 40: ...and then selecting OUT1 or OUT2 etc as appropriate The outputs may be activated as below OFF never ON always useful for testing DLIN a delayed version of the corresponding parallel input BYP when bypassed CNF during configuration mode WFS when WAIT FOR SAFE is active WAE when WAIT AND EXIT is active REB when REBUILD ing RMP0 when RAMP ing TO ZERO SAFE when the delay is greater than the con figured...

Page 41: ...t Version 2 1 Factory default values for Parallel Outputs The default values for OUT1 16 are as follows note that prior to V1 4 OUT3 16 defaulted to OFF OUT1 DUMP OUT2 SAFE OUT3 BYP OUT4 SNEZ OUT5 WFS OUT6 WAE OUT7 REB OUT8 RT0 OUT9 LIVE OUT10 STAT OUT11 FULL OUT12 MUTE OUT13 SBR OUT14 INSERT OUT15 JBAD OUT16 TIM1 ...

Page 42: ... FOR SAFE button WAE same as WAIT AND EXIT button REB same as REBUILD button RMP0 same as RAMP TO ZERO button SNEZ same as SNEEZE button DUMP same as DUMP button PANC same as PANIC button LIVE go immediately to zero delay May cause a discontinuity in output audio STAT go to static mode cancel any REBUILD or RAMP TO ZERO opera tion FULL go at once to maximum delay May cause a discontinuity in outpu...

Page 43: ...o the BD600 will be delayed according to the current delay value which will be increased by the length of the insert During Insert and SBR operations the current delay is allowed to exceed the configured Maximum Delay DLAY if this is less than the maximum allowable amount 80 seconds At the end of a SBR or Insert operation if the current delay is greater than DLAY the unit will go into a Ramp To Ze...

Page 44: ... with high bandwidth data as normal time or control signals in volve only a few characters per second To be sure that the delay is not overfilled the serial data should be limited to 1000 characters per sec ond at the 80 second full delay and proportionally more at lower maximum delay values The unit can accept full speed transmissions at any of its supported baud rates the limit described is the ...

Page 45: ...sages as a response to a poll from a host computer The host computer must not send a message unless it has received a character hex 3E or unless it has not heard from the BD600 in 100mS An overflow or bad message will be answered with a E hex 45 3E The right hand display bar segment will flash when receiving RS232 information A terminal or PC terminal emulator can usefully be used to debug and dem...

Page 46: ...s shows the current settings of each of the config values This long response in cludes multiple records each consisting of a 4 byte config variable name fol lowed by an ASCII equal sign followed by a 4 byte config value followed by hex 0D 0A carriage return line feed The last record will be followed by a None of the 4 byte values contain The records correspond to configuration variables described ...

Page 47: ... H static I panic L live M mute P micro precision delay R rebuild S sneeze W wait for safe Z ramp to zero note zero delay and maximum delay are not modes if the unit reaches maxi mum delay while in rebuild it switches to static mode while if it reaches zero delay while in ramp to zero it switches to live mode N next config value sets the current config variable to the next value When the maximum v...

Page 48: ...t config variable and value Responds with a 10 character message consisting of a four character config variable identifier an ASCII equal sign the four character value of the config variable and a See G N and Q Y first value sets the current config variable to the first value Can only be used in bypass mode Useful for making automated configuration changes See C E G N Q V and X commands Z initiate...

Page 49: ...h the configuration variables in much the same way the front panel does Use the G com mand to step to the next variable Use the N command to step through values for a single variable Most values will be used by the BD600 im mediately after they are changed so care must be taken not to change those that may cause un desirable artifacts on air M requests mode B switches to bypass mode 0 switches fro...

Page 50: ...res all configuration values to the factory defaults In the event of serious system malfeasance this function should be tried and if it does not restore normal behavior do the following to clear memory Clear all Memory RAMP TO ZERO button This function clears all memory and returns the unit to the state at which it left the factory Perform Production Self Test SNEEZE button This function goes into...

Page 51: ...mp Notes None of the ground connections may be used as a safety ground they are rated for low current DC operation only The Chassis Ground connection 1 may be used as a screen connection It should not be connected otherwise If the 5V 0 5A supply 13 is used output loads need only be connected from here to each output These would typically be LED indicators with suitable series resistors or small 5V...

Page 52: ...ill be isolated from ground and from the other groups of 4 1 Chassis Ground 14 Signal Ground 2 In 1 15 In 9 3 In 2 16 In 10 4 In 3 17 In 11 5 In 4 18 In 12 6 Common 1 4 19 Common 9 12 7 In 5 20 In 13 8 In 6 21 In 14 9 In 7 22 In 15 10 In 8 23 In 16 11 Common 5 8 24 Common 13 16 12 no connection 25 no connection 13 5V 0 5A Notes None of the ground or common connections may be used as a safety groun...

Page 53: ... etc are not delayed or used by the BD600 and need not be connected in most cases only TxData and Gnd will be required for many applications Serial Delay Inputs Pin 1 DCD out Pin 2 RxData out Pin 3 TxData in Pin 4 no connection Pin 5 Gnd Pin 6 DSR out Pin 7 RTS in Pin 8 CTS out Pin 9 RI out Serial Delay Outputs Pin 1 DCD in Pin 2 RxData in Pin 3 TxData out Pin 4 DTR out Pin 5 Gnd Pin 6 no connecti...

Page 54: ...u will need at least one Wheatstone Blade attached to the network This is because the BD600W acts as a slave to the Blade Before connecting the BD600W you will need its IP Internet Protocol address this defaults to 192 168 87 239 and is dis played during the BD600 W s startup sequence The system can be configured by using Wheatstone s WheatNet IP Navigator application shown below First connect you...

Page 55: ...licking on the Source or Destinations list and choosing Show Name Location The BD600 sends a stereo output and receives a stereo input from the net work shown as Location BD600 assuming BD600 was the name given on the Third Party De vices tab Note that the BD600 audio output is always sent to the network while its audio input is only received from the network when INPT is set to WNET In this case ...

Page 56: ...g signals are shown in the Source Destination window Note that both BD600 and Blade LIOs are shown with the Blade as the Location The only way to confirm the actual BD600 LIOs is to look at the LIO Info tab which will list the BD600 LIOs showing their signal names and other info The reader should study the WheatNet IP documentation for more information on configuring LIOs WheatNet related error me...

Page 57: ...ou will see Wheatstone Telnet Server Copyright 2012 Wheatstone Corp Ctrl D Exit Ctrl E Toggle Echo Please log in Username Enter wheatstone when prompted for Username followed by the Enter key and when prompted for Pass word hit the Enter key without any text to enter a blank password At this point you should see something like WheatNet IP Eventide BD600 Software Version 1 4 9 Built Jun 15 2015 at ...

Page 58: ... using USB on Windows 7 later OS versions do not re quire it With the BD600 powered up and connected to your computer by USB bring up Control Panel then Device Manager Look under Ports COM LPT If BD600 is visible as above this procedure is unnecessary Otherwise if BD600 is not visible look for Unknown Device under Other Devices Right click on Unknown Device and select Update Driver Software ...

Page 59: ...on 2 1 Select Browse my computer You will see the following dialog Hit the Browse button and locate and select the CD drive containing the BD600 Install Software CD Hit Next If you see a Windows Security window click on Install this driver You should now see a Windows has successfully updated Window Hit Close ...

Page 60: ...mple Rate 44 1 48kHz 24 bit sample Frequency Response 20Hz to 20kHz 1dB at 48K sampling Signal to Noise ratio 110dB A weighted Dynamic Range 100dB Distortion 003 1kHz 1dB below clipping in stable delay state Basic Rear Panel Control Signals Control Signals Remote outputs relay contacts 1A 30V DC 125V AC maximum Remote inputs closure to ground Extended Remote Rear Panel Control Signals External Pow...

Page 61: ... or your carrier We will await your instructions as to how to proceed with the unit but we will charge you for all repairs on damaged units Who is covered under the warranty The warranty applies to the original purchaser of a new unit from Eventide or an Authorized Eventide Dealer Demo units are also covered by this warranty under slightly different circumstances see below Units that are used or h...

Page 62: ... If you specify a method that does not permit collect or COD charges remit sufficient funds to prepay shipping Shipping outside the 50 United States If you purchased the unit from a dealer in your country consult with the dealer before returning the unit If you wish to return the unit to us please note the following 1 The unit must be prepaid to our door This means that you are responsible for all...

Page 63: ...return 41 Compact Flash 1 4 12 14 15 17 30 Connector 1 4 inch jack 7 AES EBU 6 Analog Input 6 Analog Output 6 Basic Remote 5 34 36 37 Delayed RS232 6 General Remote 6 RS232 6 26 Wordclock 6 9 32 XLR 6 7 9 56 display3 4 8 10 14 16 17 19 20 21 22 23 29 41 fallback 10 29 ground loop 7 jingle 3 12 13 14 15 17 23 24 30 35 38 level input 3 7 8 9 meters 3 8 9 line feed 41 Message bad jingle 17 30 no lock...

Page 64: ...Release Notes for V1 5 Document Version 2 1 ...

Reviews: