


21
GAS PIPING
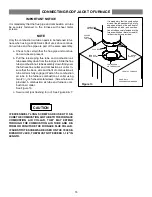
INSTALLATION AND CHECKING OF GAS LINE
Gas Supply piping must be sized in accordance with the
recommendations contained in “American National Stan-
dard Institute Installation of Gas Piping” ANSI 223.1 unless
local codes or regulations state otherwise.
Materials used and pipe sizing for U.S. mobile homes must
comply with requirements contained in Mobile Homes
A119.1, Recreational Vehicles A119.2 and H.U.D. Title 24,
Section 280.705 and any local or state codes.
NOTE
The gas line inlet on the gas valve is 1/2-14 N.P.T. The gas
line may be installed through the furnace floor or furnace
side to the gas valve.
CAUTION
To install gas line and to connect it to the gas valve, care
must be taken to hold gas valve firmly to prevent mis-
alignment of the burner orifice, or to damage gas valve
which could result in improper heating, explosion, fire
or asphyxiation.
DO NOT USE EXCESSIVE PIPE SEALANT ON PIPE
JOINTS. Pipe sealant, metal chips or other foreign ma-
terial that could be deposited in the inlet of the gas
valve, when gas pipe is installed or carried through the
gas piping into the gas valve inlet after installation, may
cause the gas valve to malfunction and could result in
possible improper heating, explosion, fire or asphyxi-
ation. Also, pipe sealant must be resistant to Propane
gas.
Where regulations require, a main shut-off valve shall
be installed externally of furnace casing. After piping
has been installed, turn gas on and check all connec-
tions with a leak detector or soap solution.
NEVER USE OPEN FLAME. FIRE OR EXPLOSION
COULD OCCUR.
Do not test the fuel system at more than 14” W.C. after
furnace has been connected to fuel line. Such testing
could void the warranty. Any test run above 14” W.C.
may damage furnace control valve which could cause
an explosion, fire or asphyxiation.
A dirt leg may be required by some local codes to trap mois-
ture and contaminations.
For NAT. gas operation, the furnace is designed for 7” W.C.
inlet gas pressure. Pressure to main burner is then reduced
to 3-1/2” W.C.
For Propane gas operation, pressure measured at the gas
valve must be 11” W.C.
IMPORTANT
When converting valve from or to Propane gas, it will be
necessary to change main burner orifice to prevent an un-
derfired or overfired condition. See furnace nameplate for
complete instructions.
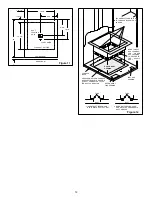
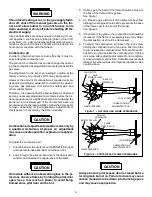
FINAL PROCEDURE
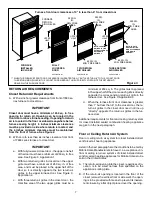
Install Furnace Doors
Install the bottom door first by holding the door flush
against the casing and sliding the door down until the
door top and bottom flanges rest in the casing chan-
nels. Then install the upper door in the same manner.
Alcove and Closet Installations may now be fin-
ished and trimmed as necessary
Leave enough gap above upper furnace door to allow it
to be lifted and removed.
NOTE
See nameplate for conversion and lighting instructions. Ob-
tain a temperature rise within the ranges specified on the
name plate.
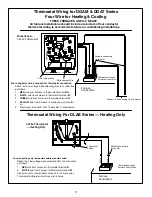
CAUTION
When installing an air conditioner which does not use the
furnace blower for air distribution and operates completely
independent of the furnace, THE THERMOSTAT SYSTEM
MUST HAVE AN INTERLOCK TO PREVENT THE FURNACE
AND AIR CONDITIONER FROM OPERATING AT THE SAME
TIME. This interlock system usually contains a heat-cool
switch which must be turned to either HEAT or COOL to acti-
vate either heating or cooling operation. This prevents po-
tentially hazardous high temperatures in any room if both
systems operate at the same time.