Technology Made Easy ...
.
Instruction Manual
α
lpha-pH550
pH Monitor
pH/mV/ºC meter
Part of Thermo Fisher Scientific
68X216869 Rev.2 Aug 07
Page 1: ...Technology Made Easy Instruction Manual αlpha pH550 pH Monitor pH mV ºC meter Part of Thermo Fisher Scientific 68X216869 Rev 2 Aug 07 ...
Page 2: ......
Page 3: ...ha pH 550 Monitor If you have doubts in the use of the instrument please do not hesitate to contact the nearest Eutech Instruments Authorised Distributor The information presented in this manual is subject to change without notice as improvements are made and does not represent a commitment on part of Eutech Instruments Eutech Instruments cannot accept any responsibility for damage or malfunction ...
Page 4: ......
Page 5: ...9 2 5 Display Keypad 10 2 5 1 Display Overview 10 2 5 2 Key Functions 11 3 Operation 12 3 1 Measurement mode 12 3 2 Menu Overview 13 3 2 1 αlpha pH 550 13 4 Calibration Mode 14 4 1 Preparing the Monitor Electrode for Calibration 14 4 2 Entering pH ORP Calibration Mode 14 4 3 pH Calibration 15 4 3 1 For USA Standard Buffer 15 4 3 2 For NIST Buffer 17 4 4 ORP Calibration 20 4 5 Temperature Calibrati...
Page 6: ... Return of Goods 33 9 3 Guidelines for Returning Unit for Repair 33 9 4 Maintenance and Cleaning 33 10 Appendices 34 10 1 Appendix 1 pH Buffer Values at Various Temperatures 34 10 2 Appendix 2 Abbreviations Used in LCD 35 ...
Page 7: ... which are not or insufficiently answered in this instruction manual please contact your authorized supplier They will be glad to assist you 1 2 Intended Use αlpha pH 550 Monitors are intended solely for pH or ORP and temperature measurement as described in this instruction manual Any other use or use not mentioned here that is incompatible with the technical specifications is deemed inappropriate...
Page 8: ...o modifications to the αlpha pH 550 are allowed The manufacturer supplier accepts no responsibility for damage caused by unauthorized modifications The risk is borne entirely by the user 1 4 Taking Out of Service Correct Disposal of the Unit Taking out of Service First disconnect the unit from the power supply and then undo all electrical connections Remove the unit from the wall panel Correct Dis...
Page 9: ... wastewater control and neutralization processes The pH Monitor has many user friendly and safety features which include Push button keypad for calibration and setup Built in non volatile memory to ensure that calibration and other information are not erased if power supply fails Menu driven program that simplifies setup 1 or 2 point calibration with selectable USA or NIST standard pH buffer set A...
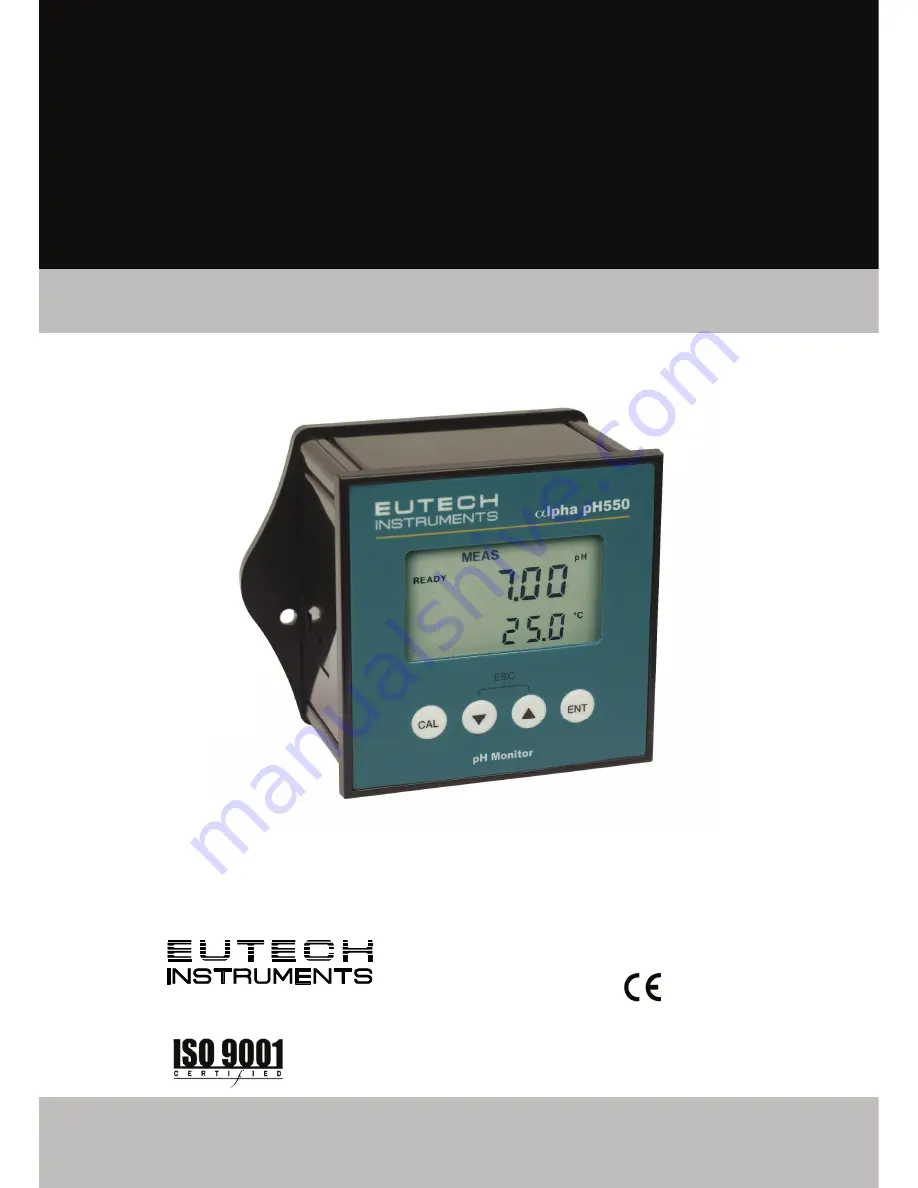
Page 10: ...t system consists of A pH process monitor A pH sensor with integrated or separate Pt100 Pt1000 temperature sensor An appropriate measurement cable An immersion flow or process assembly Power Adaptor 9 V DC Measurement Cable Housing and Sensors Alpha pH 550 Monitor ENT ESC pH Monitor lpha pH550 CAL ...
Page 11: ...d on the back PCBA as shown in the Figure 1 below Connectors J11 24V DC power J8 9V DC power J10 pH electrode Temperature probe connections wiring has to be done in the detachable connector 24V DC J11 J10 J8 9V DC Power Screw 1 ve 2 Gnd J11 Connections 1 ve 2 Gnd J10 Connections 1 pH Sense 2 pH Reference 3 No Connection 4 No Connection 5 Pt 100 Compensate 6 Pt 100 Sense 7 Pt 100 GND 8 Potential Ma...
Page 12: ...hange the jumper setting J7 as described below Remove Back Cover Remove screws from the four corners at the back of the pH Controller Remove the back cover Remove Back PCBA Remove the screw located center of the back PCBA Figure 1 Detach the back PCBA from the Controller Turn over the back PCBA Locate J7 jumper on the inner side of the back PCBA as shown in Figure 2 below Figure 2 Inner Side of Ba...
Page 13: ...e wire to Pin 2 of J10 connector 2 3 3 Connecting Temperature Probe For Automatic Temperature Compensated ATC pH readings a 100Ω Pt RTD temperature probe 2 wire or 3 wire can be connected to the Controller 3 Wire Probe 1 Connect PT100 compensate wire to Pin 5 of J10 connector 2 Connect PT100 sense wire to Pin 6 of J10 connector 3 Connect PT100 GND wire to Pin 7 of J10 connector 2 Wire Probe 1 Shor...
Page 14: ...αlpha pH 550 Eutech Instruments 8 2 4 Installation 2 4 1 Mechanical Dimensions ENT ESC pH Monitor lpha pH550 CAL 2 4 2 Wall Mount Pierce through holes at both sides 1 1 Cover the catch slots at both sides with overlays 2 ...
Page 15: ...Panel Mount Panel Gasket Prepare panel cut out of 92 0 mm X 92 0 mm Remove back cover of pH Monitor and slide it through panel cut out Attach catch to both sides of pH Meter Insert threaded rods through catch until pH Meter is held against panel 2 3 4 1 1 Panel ...
Page 16: ...ore details The LCD also consists of various mode indicators status annunciators and unit of measurement indicators pH R mV pH SETUP MEAS CAL Upper Display Lower Display ERR ATC C READY 8 8 8 8 8 8 8 F Mode Indicators MEAS Measurement mode blinks in Symmetric mode Refer Section 3 1 5 5 SETUP Setup mode Refer Section 5 CAL Calibration mode Refer Section 4 Status Annunciators READY Appears when the ...
Page 17: ...p of settings in Setup mode Select parameters and increment decrement numerical values in Setup and Calibration modes When pressed continuously speed of value increment decrement increases Returns to Measurement mode when both keys are pressed simultaneously Units of Measurement Indicators Millivolt Appears in ORP measurement calibration modes Refer Section mV 3 1 4 4 R mV Relative Millivolt pH Ap...
Page 18: ...etric mode The upper alpha numerical display shows the measured pH or mV value while the lower display shows the temperature value The indicator pH or mV at the upper right side of the display indicates the current measurement mode Refer Section 5 5 for switching measurement modes To guarantee accurate readings the measuring system the pH Monitor and the sensor must be calibrated regularly NOTE Fr...
Page 19: ...Instruction Manual αlpha pH 550 Eutech Instruments 13 3 2 Menu Overview 3 2 1 αlpha pH 550 MEAS pH C ATC READY ENT SETUP SETUP ENT SETUP SETUP SETUP ENT ENT ENT ENT CAL CAL ENT ENT ENT ENT ENT ENT ENT ...
Page 20: ...se pH 4 01 or 7 00 buffer solution Do not reuse buffer solutions after calibration Contaminants in the solution can affect the calibration and the accuracy of the measurements The pH Monitor features two internationally recognized pH buffer standards Select the buffer standard you require in the setup mode Refer Section 5 4 Available buffer options are USA buffers pH 4 01 1 68 7 00 10 01 and 12 45...
Page 21: ...other buffer value pH 4 01 1 68 10 01 or 12 45 1 Point Calibration CAL HOLD ENT CAL pH READY HOLD pH CAL CAL mV pH HOLD MEAS PH C ATC READY ENT 1 2 3 4 From pH measurement mode press CAL key to enter calibration mode as described in section 1 1 4 2 The LCD shows CAL PH Press ENT key to begin calibration Place the electrode in pH 7 00 buffer Immerse the temperature probe in the buffer solution if A...
Page 22: ...he current uncalibrated pH reading Allow the reading to stabilize LCD shows READY annunciator when the reading is stable Press ENT key to confirm the reading The pH Monitor moves to the second calibration point The lower display shows next standard buffer value pH 4 01 Use and keys to select your second buffer from one of the preset values pH 4 01 or 1 68 or 10 01 or 12 45 Remove the electrode fro...
Page 23: ...point calibration at room temperature 25 o C starting with the first buffer at pH 6 86 followed by any other buffer value pH 4 01 1 68 9 18 or 12 45 1 Point Calibration CAL HOLD ENT CAL pH READY HOLD pH CAL CAL mV pH HOLD MEAS PH C ATC READY ENT 1 2 3 4 From pH measurement mode press CAL key to enter calibration mode as described in section 1 1 4 2 The LCD shows CAL PH Press ENT key to begin calib...
Page 24: ...the current uncalibrated pH reading Allow the reading to stabilize LCD shows READY annunciator when the reading is stable Press ENT key to confirm the reading The pH Monitor moves to the second calibration point The lower display shows next standard buffer value pH 4 01 Use and keys to select your second buffer from one of the preset values pH 4 01 or 1 68 or 9 18 or 12 45 Remove the electrode fro...
Page 25: ...nunciator blinks and ERR indicator appears in the display This error can also occur if non standard buffers are used or the electrode has worn out If this happens press both and keys together to restart the calibration beginning from Step1 When calibrating with manual temperature compensation the meter automatically changes from the preset process temperature to the calibration temperature After l...
Page 26: ... is enabled Immerse the potential matching pin in the buffer if symmetrical mode is enabled The buffer annunciator 2 electrode annunciator appear in LCD The upper display shows the current mV output of the electrode with offset adjustment if any The lower display shows the default uncalibrated mV output of the electrode Allow the reading to stabilize LCD shows READY annunciator when the reading is...
Page 27: ...surement mode press the ENT key to access setup mode LCD shows SETUP mode indicator and the first page of setup OFS offset settings Press or key to access other pages of the setup mode MEAS pH C ATC READY ENT SETUP SETUP ENT SETUP SETUP SETUP ENT ENT ENT ENT ENT ENT ENT ENT ENT NOTES To exit setup mode at any time press and keys simultaneously escape The pH Monitor returns to the measurement mode ...
Page 28: ...ample was taken 2 Measure the pH value of your sample using another calibrated pH meter having its own electrode pH tester hand held meter or bench meter 3 The difference between these two readings is the offset SETUP ENT ENT 1 pH READY pH SETUP pH READY pH SETUP 2 3 From pH measurement mode press ENT key to enter setup mode as described in section 1 1 5 1 The LCD shows the first screen of setup m...
Page 29: ...ration temperature of 25 C lets you calibrate using standard solutions at 25 C even if your process temperature is different from 25 C ENT 1 SETUP 2 SETUP C 2 ENT ENT 3 SETUP C SETUP C 3 ENT SETUP C ATC SETUP C ATC 5 4 SETUP ENT 6 SETUP 7 ENT ENT ENT F SETUP From pH or ORP measurement mode press ENT key to enter setup mode as described in section 1 1 5 1 The LCD shows the first screen of setup mod...
Page 30: ...suit the new offset value Up to 10 ºC 18 ºF offset is allowed 5 5 Press ENT key to confirm the value The pH Monitor reverts to SET ºCF screen If ATC disabled ATC OFF Setting process temperature The lower display shows P ºC and the upper display shows the last configured process temperature Press or key to adjust the upper display to desired process temperature Allowable range 10 0 to 125 0 C 14 0 ...
Page 31: ...LD SETUP HOLD SETUP HOLD ENT ENT ENT 1 2 2 From pH measurement mode press ENT key to enter setup mode as described in section 1 1 5 1 The LCD shows the first screen of setup mode OFS Press or key to select buffer settings screen bUFF Press ENT key to access buffer settings bUFF Selecting buffer group The lower display shows the last configured buffer group Press or key to select the required buffe...
Page 32: ...the pH reading becomes unstable When the pH Monitor is set to symmetrical mode you should immerse the potential matching pin in the sample or process liquid or use a pH electrode with built in potential matching pin The MEAS indicator blinks when the pH Monitor is set to Symmetric mode ENT SETUP SETUP ENT SETUP SETUP SETUP ENT ENT ENT SETUP ENT ENT SETUP SETUP MEAS pH C ATC READY 1 2 2 3 3 4 4 4 F...
Page 33: ...irmed by pressing ENT key FCt dEF Reset all settings of the pH Monitor to factory defaults when confirmed by pressing ENT key CAL dEF Reset all calibration settings of the pH Monitor to factory defaults when confirmed by pressing ENT key Press ENT key to confirm your selection If nO dEF was selected the pH Monitor reverts to Cnfg screen Press or key to access other setup screens or press and key s...
Page 34: ...e press ENT key to enter setup mode as described in section 1 1 5 1 The LCD shows the first screen of setup mode OFS Press or key to select viewing electrode properties screen CdAt Press ENT key to view electrode properties CdAt 2 Electrode status The electrode annunciator appears in the LCD For pH measurement mode the slope in mV is shown in the upper display and pH reading at 0mV pH7 00 offset i...
Page 35: ...ion Automatic or Manual Calibration a pH Number of calibration points 1 or 2 points Number of calibration buffers USA 1 68 4 01 7 00 10 01 12 45 NIST 1 68 4 01 6 86 9 18 12 45 b Temperature Offset Adjustment 10 C 18 F Input Output Input Asymmetrical Symmetrical Output None Display LCD 7 segments display with symbols for status information Electrical Data and Connections pH mV Input Screw Terminal ...
Page 36: ...cription Order Code pH 4 01 buffer solution 480 ml bottle EC BU 4BT pH 7 00 buffer solution 480 ml bottle EC BU 7BT pH 10 01 buffer solution 480 ml bottle EC BU 10BT pH 4 01 buffer sachets 20 ml x 20 pcs EC BU 4BS pH 7 00 buffer sachets 20 ml x 20 pcs EC BU 7BS pH 10 01 buffer sachets 20 ml x 20 pcs EC BU 10BS pH De ionized water rinse sachets 20 ml x 20 pcs EC RIN WT pH sachet assortment pack 5 e...
Page 37: ...on buffer 500 ml 00654 00 pH 7 01 calibration buffer 500 ml 00654 04 pH 10 01 calibration buffer 500 ml 00654 08 pH 4 01 calibration buffer solution pouches 20 box 35653 01 pH 7 00 calibration buffer solution pouches 20 box 35653 02 pH 10 00 calibration buffer solution pouches 20 box 35653 03 pH De ionized water rinse sachets 20 ml x 20 pcs 35653 00 Assortment pack 5 each of pH 4 01 pH 7 00 and pH...
Page 38: ...interference Oscillating temperature readings a Ensure shield wire is properly connected to pin 7 Slow response a Dirty Oily electrode a Clean electrode Blinking ATC a No temperature probe connection during ATC mode a Ensure temperature sensing cable makes good contact a Error in calibration Blinking electrode annunciator a Ensure calibration standard solution is not contaminated Ensure electrode ...
Page 39: ...d against possible damage or loss Eutech Instruments Oakton Instruments will not be responsible for any damage resulting from careless or insufficient packing Warning Shipping damage as a result of inadequate packaging is the user s distributor s responsibility Please follow the guidelines below before shipment 9 3 Guidelines for Returning Unit for Repair Use the original packaging material if pos...
Page 40: ...00 pH 9 18 pH 10 01 0 4 01 6 98 7 12 9 47 10 32 5 4 01 6 95 7 09 9 38 10 25 10 4 00 6 92 7 06 9 32 10 18 15 4 00 6 90 7 04 9 27 10 12 20 4 00 6 88 7 02 9 22 10 06 25 4 01 6 86 7 00 9 18 10 01 30 4 01 6 85 6 99 9 14 9 97 35 4 02 6 84 6 98 9 10 9 93 40 4 03 6 84 6 97 9 07 9 89 45 4 04 6 83 6 97 9 04 9 86 50 4 06 6 83 6 97 9 01 9 83 55 4 08 6 83 6 97 8 99 9 81 60 4 10 6 84 6 98 8 96 9 79 70 4 12 6 85...
Page 41: ...e Compensation bUFF Buffer CAL Calibration C ºC Calibration temperature CdAt Electrode properties CnFg Configuration dEF Default values FCt Factory defaults OFS Offset Or Reading is over range OrP Oxidation Reduction Potential P ºC Process temperature PH pH Set Setting Sy Symmetrical mode tyP Type Ur Reading is under range Eutech Instruments 35 ...
Page 42: ......
Page 43: ......
Page 44: ...contact your nearest distributor or visit our website listed below Eutech Instruments Pte Ltd Distributed by Blk 55 Ayer Rajah Crescent 04 16 24 Singapore 139949 Tel 65 6778 6876 Fax 65 6773 0836 E mail eutech thermofisher com Web site www eutechinst com ...