background image


19 


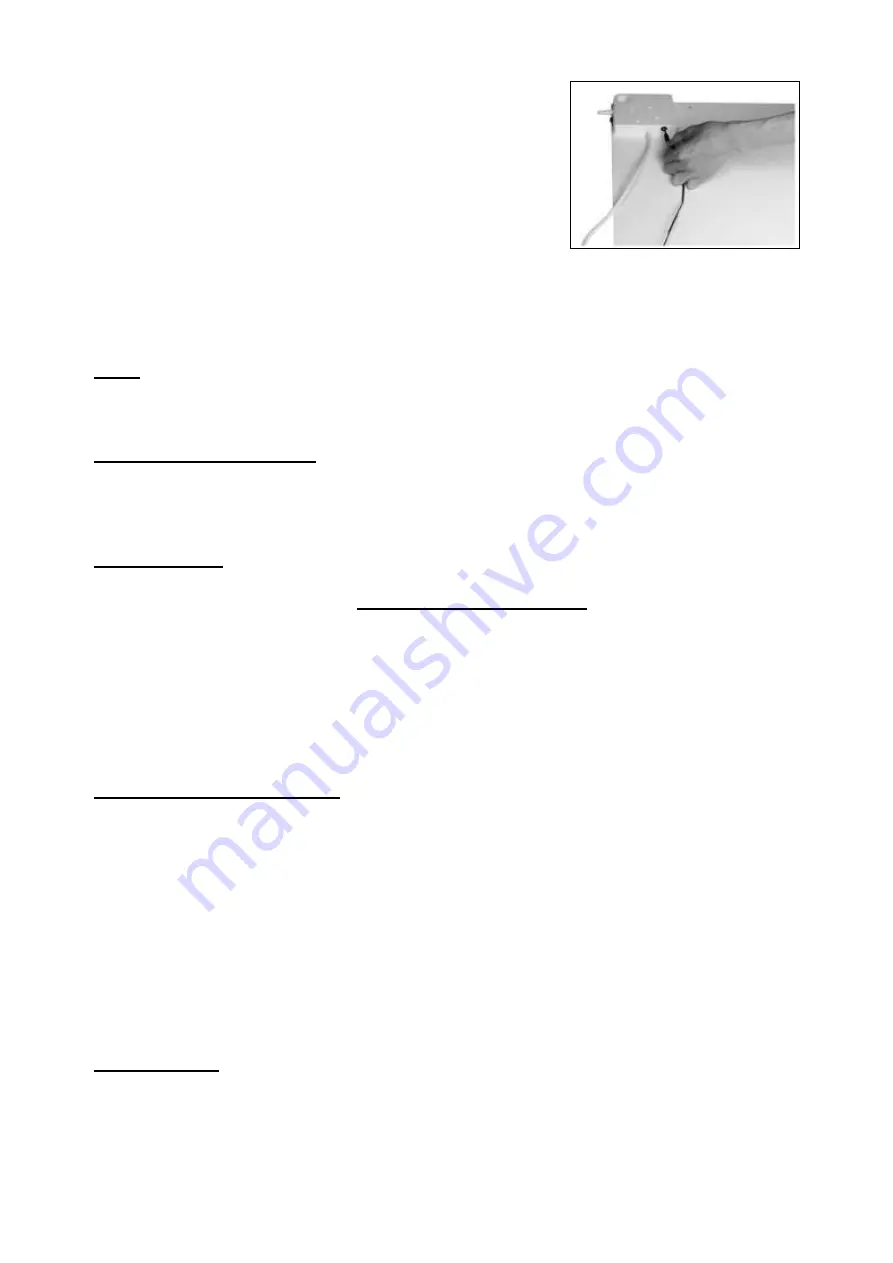
Because the temperature sensor is located on the 
heater, the measurement is not particularly accurate. 
If you want a more accurate measurement, connect 
the separate thermostat supplied by inserting the plug 
under the control panel and moving the sensor two 
meters away from the heater, see the illustration. 
When you have plugged in the separate thermostat, it 
will automatically take over the thermostat function. 


The display will switch off if you change nothing in the settings for 10 seconds. You 
can reactivate it by pressing once on any button at random. 


Press the ON/OFF button first in order to switch the device E-convect off. The heater 
is now in standby mode. Now switch the main switch off (O); the lamp will go out. 
Finally remove the plug from the socket. 

Timer 


The Mon Soleil Wifi has a timer function that can be used with the app on your 
smartphone 


Wi-Fi and app operation 

The heater can also be controlled with an app on your smartphone. To do this, the 
heater must be connected to a Wi-Fi modem. To install the app, refer to the end of this 
booklet. 

 
Safety feature 


In  case  of  internal  overheating, 

the  overheating  safeguard 

will  switch  the  heater  off. 

This may occur if the heater cannot give off enough heat or if it cannot draw in enough 
fresh air. As mentioned above, this is generally caused by (partially) covering the heater, 
or installing the heater too close to a wall or something similar. In case of overheating, 
switch off the heater and unplug. Give the heater time to cool down, remove the source 
of  the  overheating  and  use  as  normal.  If  the  problem  persists  or  if  you  have  not  been 
able to trace the source of the overheating, turn the heater off immediately and unplug. 
Contact a servicing point to have the heater repaired. 


Cleaning and Maintenance 


Keep the heater clean. Switch off the heater, remove the plug from the socket and allow 
the heater to cool down before cleaning or carrying out maintenance work. 


Wipe the outside of the heater regularly with a dry or slightly damp cloth. Do not use 
aggressive soaps, sprays, cleaners or abrasives, waxes, polishes or chemical 
solutions!  


You can keep the back of the heater free of dust with a feather duster. For thorough 
cleaning of the back, you can unscrew the heater from the wall. 


If you want to clean away the E-convect at the end of the season, you can simply 
unscrew it and store it, if possible in the original packaging, upright in a cool. Dry 
and dust-free place.  


CE-statement 

 
Eurom - Genemuiden-NL

 hereby declares that the 

EUROM electrical convector 

heater

, type

 E-CONVECT WIFI

, complies with the LVD guideline 2014/35/EU, EMC 

guideline 2014/30/EU, RED guideline 2014/53/EU  and meets the following standards:  


Summary of Contents for 35.155.2

Page 1: ...nstructieboekje Bedienungsanleitung Instruction booklet Manuel d utilisation E CONVECT WIFI VERWARMINGSPANEEL HEIZPLATTE HEATING PANEL PANNEAU DE CHAUFFAGE Art nr 35 155 2 Art nr with Swiss plug 35 156 9 ...

Page 2: ... Dette symbolet på apparatet betyr Må ikke dekkes til FI Tämä laitteessa oleva symboli tarkoittaa ei saa peittää HU A készülékén lévő szimbólum jelentése ne takarja le CS Tento symbol na vašem zařízení znamená nezakrývejte PL Ten symbol na urządzeniu oznacza nie zakrywać SK Tento symbol na vašom zariadení znamená nezakrývajte RO acest simbol ce apare pe aparatul dumneavoastră înseamnă nu acoperiţi...

Page 3: ...re vloeistof en raak de kachel nooit met natte handen aan 6 Aansluitspanning en frequentie vermeld op het apparaat dienen overeen te komen met die van het te gebruiken stopcontact De elektrische installatie dient beveiligd te zijn met een aardlekschakelaar max 30 mAmp Het stopcontact dat u gebruikt dient te allen tijde goed bereikbaar te zijn om ingeval van nood snel de stekker uit het stopcontact...

Page 4: ...uiglijke of mentale beperking of gebrek aan ervaring en kennis ongeacht of er toezicht is of instructie is gegeven aangaande het gebruik van het apparaat door een persoon die verantwoordelijk is voor hun veiligheid Er dient op te worden toegezien dat kinderen niet met het apparaat spelen 19 Deze kachel kan behalve handmatig ook met een timer of een app worden bediend Hoe u hem ook in werking stelt...

Page 5: ...onvect verven in de kleur die u wenst met elke waterbestendige verf Verf het kastje met de schakelaar niet en neem de stekker uit het stopcontact voordat u gaat verven Laat het paneel goed drogen voor u het weer in gebruik neemt Verwijder al het verpakkingsmateriaal en houd het buiten het bereik van kinderen Controleer na verwijdering van de verpakking of het apparaat geen beschadigingen of tekene...

Page 6: ...hroeven afb 1 schuif hem zo ver mogelijk naar links en laat hem vervolgens zakken schroef van A naar B zie afb 2 De afstandsbeugel houdt de onderzijde van de kachel op de juiste afstand van de muur Plaats nu het veiligheidsbeugeltje X op één van de ophangbeugels markeer de plaats voor de schroef boor een gat voorzie het van een plug en schroef het veiligheidsbeugeltje tegen de wand direct boven de...

Page 7: ...wanneer hij inwendig te heet wordt Dat kan gebeuren wanneer de kachel zijn warmte onvoldoende kan afgeven of te weinig frisse lucht kan aanzuigen Doorgaans is de oorzaak dus gedeeltelijke afdekking van de kachel plaatsing te dicht bij bijv een muur enz Bij oververhitting dient u de kachel uit te schakelen en de stekker uit het stopcontact te nemen Geef de kachel tijd om af te koelen neem de reden ...

Page 8: ...30 EU RED richtlijn 2014 53 EU en in overeenstemming is met de onderstaande normen LVD 2015 35 EU EN 60335 1 2012 A11 2014 EN 60335 2 30 2009 A11 2012 EN 62233 2008 EMC 2014 30 EU EN 55014 2006 A1 2009 A2 2011 EN 55014 2 2015 EN 61000 3 2 2014 EN 61000 3 3 2013 RED 2014 53 EU EN 300 328 V2 1 1 EN 301 489 1 V1 9 2 EN 301 489 17 V2 2 1 EN 62479 2010 Genemuiden 01 06 2017 W J Bakker alg dir ...

Page 9: ...stige Flüssigkeiten und berühren Sie den Ofen niemals mit nassen Händen 6 Anschlussspannung und Frequenz genannt auf dem Gerät müssen der benutzten Steckdose entsprechen Die elektrische Installation muss mit einem Leitungsschutzschalter geschützt sein max 30 mAmp Die verwendete Steckdose muss immer gut erreichbar sein um im Notfall den Netzstecker rasch aus der Steckdose ziehen zu können 7 Rollen ...

Page 10: ...er Personen mit körperlichen sensorischen oder geistigen Behinderungen oder durch Personen ohne Wissen oder Erfahrung mit diesem Gerät bedient zu werden auch nicht unter Aufsicht oder nach Unterweisung durch eine Person die für die Sicherheit der oben genannten Personen verantwortlich ist Kindern darf das Spielen mit dem Gerät nicht erlaubt werden 19 Die Bedienung dieses Heizgeräts kann sowohl man...

Page 11: ...icht Rot Einzigartig am E convect ist dass Sie ihn mit Ihrer Wunschfarbe versehen können Sie können den E convect mit jeder wasserbeständigen Farbe in der von Ihnen gewünschten Farbe anstreichen Streichen Sie das Schaltergehäuse nicht und entfernen Sie vor dem Streichen den Stecker aus der Steckdose Lassen Sie die Platte gut trocknen bevor Sie sie wieder in Gebrauch nehmen Entfernen Sie sämtliches...

Page 12: ...einander und absolut waagerecht Die Löcher an den markierten Stellen bohren und Dübel einsetzen Die im Lieferumfang enthaltenen Schrauben in die Dübel drehen bis sie noch 5 mm herausragen Den E convect Wifi mit seinen Aufhängbügeln über die Schrauben hängen Abb 1 möglichst weit nach links schieben und anschließend absinken lassen Schraube von A nach B siehe Abb 2 Der Distanzbügel sorgt für den ent...

Page 13: ... mit der App auf Ihrem Smartphone bedient werden kann WLAN und App Bedienung Die Bedienung des Heizgeräts kann auch über eine App auf Ihrem Smartphone erfolgen Zu diesem Zweck muss das Heizgerät mit einem WLAN Modem verbunden sein Die Installationsanleitung der App finden Sie im hinteren Teil dieser Anleitung Sicherung Die Überhitzungssicherung schaltet die Heizung aus wenn es inwendig zu heiß wir...

Page 14: ...nd an einem kühlen trockenen und staubfreiem Ort CE Erklärung Hiermit erklärt Eurom Genemuiden NL dass das Produkt Elektrische Konvektorheizung Marke EUROM Typ E CONVECT WIFI der LVD Richtlinie 2014 35 EU EMC Richtlinie 2014 30 EU RED Richtlinie 2014 53 EU sowie den folgenden Normen entspricht LVD 2015 35 EU EN 60335 1 2012 A11 2014 EN 60335 2 30 2009 A11 2012 EN 62233 2008 EMC 2014 30 EU EN 55014...

Page 15: ...th wet hands 6 The supply voltage and utility frequency specified on the machine need to match those of the socket that is used The electrical installation needs to be secured with a ground fault circuit interrupter max 30 mAmp The electrical socket that you are using must be to hand at all times in order to be able to remove the plug from the socket in the event of an emergency 7 Fully extend the...

Page 16: ...n or a lack of experience and knowledge irrespective of whether they are being supervised or have been issued with instructions in relation to the use of the device by a person who is responsible for their safety Always ensure that children cannot play with the device 19 This heater can also be controlled with a timer or an app as well as manually However you operate it always ensure that all safe...

Page 17: ...ith the switch and remove the plug from the socket before you start painting Allow the panel to dry before using it again Remove all packaging material and keep out of reach of children After removing packaging check the appliance for damage or other signs that could indicate a fault defect malfunction In case of doubt do not use the appliance but contact your vendor for inspection or replacement ...

Page 18: ...pacer bracket keeps the bottom of the heater at the correct distance from the wall Now mount the safety bracket X onto one of the suspension brackets mark the screw position drill a hole insert a plug and screw the safety bracket against the wall immediately above the suspension bracket see fig 3 Your heater will now be firmly mounted and ready for use To take the heater off the wall first remove ...

Page 19: ... draw in enough fresh air As mentioned above this is generally caused by partially covering the heater or installing the heater too close to a wall or something similar In case of overheating switch off the heater and unplug Give the heater time to cool down remove the source of the overheating and use as normal If the problem persists or if you have not been able to trace the source of the overhe...

Page 20: ... 2009 A11 2012 EN 62233 2008 EMC 2014 30 EU EN 55014 2006 A1 2009 A2 2011 EN 55014 2 2015 EN 61000 3 2 2014 EN 61000 3 3 2013 RED 2014 53 EU EN 300 328 V2 1 1 EN 301 489 1 V1 9 2 EN 301 489 17 V2 2 1 EN 62479 2010 Genemuiden 01 06 2017 W J Bakker alg dir ...

Page 21: ...un autre liquide et ne touchez jamais le poêle avec des mains mouillées 6 La tension et la fréquence mentionnées sur l appareil doivent correspondre à celles de la prise de courant utilisée l Installation électrique doit être protégée avec un disjoncteur différentiel max 30 mAmp La prise de courant que vous utilisez doit toujours être accessible de façon à ce que la fiche puisse être retirée rapid...

Page 22: ... une utilisation par des personnes y compris des enfants souffrant d un handicap physique sensoriel ou mental ou manquant d expérience ou de connaissance même si une surveillance est assurée ou que des instructions ont été données sur l utilisation de l appareil par une personne responsable de leur sécurité Il convient de veiller à ce que les enfants ne jouent pas avec l appareil 19 Ce poêle peut ...

Page 23: ...dre Vous pouvez peindre le panneau E convect dans la couleur que vous souhaitez avec de la peinture imperméable à l eau Ne peignez pas le boîtier avec le commutateur et retirez la fiche de la prise murale avant de peindre Laissez le panneau bien sécher avant de le réutiliser Enlevez la totalité de l emballage et tenez le hors de portée d enfants Après avoir enlevé l emballage contrôlez si l appare...

Page 24: ...l avec ses brides de suspension au dessus des vis image 1 glissez le le plus possible vers la gauche et baissez le ensuit vissez de A à B voir image 2 La bride d espacement garde la partie inférieure du poêle à la bonne distance du mur Placez à présent la bride de sécurité X sur l une des brides de suspension marquez l endroit pour la vis percez un trou pourvoyez le d un bouchon et vissez la bride...

Page 25: ...s de surchauffe interne Cela peut arriver lorsque le poêle ne peut diffuser suffisamment sa chaleur ou lorsqu il ne peut aspirer assez d air frais La cause la plus fréquente est un recouvrement partiel du poêle une installation trop près de par ex un mur etc En cas de surchauffe vous devez éteindre le poêle et retirer la fiche de la prise de courant Laissez refroidir le poêle réparez la cause de l...

Page 26: ...EMC 2014 30 EU directive RED 2014 53EU et est conforme aux normes ci dessous LVD 2015 35 EU EN 60335 1 2012 A11 2014 EN 60335 2 30 2009 A11 2012 EN 62233 2008 EMC 2014 30 EU EN 55014 2006 A1 2009 A2 2011 EN 55014 2 2015 EN 61000 3 2 2014 EN 61000 3 3 2013 RED 2014 53 EU EN 300 328 V2 1 1 EN 301 489 1 V1 9 2 EN 301 489 17 V2 2 1 EN 62479 2010 Genemuiden 01 06 2017 W J Bakker alg dir ...

Page 27: ...r search for Eurom Smart in the App store or Google Play Avec un smartphone scannez le code QR ci dessous ou recherchez Eurom Smart dans l App store ou Google Play De Eurom Smart App wordt toegevoegd op uw smartphone Die Eurom Smart App wird auf Ihrem Smartphone installiert The Eurom Smart App will be added to your smartphone L Eurom Smart App est ajoutée sur votre smartphone NL Registreren Eurom ...

Page 28: ...achtwoord in en kies confirm om de registratie te bevestigen 3 Per SMS erhalten Sie den sog Verification Code Geben Sie diesen Verification Code und das von Ihnen gewählte Passwort innerhalb von 60 Sekunden ein und wählen Sie Confirm um die Registrierung zu bestätigen 3 You will receive an SMS with a verification code Within 60 seconds enter this verification code and your chosen password and sele...

Page 29: ...one avec lequel vous souhaitez commander votre poêle soit connecté au même modem Wi Fi que celui auquel le poêle a accès 1 Om de Eurom Smart App te kunnen gebruiken dient uw kachel eenmalig te worden toegevoegd in de App Kies Add Device 1 Um die Eurom Smart App nutzen zu können muss Ihr Heizgerät einmalig zur App hinzugefügt werden Wählen Sie Add Device 1 In order to use the Smart App your heater ...

Page 30: ...r rapidly Blink 3 When the lamp on the heater is blinking rapidly select in the App confirm indicator rapidly blinking 3 Lorsque le témoin sur le poêle clignote rapidement sélectionnez dans l appli confirm indicator rapidly blink 4 Geef het correcte Wi Fi wachtwoord 4 Geben Sie das korrekte WLAN Passwort ein 4 Enter the correct Wi Fi password 4 Saisissez le mot de passe Wi Fi correct ...

Page 31: ... be made between the Eurom Smart App and the Eurom heater 5 Une connexion est maintenant établie entre l appli Eurom Smart et le poêle Eurom 6 Kies Done wanneer de verbinding succesvol is gemaakt 6 Wählen Sie Done wenn die Verbindung erfolgreich hergestellt wurde 6 Select Done once the connection has been successfully established 6 Sélectionnez Done lorsque la connexion est établie avec succès ...

Page 32: ... logischen Namen zu geben sodass es Ihnen klar ist um welches Heizgerät es sich handelt 8 Select at top right in the control screen then select Modify Device Name to give your heater a logical name so that it is clear to you which heater it is 8 Sélectionnez en haut à droite sur l écran de commande puis sélectionnez Modify Device Name pour donner un nom logique à votre poêle Ainsi vous savez direc...

Page 33: ...e verbinding met de Wi Fi modem de kachel toch in en uit zal schakelen op de door u ingestelde tijden Het opslaan van de timer gegevens in de kachel is een veiligheidsvoorziening Ook zonder Wifi verbinding wordt het door u ingestelde aan en uit schema afgewerkt De kachel zal dus niet onverhoopt door blijven verwarmen wanneer de Wifi verbinding tijdelijk wegvalt De gegevens van de Smart timer blijv...

Page 34: ...dennoch zu den von Ihnen eingestellten Zeiten ein und ausschaltet falls die Verbindung des Heizgerätes zum WLAN unterbrochen wird Die Speicherung der Timer Daten im Heizgerät ist eine Schutzmaßnahme Das eingestellte Schema wird auch ohne WLAN Verbindung ausgeführt Auf diese Weise wird verhindert dass das Heizgerät bei einem temporären Ausfall der WLAN Verbindung weiter heizt Die Daten des Smart Ti...

Page 35: ...ata and the heater loses the connection with the Wi Fi modem the heater will still be able to switch itself on and off on your specified times Storing the timer data in the heater is a safety precaution Your set on and off times schedule will also work without a Wi Fi connection So the heater will not unexpectedly continue heating up if the Wi Fi connection temporarily fails The Smart timer data w...

Page 36: ...a et s éteindra quand même aux heures que vous avez réglées L enregistrement des données de minuterie dans le poêle est un dispositif de sécurité Même sans connexion Wi Fi le calendrier que vous avez réglé pour allumer et éteindre est appliqué Le poêle ne continuera donc pas à chauffer de manière imprévue en cas d arrêt temporaire de la connexion Wi Fi Les données du Smart timer restent conservées...

Reviews: