background image


00128029, Version 1.0 


23/36

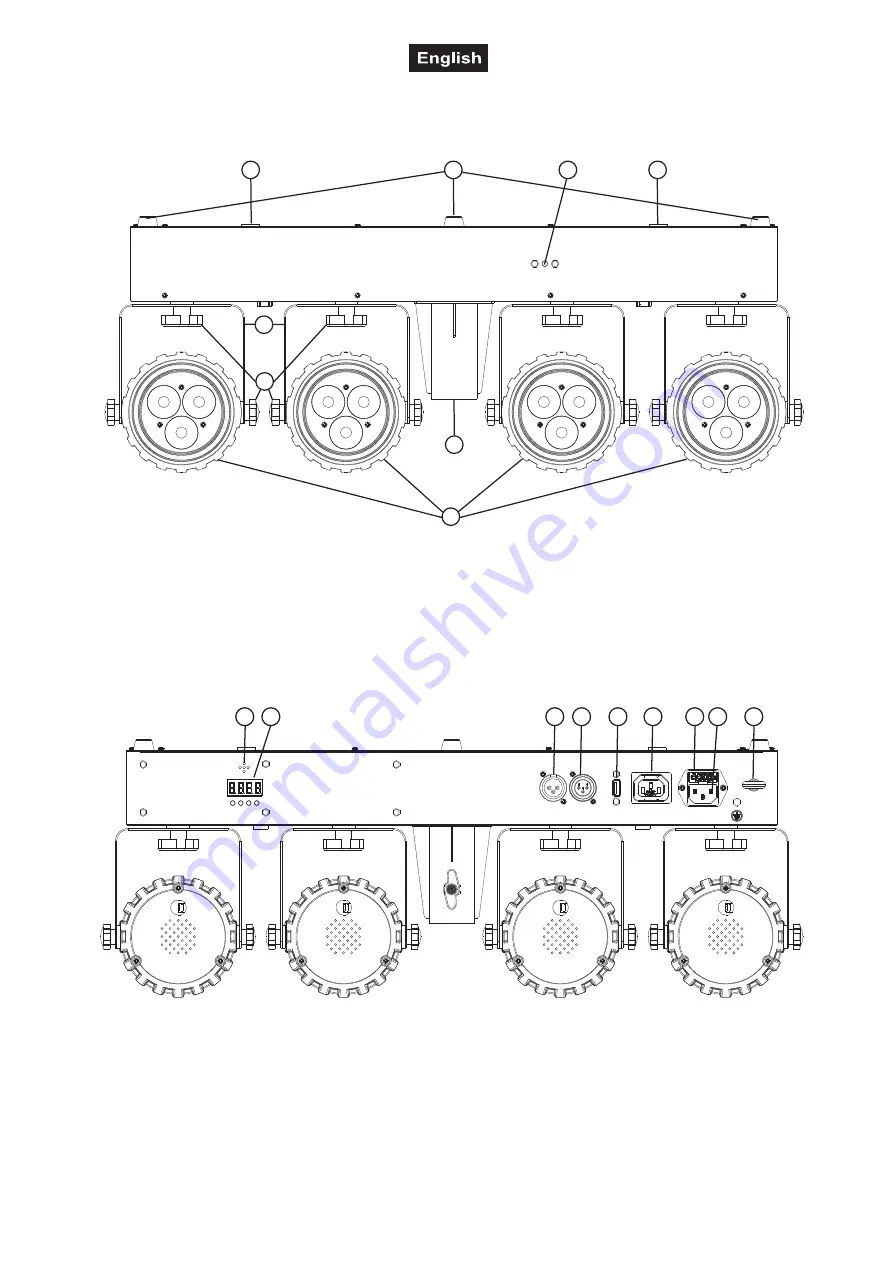
DESCRIPTION OF THE DEVICE 

Front


(1) 

Thread for mounting a truss clamp 

(2) 

Rubber feet 

(3) 

Infrared sensor for the remote control 

(4) 

Mounting bracket Fixation screws 

(5) 

Fixation screws 

(6) 

Stand sleeve with fixation screw 

(7) 

Spots with RGBW LEDs 


Rear 


(8) 

Microphone 

(9) 

Display with programming buttons 

(10) 

DMX input 

(11) 

DMX output 

(12) 

USB port for QuickDMX wireless receiver 

(13) 

Power output 

(14) 

Fuseholder 

(15) 

Power input 

(16) 

Attachment eyelet 


2

3

4

5

6

7

1

1

8

9

10

12

13

14

15

16

11

Summary of Contents for KLS-120

Page 1: ...r manual LED KLS 120 Compact Light Set LED KLS 120 Compact Light Set Komplette DMX LED Lichtanlage Complete DMX LED light set No 42109606 www eurolite de MASTER SLAVE STAND ALONE REMOTE CONTROL DMX RGBW IR optional 18 STROBE ...

Page 2: ......

Page 3: ...NSTRUCTIONS 21 DESCRIPTION OF THE DEVICE 23 Front 23 Rear 23 INSTALLATION 24 Overhead rigging 24 Mounting on a stand 25 CONNECTIONS 25 DMX512 control 25 Wireless DMX transmission with QuickDMX 25 Connection to the mains 26 OPERATION 26 Menu structure 27 Stand alone mode 27 Remote control IR 7 29 DMX operation 29 CLEANING AND MAINTENANCE 33 Replacing the fuse 33 PROTECTING THE ENVIRONMENT 33 TECHNI...

Page 4: ...BW Spots Querträger mit integrierter DMX Steuereinheit und Stativhülse Absolutes Leichtgewicht bestens geeignet für mobilen Einsatz Ideal für Bands Bühnen oder Alleinunterhalter Geeignet zur Montage auf einem Boxenhochständer nicht inkl oder an Traversen Lieferung erfolgt vormontiert in praktischer Transporttasche 4 leistungsstarke 4in1 LEDs pro Spot ermöglichen homogene RGBW Lichtmischung Scheinw...

Page 5: ...u Verletzungen des Benutzers führen Die Steckdose muss gut zugänglich sein damit Sie im Bedarfsfall den Netzstecker schnell ziehen können Fassen Sie den Netzstecker niemals mit nassen Händen an da die Gefahr eines Stromschlags besteht Das Netzkabel darf nicht geknickt oder gequetscht werden Halten Sie es von heißen Oberflächen und scharfen Kanten fern Ziehen Sie den Netzstecker nie am Kabel aus de...

Page 6: ... verursacht werden Bei einer Montage über Kopf ist das Gerät immer durch eine zweite Befestigung z B Fangseil oder Fangnetz zu sichern Während Montage und Wartungsarbeiten muss der Bereich unterhalb des Geräts abgesperrt sein Bei gewerblicher Nutzung sind die landesspezifischen Unfallverhütungsvorschriften des Verbandes der gewerblichen Berufsgenossenschaften für elektrische Anlagen und Betriebsmi...

Page 7: ...Fernbedienung 4 Montagebügel 5 Feststellschrauben 6 Stativhülse mit Feststellschraube 7 Spots mit RGBW LEDs Rückseite 8 Mikrofon 9 LED Anzeige mit Bedientasten 10 DMX Eingang 11 DMX Ausgang 12 USB Buchse für QuickDMX Funkempfänger 13 Netzausgang 14 Sicherungshalter 15 Netzanschluss 16 Fangsicherung 2 3 4 5 6 7 1 1 8 9 10 12 13 14 15 16 11 ...

Page 8: ... die Verankerung stabil ist 1 Die tragende Struktur muss mindestens für das Zehnfache aller montierten Geräte ausgelegt sein 2 Sperren Sie den Arbeitsbereich während der Montage und arbeiten Sie von einer stabilen Plattform aus 3 Verwenden Sie Montagematerial das für die Struktur geeignet ist und die Last des Geräts tragen kann Geeignetes Montagematerial finden Sie im Abschnitt Zubehör 4 Sichern S...

Page 9: ...dazu über 3 polige XLR Anschlüsse 1 Verbinden Sie den Ausgang Ihres Controllers mit dem DMX Eingang DMX IN des Lichtsets über ein DMX Kabel 2 Verbinden Sie den DMX Ausgang DMX OUT des Geräts mit dem DMX Eingang des nächsten Geräts in der Kette Verbinden Sie immer einen Ausgang mit dem Eingang des nächsten Geräts bis alle Geräte angeschlossen sind 3 Am letzten Gerät muss die DMX Leitung durch einen...

Page 10: ...ER OUT können weitere Geräte mit Strom versorgt werden Zum Zusammenschalten der Geräte verbinden Sie immer den Ausgang POWER OUT mit dem Eingang POWER IN des nächsten Geräts bis alle Geräte angeschlossen sind Passende Netzkabel sind optional erhältlich Auf diese Weise lassen sich bis zu 8 Geräte bei 230 240 Volt Netzspannung und bis zu 4 Geräte bei 110 115 Volt Netzspannung zusammenschalten BEDIEN...

Page 11: ...llungen Im Modus Stat strahlt das Gerät konstant in einer von 19 vorgegebenen Farben 1 Drücken Sie die Taste MENU so oft bis das Display die Betriebsart Stat anzeigt Bestätigen Sie mit der Taste ENTER 2 Wählen Sie mit den Tasten UP und DOWN die gewünschte Farbe S01 S19 Bestätigen Sie mit der Taste ENTER Automatikbetrieb Im Automatikbetrieb stehen 4 verschiedene Showprogramme zur Verfügung die mit ...

Page 12: ... der Taste ENTER Jetzt kann die Grundfarbe Grün eingestellt werden danach Blau und Weiß Gesamthelligkeit Im Menu diMM lässt sich die Gesamthelligkeit für die Standalone Betriebsarten Stat Auto Soun und Colo einstellen 1 Drücken Sie die Taste MENU so oft bis das Display diMM anzeigt Bestätigen Sie mit der Taste ENTER 2 Wählen Sie mit den Tasten UP und DOWN die gewünschte Helligkeit dI 01 dunkel dI ...

Page 13: ...ANUAL Farbmodus Farben wählen mit R G B W sowie 1 9 Gesamthelligkeit 1 dunkel 9 hell Hinweise Die Fernbedienung wird mit eingesetzter Batterie geliefert Damit die Batterie während der Lagerung nicht entladen werden kann befindet sich eine Isolierfolie zwischen der Batterie und den Batteriekontakten Ziehen Sie vor dem ersten Betrieb die Folie auf der Rückseite der Fernbedienung aus dem Batteriehalt...

Page 14: ...ie DMX Startadresse wird aufgerufen d Stellen die Adresse mit den Tasten UP und DOWN ein Bestätigen Sie mit der Taste ENTER 4 Beim Empfang von DMX Steuersignalen blinkt das Display nicht Fehlen die Steuersignale blinkt das Display Hinweis Bitte vergewissern Sie sich dass sich die Steuerkanäle nicht mit anderen Geräten überlappen damit das Gerät korrekt und unabhängig von anderen Geräten in der DMX...

Page 15: ...steuertes Programm 2 190 219 Musikgesteuertes Programm 3 220 255 Musikgesteuertes Programm 4 7 Kanal Modus Kanal Wert Funktion 1 Dimmer 000 255 Zunehmende Helligkeit 0 100 2 Strobe Effekt 000 009 Keine Funktion 010 255 Strobe mit zunehmender Geschwindigkeit 0 100 3 6 Spot 1 4 Farbvoreinstellungen jeder Spot kann separat gesteuert werden 000 009 Keine Funktion 010 019 Rot 020 029 Grün 030 039 Blau ...

Page 16: ... 255 Grün 0 100 7 000 255 Blau 0 100 8 000 255 Weiß 0 100 9 000 255 Rot 0 100 Spot 3 10 000 255 Grün 0 100 11 000 255 Blau 0 100 12 000 255 Weiß 0 100 13 000 255 Rot 0 100 Spot 4 14 000 255 Grün 0 100 15 000 255 Blau 0 100 16 000 255 Weiß 0 100 19 Kanal Modus Kanal Wert Funktion 1 Dimmer 000 255 Zunehmende Helligkeit 0 100 2 Strobe Effekt 000 009 Keine Funktion 010 255 Strobe mit zunehmender Gesch...

Page 17: ...mal Ersatzteile benötigt werden verwenden Sie bitte nur Originalersatzteile Sollten Sie noch weitere Fragen haben wenden Sie sich bitte an Ihren Fachhändler Sicherungswechsel Wenn die Feinsicherung des Geräts defekt ist ersetzen Sie diese durch eine Sicherung gleichen Typs 1 Trennen Sie das Gerät vom Netz und lassen Sie es abkühlen 2 Öffnen Sie den Sicherungshalter am Netzanschluss mit einem passe...

Page 18: ...ne Farbmischung Blitzrate 0 20 Hz DMX Kanäle 4 7 16 19 DMX Eingang 3 pol XLR M Einbauversion DMX Ausgang 3 pol XLR W Einbauversion Lüfter Ohne da konvektionsgekühlt Ansteuerung IR Fernbedienung Stand alone DMX QuickDMX optional Master Slave Funktion Musiksteuerung über Mikrofon Im EASY SHOW vorprogrammiert Abstrahlwinkel 1 2 Peak 18 Abstrahlwinkel 1 10 Peak 34 Gehäusefarbe Schwarz Breite 61 6 cm H...

Page 19: ...EU Boxenhochständer Best Nr 60004160 EUROLITE DMX Kabel XLR 3pol 3m sw Best Nr 3022785H PSSO DMX Kabel XLR 3pol 3m sw Neutrik Best Nr 30227810 EUROLITE IR 7 Fernbedienung Best Nr 50530561 EUROLITE QuickDMX USB Funksender Empfänger Best Nr 70064704 Tasche LED KLS 180 Best Nr E6509704 Technische Änderungen ohne vorherige Ankündigung und Irrtum vorbehalten 04 03 2020 ...

Page 20: ...with integrated DMX control unit and stand sleeve Ultra light ideally suited for mobile use Ideal for bands stages or solo entertainers Suited for installation on a speaker stand not included or truss Comes pre assembled with practical transport bag 4 powerful 4in1 LEDs per spot provide for an exquisite RGBW color mix Movable and tiltable spotlights Via DMX each spot can be individually controlled...

Page 21: ... the device quickly if need be Never touch the mains plug with wet or damp hands There is the risk of potentially fatal electric shock The mains cable must not be bent or squeezed Keep it away from hot surfaces or sharp edges Never pull the mains cable to disconnect the mains plug from the mains outlet always seize the plug Unplug the device during lightning storms when unused for long periods of ...

Page 22: ...ecure the device with a secondary safety attachment such as a safety bond or safety net Make sure that the area below the installation place is blocked when rigging derigging or servicing the device For commercial use the country specific accident prevention regulations of the government safety organization for electrical facilities must be complied with at all times Caution material damage This d...

Page 23: ...ntrol 4 Mounting bracket Fixation screws 5 Fixation screws 6 Stand sleeve with fixation screw 7 Spots with RGBW LEDs Rear 8 Microphone 9 Display with programming buttons 10 DMX input 11 DMX output 12 USB port for QuickDMX wireless receiver 13 Power output 14 Fuseholder 15 Power input 16 Attachment eyelet 2 3 4 5 6 7 1 1 8 9 10 12 13 14 15 16 11 ...

Page 24: ...ust support at least 10 times the weight of all fixtures to be installed on it 2 Block access below the work area and work from a stable platform when installing the device 3 Use rigging hardware that is compatible with the structure and capable of bearing the weight of the device Please refer to the Accessories section for a list of suitable rigging hardware 4 Secure the device with a safety bond...

Page 25: ...light set to the DMX input of the next unit in the chain Always connect one output to the input of the next unit until all units are connected 3 At the last unit the DMX cable has to be terminated Plug the terminator with a 120 Ω resistor between Signal and Signal in the DMX output of the last unit 4 If the cable length exceeds 300 m or the number of DMX devices is greater than 32 it is recommende...

Page 26: ... In this manner up to 8 devices can be linked at 230 240 input voltage and up to 4 devices at 110 115 input voltage OPERATION After connecting the device to the mains it is ready for operation The display indicates the last operating mode The operating modes can be selected by means of the display and the control buttons All settings remain stored even if the device is disconnected from the mains ...

Page 27: ...SILE on LEDs off if there is no music signal oFF LEDs remain on if there is no music signal Slave mode SLAV SLAU Slave mode IR remote control InFr on IR remote control on oFF IR remote control off Stand alone mode Preset colors In the Stat mode the device will constantly emit one of 19 preset colors 1 Press the MENU button so many times until Stat is indicated in the display Confirm with the ENTER...

Page 28: ...h the ENTER button 2 Now the display indicates the letter r for the color red and the corresponding intensity value Use the buttons UP and DOWN to adjust the desired value 3 Confirm with the ENTER button Now the color green can be adjusted then blue and white Total brightness Menu point diMM allows the adjustment of the total brightness for all stand alone operating modes Stat Auto Soun Colo 1 Pre...

Page 29: ...e right and at the same time remove the battery support For operation one 3 V button cell type CR 2025 is required When inserting pay attention that the positive pole of the button cell shows upwards in the support Remove the battery from the remote control as a precaution if the device is not used for a longer period of time DMX operation Setting the number of DMX channels and the DMX starting ad...

Page 30: ...Master dimmer 000 255 Increasing brightness 0 100 2 Strobe effect 000 009 No function 010 255 Strobe with increasing speed 0 100 3 Preset color Color Presets each spot can be controlled individually 000 009 No function 010 019 Red 020 029 Green 030 039 Blue 040 049 White 050 059 Yellow 060 069 Magenta 070 079 Cyan 080 089 Dark orange 090 099 Green yellow 100 109 Salmon 110 119 Turquoise 120 129 Li...

Page 31: ...d individually 000 009 No function 010 019 Red 020 029 Green 030 039 Blue 040 049 White 050 059 Yellow 060 069 Magenta 070 079 Cyan 080 089 Dark orange 090 099 Green yellow 100 109 Salmon 110 119 Turquoise 120 129 Light green 130 139 Orange 140 149 Straw 150 159 Lavender 160 169 Light blue 170 179 Dark blue 180 189 Pink 190 255 All on 7 Auto and Sound program 000 009 No function 010 039 Auto progr...

Page 32: ...0 100 2 Strobe effect 000 009 No function 010 255 Strobe with increasing speed 0 100 3 000 255 Red 0 100 Spot 1 4 000 255 Green 0 100 5 000 255 Blue 0 100 6 000 255 White 0 100 7 000 255 Red 0 100 Spot 2 8 000 255 Green 0 100 9 000 255 Blue 0 100 10 000 255 White 0 100 11 000 255 Red 0 100 Spot 3 12 000 255 Green 0 100 13 000 255 Blue 0 100 14 000 255 White 0 100 15 000 255 Red 0 100 Spot 4 16 000...

Page 33: ...use by a fuse of same type and rating 1 Disconnect the device from power and allow it to cool 2 Open the fuse holder of the mains connection with a fitting screwdriver 3 Remove the old fuse from the fuse holder and replace it with a new fuse 4 Carefully push the fuse holder back into its position before reapplying power PROTECTING THE ENVIRONMENT Disposal of old equipment When to be definitively p...

Page 34: ...ogenous color mix Flash rate 0 20 Hz DMX channels 4 7 16 19 DMX input 3 pin XLR M mounting version DMX output 3 pin XLR F mounting version Cooling fan No cooling by convection Control IR remote control Stand alone DMX QuickDMX optional Master slave function Sound to light via Microphone Pre programmed in EASY SHOW Beam angle 1 2 peak 18 Beam angle 1 10 peak 34 Housing color Black Width 61 6 cm Hei...

Page 35: ...MNITRONIC BS 1 EU Loudspeaker Stand No 60004160 EUROLITE DMX cable XLR 3pin 3m bk No 3022785H PSSO DMX cable XLR 3pin 3m bk Neutrik No 30227810 EUROLITE IR 7 Remote Control No 50530561 EUROLITE QuickDMX USB Wireless Transmitter Receiver No 70064704 Bag LED KLS 180 No E6509704 All information is subject to change without prior notice 04 03 2020 ...

Page 36: ...Eurolite is a brand of Steinigke Showtechnic GmbH Andreas Bauer Str 5 97297 Waldbüttelbrunn Germany D00126056 Version 1 0 Publ 04 03 2020 ...

Reviews: