background image

00071186.DOC, Version 1.0

25/28

Master / Slave-operation

The master/slave-operation enables that several devices can be synchronized and controlled by one master-
device.

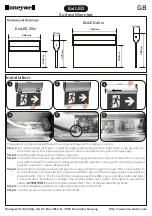
On the rear of the Audience Blinder 4x50W LED COB 3200K you can find an XLR-jack (DMX Out) and an
XLR-plug (DMX In), which can be used for connecting several devices.

Choose the device which is to control the spotlights. Set the desired Master-mode on the master-device.
This device then works as master-device and controls all other slave-devices, which are to be connected to
the master-device via a balanced microphone lead. Connect the DMX out connectors with the DMX input
plug of the next device.

Set the Slave-mode on every slave-device.

DMX-controlled operation

The device has 5 DMX channel modes. The Control Board allows you, as described above, to assign the
DMX-Mode.

You can control the devices individually via your DMX-controller. Every DMX-channel has a different
occupation with different features.

The Control Board allows you to assign the DMX fixture address, which is defined as the first channel from
which the Audience Blinder 4x50W LED COB 3200K will respond to the controller.

Please, be sure that you don’t have any overlapping channels in order to control each Audience Blinder
4x50W LED COB 3200K correctly and independently from any other fixture on the DMX-chain. If several
Audience Blinder 4x50W LED COB 3200K are addressed similarly, they will work synchronically.
If you set in the 7 channel mode, for example, the address to channel 8, the device will use the channel 8 to
14 for control.

Controlling:

After having addressed the Audience Blinder 4x50W LED COB 3200K , you may now start operating it via
your lighting controller.

Note: 

It’s necessary to insert the XLR termination plug (with 120 Ohm) in the last lighting in the link in order

to ensure proper transmission on the DMX data link.

DMX-protocol

DMX mode:

Press the MODE button until the display shows DMX MODE.
Press the ENTER button. You can select the desired DMX
address via the UP or DOWN buttons.

6 channel mode (default setting)

Control-channel 1 - Dimmer LED 1 (left)

Decimal Hexad. Percentage

S/F

Feature

0 255

00 FF

0% 100%

F

Gradual adjustment of the dimmer intensity from 0 to 100 %

Control-channel 2 - Dimmer LED 2 (right)

Decimal Hexad. Percentage

S/F

Feature

0 255

00 FF

0% 100%

F

Gradual adjustment of the dimmer intensity from 0 to 100 %

DMX MODE

ADDR:001-512  CH: 07/06/04/02/01

Summary of Contents for Audience Blinder 4x50W LED COB 3200K

Page 1: ...Copyright Nachdruck verboten Reproduction prohibited F r weiteren Gebrauch aufbewahren Keep this manual for future needs BEDIENUNGSANLEITUNG USER MANUAL Audience Blinder 4x50W LED COB 3200K...

Page 2: ...16 SAFETY INSTRUCTIONS 16 OPERATING DETERMINATIONS 18 DESCRIPTION 19 Features 19 Overview 19 INSTALLATION 20 Overhead rigging 20 Connection with the mains 21 DMX 512 connection connection between fixt...

Page 3: ...n EINF HRUNG Wir freuen uns dass Sie sich f r einen EUROLITE Audience Blinder 4x50W LED COB 3200K entschieden haben Wenn Sie nachfolgende Hinweise beachten sind wir sicher dass Sie lange Zeit Freude a...

Page 4: ...s sichergestellt werden dass der Adernquerschnitt f r die ben tigte Stromzufuhr des Ger tes zugelassen ist Alle Warnhinweise f r die Netzleitung gelten auch f r evtl Verl ngerungsleitungen Ger t bei N...

Page 5: ...N betrieben werden Verwenden Sie das Ger t nicht bei Gewitter berspannung k nnte das Ger t zerst ren Das Ger t bei Gewitter allpolig vom Netz trennen Netzstecker ziehen Das Bildzeichen m bezeichnet de...

Page 6: ...Stabiles und formsch nes Geh use Komfortable Adressierung und Einstellung ber Steuereinheit mit LCD Anzeige und 4 Bedientasten Arretierm glichkeit am Halteb gel Netzanschluss ber Neutrik PowerCon Buch...

Page 7: ...n Sachkundigen gepr ft werden Vorgehensweise Das Ger t sollte idealerweise au erhalb des Aufenthaltsbereiches von Personen installiert werden WICHTIG BERKOPFMONTAGE ERFORDERT EIN HOHES MA AN ERFAHRUNG...

Page 8: ...ngeb gel ein und ziehen Sie die Feststellschrauben gut fest LEBENSGEFAHR Vor der ersten Inbetriebnahme muss die Einrichtung durch einen Sachverst ndigen gepr ft werden Anschluss ans Netz Schlie en Si...

Page 9: ...el verwendet werden Aufbau einer seriellen DMX Kette Schlie en Sie den DMX Ausgang des ersten Ger tes der Kette an den DMX Eingang des n chsten Ger tes an Verbinden Sie immer einen Ausgang mit dem Ein...

Page 10: ...Taste um jeweils die Helligkeit und Strobe Geschwindigkeit zu w hlen ber die UP DOWN Taste stellen Sie die gew nschte Helligkeit C1 4 00 99 C1 LED1 C2 LED2 oder Strobe Geschwindigkeit F00 99 ein Auto...

Page 11: ...die UP oder DOWN Taste k nnen Sie den gew nschten Wert von 00 bis 99 zunehmend eingeben Chaser Ein Chaser ist eine Aneinanderreihung von verschiedenen Steps die nacheinander in einer Schleife abgespi...

Page 12: ...Belegung mit verschiedenen Eigenschaften ber das Control Board k nnen Sie die DMX Startadresse definieren Die Startadresse ist der erste Kanal auf den das Ger t auf Signale vom Controller reagiert Bit...

Page 13: ...Ansprechverhalten Halogenlampe 46 75 2E 4B 18 29 S Exponentiale Dimmerkurve Ansprechverhalten Halogenlampe 76 105 4C 69 30 41 S Umgekehrt exponentiale Dimmerkurve Ansprechverhalten Halogenlampe 106 1...

Page 14: ...9 68 Flow 2 175 199 AF C7 69 78 Flow 3 200 255 C8 FF 78 100 Keine Funktion Ge schwin digkeit 0 255 zu nehmend Flash 0 255 zunehmend REINIGUNG UND WARTUNG Der Unternehmer hat daf r zu sorgen dass siche...

Page 15: ...Schritt 1 Drehen Sie den Sicherungshalter mit einem passenden Schraubendreher aus dem Geh use gegen den Uhrzeigersinn Schritt 2 Entfernen Sie die defekte Sicherung aus dem Sicherungshalter Schritt 3 S...

Page 16: ...the Internet INTRODUCTION Thank you for having chosen a EUROLITE Audience Blinder 4x50W LED COB 3200K If you follow the instructions given in this manual we are sure that you will enjoy this device fo...

Page 17: ...rom time to time If extension cords are used make sure that the core diameter is sufficient for the required power consumption of the device All warnings concerning the power cords are also valid for...

Page 18: ...evice must only be operated in an altitude between 20 and 2000 m over NN Never use the device during thunderstorms Over voltage could destroy the device Always disconnect the device during thunderstor...

Page 19: ...ousing and an appealing design Comfortable addressing and setting via control panel with LC display and four operating buttons Locking possibility at the mounting bracket Power connection via Neutrik...

Page 20: ...year Procedure The device should be installed outside areas where persons may walk by or be seated IMPORTANT OVERHEAD RIGGING REQUIRES EXTENSIVE EXPERIENCE including but not limited to calculating wor...

Page 21: ...tion with the mains Connect the device to the mains with the enclosed power supply cable The occupation of the connection cables is as follows Cable Pin International Brown Live L Blue Neutral N Yello...

Page 22: ...puts you need to use adapter cables Building a serial DMX chain Connect the DMX output of the first fixture in the DMX chain with the DMX input of the next fixture Always connect one output with the i...

Page 23: ...y shows DIMMER Press the ENTER button to select brightness and flash settings respectively You can select the desired brightness C1 4 00 99 C1 LED1 and C2 LED2 or Flash speed F00 99 via the UP or DOWN...

Page 24: ...or DOWN button Press the ENTER button to select the flash setting respectively You can select the desired value from 00 to 99 increasing via the UP or DOWN button Chaser A chaser is a sequence of diff...

Page 25: ...x50W LED COB 3200K will respond to the controller Please be sure that you don t have any overlapping channels in order to control each Audience Blinder 4x50W LED COB 3200K correctly and independently...

Page 26: ...lamp 76 105 4C 69 30 41 S Inverse square dimmer curve response characteristics of halogen lamp 106 135 6A 87 42 53 S S shaped dimmer curve response characteristics of halogen lamp 136 165 88 A5 53 65...

Page 27: ...7D 95 49 58 Flow 1 150 174 96 AE 59 68 Flow 2 175 199 AF C7 69 78 Flow 3 200 255 C8 FF 78 100 No function Speed 0 255 increasing Flash 0 255 increasing CLEANING AND MAINTENANCE The operator has to mak...

Page 28: ...1 Unscrew the fuseholder with a fitting screwdriver from the housing anti clockwise Step 2 Remove the old fuse from the fuseholder Step 3 Install the new fuse in the fuseholder Step 4 Replace the fuse...

Reviews: