Instruction Manual
EVC-TP-IE358BN3
www.eurovideo-cctv.com
6
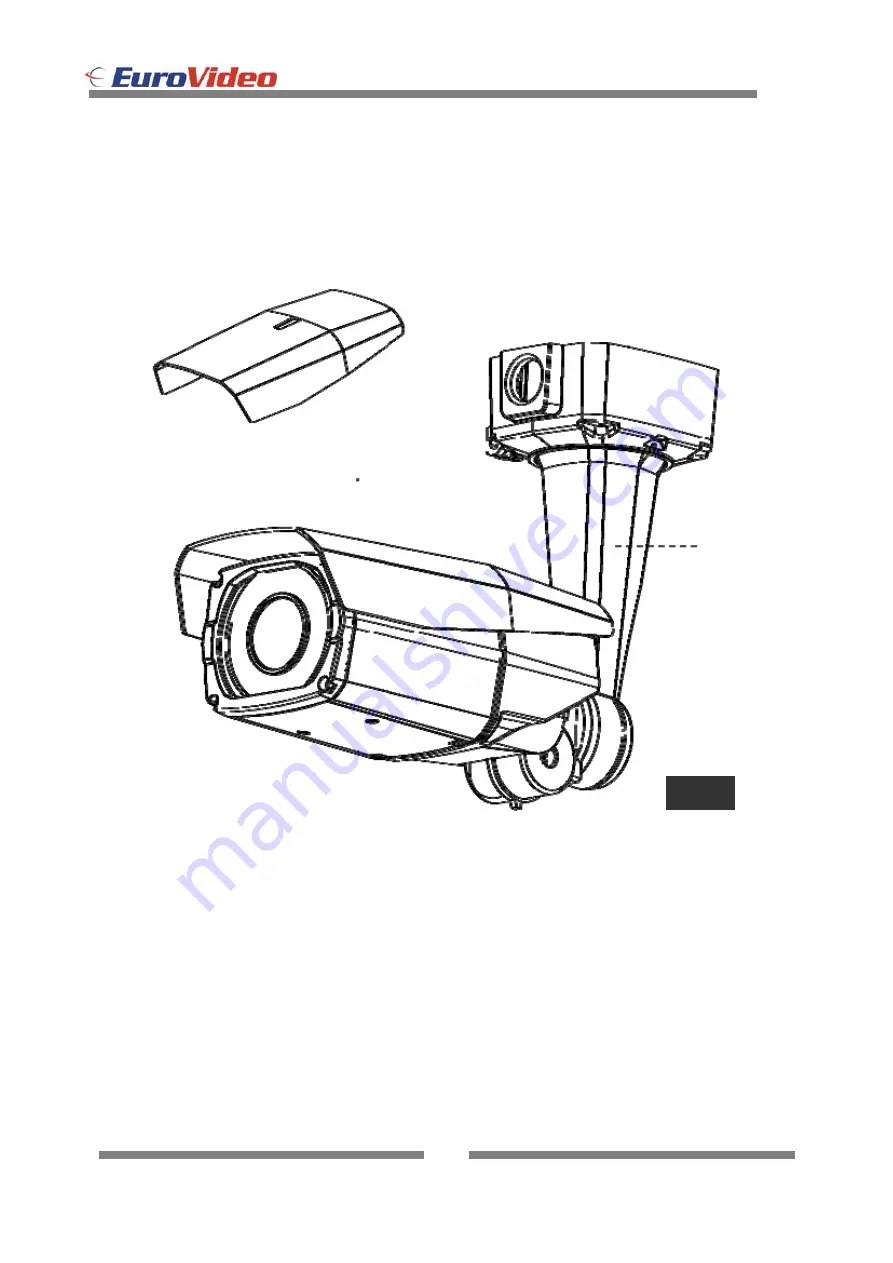
A . OUTER PART
1. Sunvisor 2. Camera Body 3.
Bottom (function part
)
4.
Bracket
5. Bracket mount
6. Set Screw groove for Sunvisor
NAME OF EACH PART
FIG 1
④
③
②
⑤
Page 1: ...EVC TP IE358BN3 Ver 1 1 Weather Proof Camera Instruction Manual Weather Proof Camera ...
Page 2: ... TP IE358BN3 www eurovideo cctv com 2 Warnings Caution 3 What s in the Box 4 General Features 5 Name of Each Part 6 Installation 8 Connection 9 Specifications 10 OSD Menu Setting 11 Dimensions 22 Troubleshooting 23 CONTENTS ...
Page 3: ...roduct incorrectly death or serious injury may occur The unit should be installed by the trained Personnel Switch off immediately if the product emits smoke or abnormal heat Never install the product in area exposed to oil or gas Never touch the power cord with wet hands Clean only with dry cloth Ensure that the product is not subjected to strong impacts and vibration Never expose the camera to di...
Page 4: ...k of electric shock to persons This symbol is intended to alert the user to the presence of important operating and maintenance servicing instructions in the literature accompanying the appliance WARNINGS CAUTION CAUTION RISK OF ELECTRIC SHOCK DO NOT OPEN CAUTION TO REDUCE THE RISK OF ELECTRIC SHOCK DO NOT REMOVE COVER OR BACK NO USER SERVICEABLE PARTS INSIDE REFER SERVICING TO QUALIFIED SERVICE P...
Page 5: ... camera or a faint movement to produce more stable pictures z Motion Detection 8Zone Alarm output Since the camera detects motion and generates signals without any additional external sensors you can monitor more efficiently by connecting an alarm device z Providing better compressibility times than ICR type z Providing best illumination every corner of the screen z Privacy Masking Zone You can ea...
Page 6: ...Instruction Manual EVC TP IE358BN3 www eurovideo cctv com 6 A OUTER PART 1 Sunvisor 2 Camera Body 3 Bottom function part 4 Bracket 5 Bracket mount 6 Set Screw groove for Sunvisor NAME OF EACH PART FIG 1 ...
Page 7: ...N PART Function 1 Extra Video Out CVBS Output 2 IR LED ON OFF IR LED is use not use LED L H LOW HIGH IR LED Illumination LOW HIGH LED T W ON OFF SLC Smart LED Control is ON OFF NAME OF EACH PART z Note When you use LED T W Function you should set LED T W mode as ON FIG 2 ...
Page 8: ...l you need to make 8mm diameter 4 holes by drill like fig 3 Depth 37mm b Install SET Calblock on the holes c To install Wall or Ceiling Bracket Tip select a ceiling board strong enough to gold 4times the total weight of the camera Weight combined camera approx 2 4kg d Assemble a wall or ceiling mount bracket INSTALLATION ...
Page 9: ...Instruction Manual EVC TP IE358BN3 www eurovideo cctv com 9 1 Terminal Block Accessory 2 TC 0018_DC Jack Accessory 3 Adaptor DC12V AC24V 4 Video Output CVBS CONNECTION Adaptor Monitor FIG 4 ...
Page 10: ...Selectable Sense up Auto Fixed Off selectable Limit x2 x256 DNR On Off 1 32 Level Adjustable Privacy On Off 8Zone Mirror On Off H Rev V Rev Sharpness On Off Level Adjustable White Balance ATW AWC Manual Outdoor 1800 K 10 500 K Indoor 4500 K 8500 K C Video Output VBS 1 oVp p 75ohm Video 0 7Vp p Sync 0 3Vp p Burst 0 3Vp p Current DC12V 800mA 9 6W With heater DC12V 1 35A 17W AC24V 700mA 17W With heat...
Page 11: ...NDOOR OUTDOOR AWC ATW MANUAL BACKLIGHT OFF BLC TOP BOTTOM LEFT RIGHT LEVEL HLC MASK COLOR Level selectable OFF DNR ON ON LIMIT 1 32 Level Selectable OFF DAY NIGHT EXTERN COLOR BW AUTO EXTERNAL DWELL TIME 5 60 SEC DURATION TIME SLOW FAST IMAGE FREESE Z REV H REV DZOOM SHARPNESS RETURN SPECIAL CAM TITLE SYNC MOTION DET PRIVACY DIS COMM ADJ LANGUAGE RESET RETURN EXIT Saves all the setup Menu and then...
Page 12: ...Selectable FILL SET RETURN PRIVACY OFF AREA SEL AREA1 8 AREA MODE TOP BOTTOM LEFT RIGHT MASK COLOR GREEN RED BLUE BLACK WHITE GRAY TRANSP Level Selectable RETURN DIS OFF OFF ON COM ADJ CAM ID ID Selectable BAUD RATE 2400 4800 9600 19200 38400 57600 PARITY 8 N 1 RET PKT ENABLE DISP CAM ID OFF LANGUAGE ENGLISH NTSC ENGLISH KOREAN SPANISH JAPANESE FRENCH PAL ENGLISH FRENCH GERMAN SPANISH ITALIAN CHIN...
Page 13: ...You can open Brightness DC Level Menu By operating Menu Key and control the Brightness by Operating Left Right Key B EXPOSURE 1 You can open Exposure Menu on Exposure of Main Menu by Operating Menu Set key 2 You can select or deselect Flickerless Function on Shutter Menu Note When set as FLK SENS UP Function is automatically deselected 3 You can select Low High or Off on AGC Menu by operating Left...
Page 14: ...akes optimum color depending on surrounding illumination and circumstance 2 You can select MANUAL ATW AWC SET or OUTDOOR INDOOR on White Bal menu by operating Left Right key 3 You can control Manual White Balance level on Manual Mode by operating Left Right Key D BACK LIGHT Back Light Compensation 1 You can open BLC Menu by operating Menu Set Key when BLC Mode is ON OSD Menu 2 You can setup BLC Ar...
Page 15: ...g Left Right Key You can open HLC SETUP Menu by operating Menu Key and control the MASK COLOR by operating Left Right Key F DNR Digital Noise Reduction 1 DNR is function that digitally reduces Noise in low illumination Circumstance Note When Video Data alteration is large it may affect the resolution 2 After set as ON on DNR Menu by operating Left Right Key you can open SDNR menu by operating Menu...
Page 16: ...rating Left Right Key 3 When set as Auto Mode it changes to color or B W based on AGC Activity status as it gets dark 4 You can open Extern setup Menu on Extern Auto Mode by operating Menu Key and can change Dwell Time Day Night Night Day by Left Right Key H IMAGE ADJ 1 FREEZE is a function that displays as freeze frame of a screen you want to play You can set as ON 2 V REV H REV is a Digital Flip...
Page 17: ... SHARPNESS is a function that controls the sharpness of screen image You can open internal Menu by Operating Menu SET Key and Control the Level by Operating Left Right Key I SPECIAL 1 You can open internal Menu on SPECIAL MENU by operating Menu Set Key I 1 CAM TITLE 1 CAM TITLE is a function that sets and display a title of CAMERA You can open Title Setup by operating Menu key when CAM TITLE is ON...
Page 18: ...sits on pos 2 You can change ID Display Position by operating Left Right Up or Down Key and move back to Title Setup Menu by operating Menu key 3 You can set the Title with Alphabet and number and move back to Main Menu by operating END Key I 3 SYNC 1 SYNC is a function that displays SYNC System of current Camera Unchanging OSD Menu Setting ...
Page 19: ...N 3 You can individually set 8 Areas in total and change L_TOP BOTTOM or R_TOP BOTTOM by operating Left Right Key on SEL POS per Area 4 After Changing Y POS X POS when operate Fill Set Key Motion Detection function becomes active for the Area I 5 PRIVACY 1 PRIVACY is a Privacy Protection function that makes certain areas set by user to be masked 2 You can open the Menu by Operating Menu Set Key wh...
Page 20: ...ANSP Transparency I 6 DIS Digital Image Stabilization 1 DIS is the function that is able to revise an shaking image You can set as ON OFF by operating Left Right Key I 7 COMM ADJ 1 COMM ADJ is a function to setup when you want Camera to communicate with the outside Note the function is disabled when camera doesn t have IP support OSD Menu Setting ...
Page 21: ...w eurovideo cctv com 21 I 8 LANGUAGE 1 You can change Display Laguage on Language of function Menu by operating Left Right Key 2 Language Support NTSC English French Korean Spanish Japanese PAL English French German Spanish Italian Chines ...
Page 22: ...BN3 www eurovideo cctv com 22 I 9 RESET 1 You can initiate all the setups on OSD Menu 2 Move to LOAD DEFAULT Mode on Reset of Function Menu by operating Menu Set Key 3 You can select Yes No by Operating Menu Set Key OSD Menu Setting ...
Page 23: ...Instruction Manual EVC TP IE358BN3 www eurovideo cctv com 23 DIMENSIONS ...
Page 24: ...Sun or fluorescent lamp Check if the connector of Auto Iris Lens is connected correctly when using Unclear Screen Check if the Lens gets dirty You can wipe out with clean fabric or brush Check if the monitor is in a condition as following If light is coming inside too much You can change the angle of Camera or you can adjust back focus No Operation of Color Auto Mode Check if you set Color mode EX...