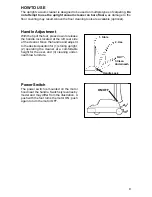
Eureka C2132B - Home Care Commercial Upright Vacuum Owner'S Manual Download Page 11

EZ Kleen

® 

Dust Cup and Bag

The cloth bag and the dust cup play a very important role in the efficiency of the
vacuum cleaner.  The cloth bag allows air to move through the cleaner while it traps
dirt inside the cloth bag and the dust cup.  When dirt particles cling to the cloth bag
they can restrict airflow,  If air cannot pass through the cloth bag, no cleaning can take
place regardless of how powerful the unit.  Some fine particles can restrict airflow very
quickly and will decrease performance even before the dust cup appears to be full.
For that reason, when vacuuming powder, flour dust, or similar fine substances, it may
be necessary to turn off the cleaner and empty the dust cup more often.
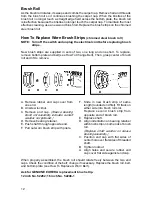
NOTE: Turn off the switch and unplug the electrical cord before emptying the

dust cup.  Never operate the vacuum cleaner without the dust cup latched
in place.

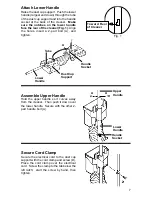
1. Unhook the clip from the top of the

cloth bag.

2. Shake the cloth bag to release dust

clinging inside.

3. Release each latch, one on either side

of the handle (push down on the lock,
lift up on the bottom and pull the top
forward.)

NOTE: Keep the latch free of dust

or obstructions that would
prevent it from locking
securely.

4. Lift the lid;  swing it up and outward.

5. Reach in, grasp the dust cup and pull

it out of the support.

6. Empty contents in a suitable container.

(If desired, the cup can be washed in
warm water using a mild soap solu-
tion.  Be sure the cup is completely dry
before replacing.)

7. Place the cup into the support, swing

the lid shut, and fasten each latch.

8. Hook clip to top of bag (refer to item

1).

3. Release

Latch

1. Unhook

Lock

                Push

  Down

11

4. Lift
    Lid

     Lift
     Up

7. Replace

Cup
and
Swing
Lid
Shut

5.Remove

Cup

6.Empty

Cup

2. Shake
    Bag

Summary of Contents for C2132B - Home Care Commercial Upright Vacuum

Page 1: ...tant Safeguards 2 General Information 6 Assembly 6 8 Use 9 EZ Kleen Dust Bag 11 Brush Roll 12 Brush Roll Belt 13 Headlight 14 Warranty 15 For location of nearest Eureka Warranty Station or service inf...

Page 2: ...a properly grounded outlet only refer to Grounding Instructions Do not use extension cords or outlets with inadequate current carrying capacity Turn off all controls before unplugging Do not unplug b...

Page 3: ...utlet installed by a qualified technician This appliance is for use on a nominal 120 volt circuit and has a grounding plug that looks like the plug illustrated in Figure A A temporary adapter which lo...

Page 4: ...ise la terre Ne pas utiliser des rallonges ou des prises qui n ont pas de capacit suffisante pour transporter le courant Fermer tous les contr les avant d brancher Ne pas d brancher en tirant sur le c...

Page 5: ...onsulter un lectricien ou un technicien d entretien qualifi si vous n tes pas certain que la prise est correctement mise la terre Ne pas modifier la fiche fournie avec l appareil si elle ne peut tre i...

Page 6: ...at any time The bearings are permanently lubricated and sealed HOW TO ASSEMBLE CAUTION Fully assemble the cleaner before using Assembly Packet The assembly packet contains two 2 part handle bolts 2 c...

Page 7: ...at the back of the cleaner Make sure the notches on the lower handle face the rear of the cleaner Fig 1 Align the holes insert a 2 part bolt A and tighten A A Dust Cup Support Tube Lower Handle Handl...

Page 8: ...ndle Pull up on the cord to tighten but leave enough slack near the base so the cord is not strained when the handle is lowered Attach Upper Cord Hook Pull the spring on the electrical cord upward tow...

Page 9: ...lease the handle lock located at the left rear side of the cleaner Move the handle and adjust it to the desired position for 1 storing upright 2 operating the cleaner at a comfortable height for the u...

Page 10: ...fficult to push follow the procedure and test the cleaner at the next higher setting Continue testing the setting until the cleaner is comfortable to move Moving the knob or slide to the next higher s...

Page 11: ...l cord before emptying the dust cup Never operate the vacuum cleaner without the dust cup latched in place 1 Unhook the clip from the top of the cloth bag 2 Shake the cloth bag to release dust clingin...

Page 12: ...n the two end caps Check the condition of the belt change if necessary Replace the brush roll belt and bottom plate see How To Replace A Worn Belt Ask for GENUINE EUREKA replacement brush strip 12 inc...

Page 13: ...nevenly How To Replace A Worn Belt NOTE Turn off the switch and unplug the electrical cord before replacing belt Belt pulleys can become hot during normal use To prevent burns avoid touching the belt...

Page 14: ...o one notch twist or pry the screwdriver to release the lens Repeat for the second notch on the opposite side Rotate the bulb socket forward Push bulb in and turn to remove Secure new bulb into socket...

Page 15: ...s bristle strips belts light bulbs hoses fans and impellers Damages or malfunctions caused by negligence abuse or use not in accordance with the Owner s Guide Defects or damages caused by unauthorized...

Page 16: ...ion When returning parts for repair please include the model type and serial numbers from the data plate on the cleaner FURTHER LIMITATIONS AND EXCLUSIONS Any warranty that may be implied in connectio...

Reviews: