background image

14

15

Method 2:

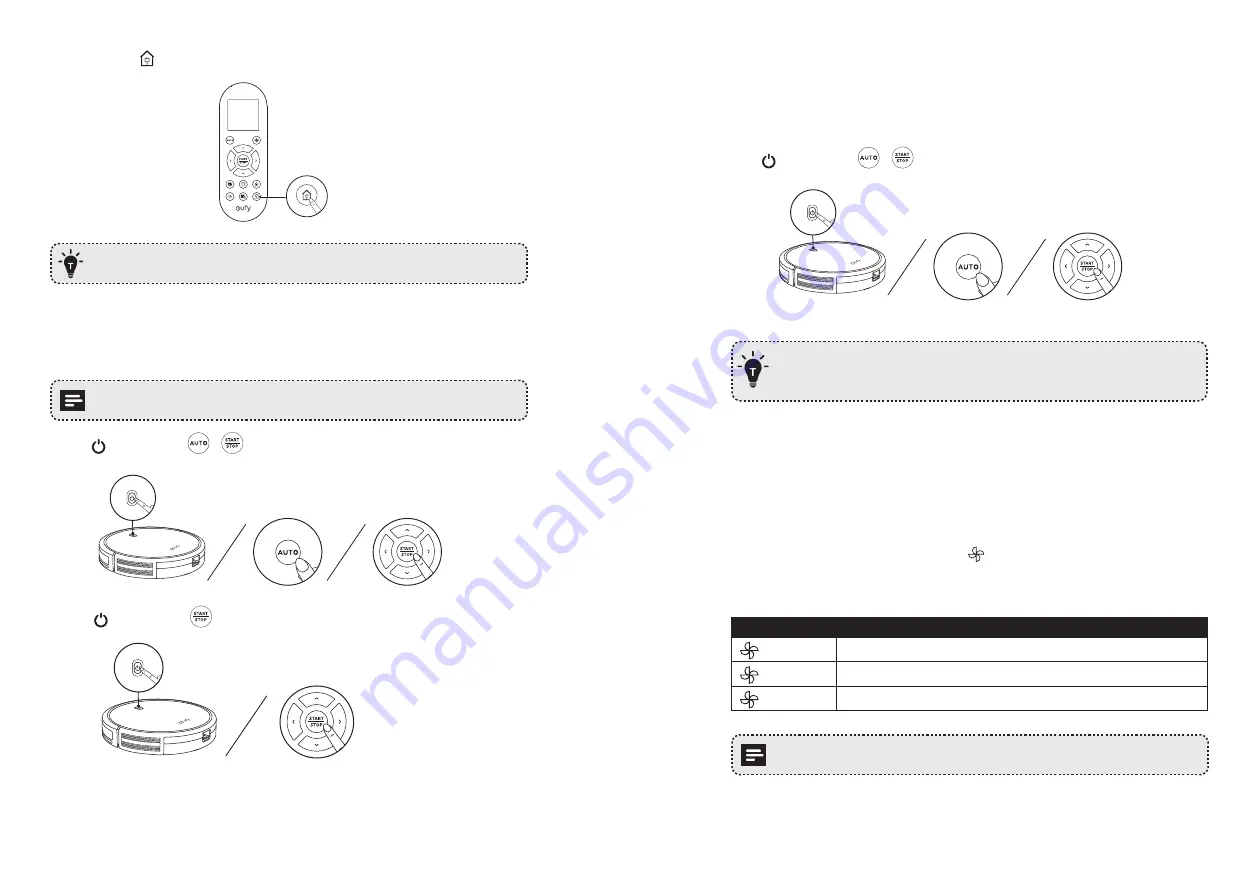
 Press   on the remote control to return RoboVac to the Charging Base. 

Turn off the main power switch if RoboVac will not be used for a long period of 

time. To preserve the battery’s lifespan, recharge at least once every 6 months. 

Start / Stop Cleaning 

Make sure the main power switch on the bottom of RoboVac is turned on before use.

1. Press   on RoboVac or 

 / 

 on the remote control to start cleaning in Auto Mode.

2. Press   on RoboVac or 

 on the remote control to stop cleaning.

Select a Cleaning Mode

1.  Auto cleaning 

RoboVac optimizes its cleaning path by selecting different cleaning modes automatically 

until cleaning is complete. This is the most commonly used cleaning mode.

Press   on RoboVac or 

 / 

 on the remote control to start cleaning in Auto Mode. 

- RoboVac will return to the Charging Base automatically when the battery level becomes 

low or when RoboVac finishes cleaning.

- By default, RoboVac starts in Auto cleaning mode when it is turned on.

BoostIQ™ Feature 

When the BoostIQ™ feature is enabled, RoboVac will automatically increase the suction 

power if it detects stronger power is needed to ensure the best clean. BoostIQ™ is ideal for 

cleaning thicker carpets and hard-to-sweep messes, which will reduce the total cleaning 

time, but increase the noise level. If the vacuuming noise caused by BoostIQ™ disturbs 

you, you can disable this feature. This feature only works in Auto and Single Room cleaning 

modes.
In Auto or Single Room cleaning mode, press   on the remote control repeatedly to adjust 

the suction power level. 

•  The corresponding icon is displayed on the remote control. 

Icon

Suction Power Level

Standard

Standard power 

BoostIQ

Automatically switches between Standard and Enhanced power (default)

Max

Maximum power

When RoboVac starts cleaning in Auto or Single Room mode the next time, it will 

clean according to the suction power level you previously selected.

Summary of Contents for RoboVac 11S

Page 1: ...Cleaning Owner s Manual RoboVac 11S T2108 www eufylife com For FAQs and more information please visit T2108 51005000959 V02...

Page 2: ...t a Cleaning Mode Set Time and Scheduled Cleaning 17 Cleaning and Maintenance Clean the Dust Collector and Filters Clean the Rolling Brush Clean the Side Brushes Replace the Side Brushes Clean the Sen...

Page 3: ...s device to pick up spills of bleach paint chemicals or anything wet Before using this device pick up objects like clothing and loose paper Lift up cords for blinds or curtains and move power cords an...

Page 4: ...onnements temp rature ambiante Ne nettoyer qu avec un chiffon imbib d eau Ne pas utiliser cet appareil pour ramasser quoi que ce soit qui br le ou fume Ne pas utiliser cet appareil pour nettoyer des f...

Page 5: ...leaning Tool Side Brushes x4 Charging Base Remote Control AAA Battery x2 RoboVac Anatomy Top Side Auto cleaning Start Stop button Bumper Dust collector release button Infrared sensor Dust collector Bo...

Page 6: ...nually Adjust the hour and minute Start Single Room cleaning Return RoboVac to Charging Base Schedule Auto cleaning start time Remote Control Display 6 1 2 3 4 5 7 8 9 10 Returning to Charging Base Au...

Page 7: ...sseled edges of area rugs underneath to prevent tangling RoboVac Avoid cleaning very dark colored high pile rugs or rugs thicker than 1 02 in 26 mm as they may cause RoboVac to malfunction c Keep Robo...

Page 8: ...When the Charging Base connects to AC power the LED indicator on the Charging Base is SOLID WHITE Install the Charging Base in a location that RoboVac can easily access It is recommended to place the...

Page 9: ...ecomes low or when RoboVac finishes cleaning By default RoboVac starts in Auto cleaning mode when it is turned on BoostIQ Feature When the BoostIQ feature is enabled RoboVac will automatically increas...

Page 10: ...Edge mode RoboVac will clean for 20 minutes and return to the Charging Base Press on the remote control to start cleaning in Edge mode 4 Single Room cleaning RoboVac intensively cleans one single roo...

Page 11: ...time Make sure the main power switch on the bottom of RoboVac is turned on Press on the remote control will blink on the display Press to set the hour and minute Note Make sure AM PM is set correctly...

Page 12: ...collector back into the main unit You can wash the dust collector pre filter and foam filter with water Be sure to air dry them thoroughly before reassembling Do not wash the high performance filter w...

Page 13: ...f time Follow the instructions below to replace them Pull off the old side brushes and snap the new ones into place Clean the Sensors and Charging Pins To maintain the best performance clean the drop...

Page 14: ...n RoboVac is in the vicinity of the Charging Base it will return more quickly However if the Charging Base is located far away RoboVac will need more time to return Please be patient as it works its w...

Page 15: ...pe DC 14 4 V Li ion 2600 mAh Dust Collector Capacity 0 6 L Cleaning Time Max 100 mins Charging Time 300 360 mins Input 19 V 0 6 A Output 19 V 0 6 A Customer Service EufyOfficial EufyOfficial EufyOffic...

Page 16: ......

Reviews: