Operating Instructions
Safety Relay ESM-BT4..
4
Subject to technical modifications; no r
esponsibility is accepted for the accuracy of this information.
© EUCHNER GmbH + Co. KG
2109074
-10
-08/22 V1.1.0 (translation of the original operating instructions)
Applications
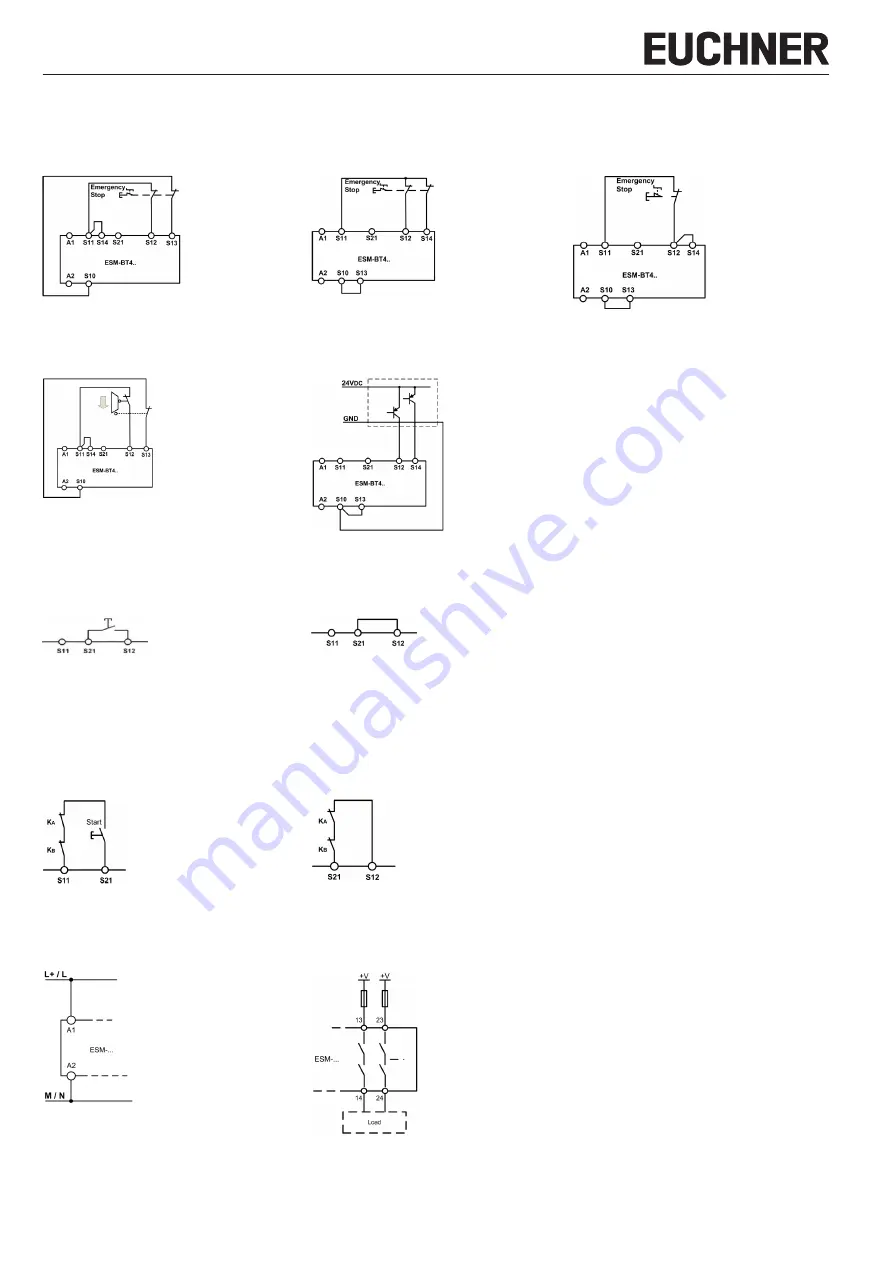
Depending on the application or the result of the risk assessment according to DIN EN ISO 13849-1, the device must be wired as shown in Fig. 5 to Fig. 15.
Non-time-delayed safety contacts can be used up to category 4, PL e, time-delayed safety contacts up to category 3, PL e.
Emergency stop circuit
Fig. 5: Dual-channel emergency stop circuit with
short circuit and ground fault monitoring
(category 4, up to PL e).
Fig. 6: Dual-channel emergency stop circuit with
ground fault monitoring (category 3, up
to PL d).
Fig. 7: Single-channel emergency stop circuit with
ground fault monitoring (category 1, up to
PL c).
Notice:
In order to activate earth fault monitoring, the PE
must be connected only to the power supply unit
according to EN 60204-1.
Wire the start circuit in accordance with the applica-
tion according to Bild 10 or Bild 11.
Fig. 8: Dual-channel sliding guard monitoring with
short circuit and ground fault monitoring
(category 4, up to PL e).
Fig. 9: Dual-channel emergency stop circuit with pnp
semiconductor outputs / OSSD outputs with
short circuit detection (category 4, up to PL e).
Starting behavior
Attention:
Safety contacts switch immediately when
the power supply is connected.
Fig. 10: Manual start.
Fig. 11: Automatic start (e.g. for applications with a
safety door). Max perm. delay during clos-
ing of the safety switches on S12 and S13:
S12 before S13: 300 ms
S13 before S12: any
Feedback loop
Fig. 12: Feedback loop with manual start. Monitor-
ing of externally connected contactors or
expansion modules.
Fig. 13: Feedback loop with automatic start. Mon-
itoring of externally connected contactors
or expansion modules.
Power supply and safety contacts
Fig. 14: Connection of the power supply to terminals
A1 and A2 (power supply according to the
technical data).
Fig. 15: Connection to switching loads on safety
contacts (example contact configuration.
Differing according to device type. Switching
voV corresponding to technical data).


