34
MAINTENANCE
1. The Crewson Brunner Automatic Slack Adjuster
should not require manual readjustment. If the maxi-
mum chamber stroke is within the range for the size
chamber used, the slack should not be manually read-
justed. If the chamber stroke exceeds the limit, and does
not adjust to within the specifications, either the brake
linings or the slack adjuster should be replaced. Apply
the brakes several times and watch for the hex to ro-
tate. A box wrench on the hex makes an excellent indi-
cator to magnify the movement. The hex extension must
rotate. The adjustment is intentionally made in small
increments so it will take several cycles to bring the
adjuster within the stroke limit shown in the chart.
2. If the hex extension did not rotate , the automatic
slack must be replaced.
Slack Adjuster Replacement
1. Chock the wheels.
2. Fully cage the spring chamber with 100 psi air
pressure or a threaded T-bolt only.
3. Remove the existing slack adjuster and clevis. Do
not move the existing jam nut.
4. Clean and apply anti-seize compound to the push-
rod threads.
5. Thread the Crewson Brunner clevis onto the push-
rod and install the 1/2” clevis pin. Do not tighten the
jam nut.
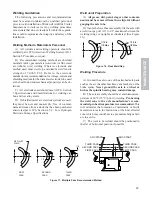
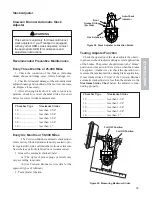
6. Slide the installation template over the “S” cam
spline. Swing the template into the clevis until the ap-
propriate slot totally engages the 1/2” clevis pin.
7. Once the template has been swung into place, in-
stall the 1/4” clevis pin. If the 1/4” pin does not slide
freely into the clevis and template, remove the tem-
plate from the clevis. Rotate the clevis clockwise or
counterclockwise several turns and reinstall the tem-
plate in the clevis.
8. Position the clevis on the pushrod so both pins fit
freely in the clevis and the template.
9. If the pushrod threads extend through the clevis
more than 1/16”, remove the clevis and cut the rod to
length. A minimum of 1/2” thread engagement in the
clevis body is required. If this is not the case, install a
new pushrod and cut to length or use an extended length
Crewson Brunner clevis.
10. Tighten jam nut to a minimum of 50 ft-lbs.
11. Remove both clevis pins and template.
12. Before installing auto slack adjuster, coat the “S”
cam spline, both clevis pins, and the pushrod threads
with anti-seize compound.
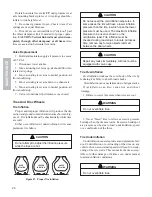
13. In stall the slack adjuster on the “S” cam spline.
Using a 7/16” wrench, manually rotate the adjuster shaft
clockwise until the slack adjuster arm holes line up with
the clevis holes.
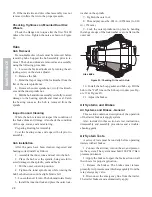
14. If your slack adjuster is equipped with an auto-
check indicator, insert the 1/4” and 1/2” pins in to the
auto-check holes. The clevis pin heads should be to-
ward the front of the auto-check. The auto-check should
face the center of the vehicle.
15. Insert the clevis pins through the auto-check and
clevis and secure with cotter pins. If you do not have
an auto-check insert the pins through the clevis and se-
cure with cotter pins.
16. Using a 7/16” wrench, manually rotate the ad-
juster clockwise until the brake shoes contact the brake
drum.
17. Install any washers and the snap ring on the “S”
cam shaft.
18. Manually back off the adjuster counterclockwise
1/2 turn.
19. Uncage the spring brake.
20. Build up the vehicle air pressure to 90 psi.
21. Fully apply and release the brakes several times
to check for adequate clearance to all of the adjacent
components.
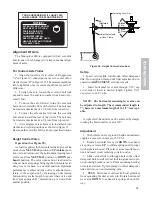
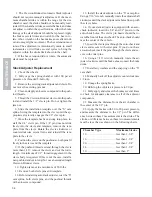
22. Measure the distance from the air chamber to
the center of the 1/2” pin.
23. Apply the brakes with 80 to 90 psi air pressure,
and measure the distance to the 1/2” pin. The differ-
ence between these 2 measurements is the stroke. The
stroke, or difference between these two measurements
must be less than as shown on the following charts.
Chamber Type
Maximum Stroke
12.......................................... less than 1-3/8”
16.......................................... less than 1-3/4”
20.......................................... less than 1-3/4”
24.......................................... less than 1-3/4”
30.......................................... less than 2”


