background image

EN 17

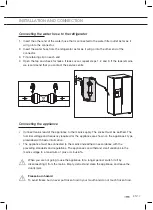
Connecting the water hose to the refrigerator

1.  Insert the other end of the water hose that is connected to the water filter outlet as far as it 

will go into the connector.

2.  Insert the water hose from the refrigerator as far as it will go into the other end of the 

connector.

3.  Fit a retaining clip on each end.
4.  Open the tap and check for leaks. If leaks occur, repeat steps 1, 2 and 3. If the leak remains, 

we recommend that you contact the service centre.

Connecting the appliance

•  Connect mains lead of the appliance to the mains supply. The socket must be earthed. The 

nominal voltage and frequency required for the appliance are shown on the appliance's type 
plate/label with basic information.

•  The appliance must be connected to the mains and earthed in accordance with the 

prevailing standards and regulations. The appliance can withstand small variations in the 
mains voltage to a maximum of plus or minus 6%.

When you are not going to use the appliance for a longer period, switch it off by 
disconnecting it from the mains. Empty, defrost and clean the appliance, and leave the 
door(s) ajar.

Freeze burn hazard

To avoid freeze burn, never put frozen food in your mouth and do not touch frozen food.

INSTALLATION AND CONNECTION

Summary of Contents for AKV778IRVS

Page 1: ...GEBRUIKSAANWIJZING INSTRUCTIONS FOR USE Side by Side KOELKAST Side by Side REFRIGERATOR AKV778IRVS...

Page 2: ...De keuze van de ruimte 13 Het waterfilter installeren en de waterslangen aansluiten 15 De waterslang aan de koelkast aansluiten 17 Toestel aansluiten 17 Deur en afstellen 18 Toestelbeschrijving Toest...

Page 3: ...vriezer 29 Bevroren voedsel ontdooien 30 Onderhoud Het toestel ontdooien 32 Het toestel reinigen 32 De water en ijsdispenser reinigen 33 Het ijsreservoir verwijderen en schoonmaken 34 Storingen Storin...

Page 4: ...toestel in gebruik neemt en berg de handleiding daarna veilig op voor toekomstig gebruik Link naar de EPREL database van de EU De QR code op het energielabel dat bij het apparaat wordt geleverd biedt...

Page 5: ...ervoor te zorgen dat ze niet met het apparaat spelen Reiniging en onderhoud mogen niet door kinderen worden uitgevoerd zonder toezicht Houd alle verpakkingsmaterialen uit de buurt van kinderen Alleen...

Page 6: ...geen mechanische of andere middelen om het ontdooiproces te versnellen behalve die middelen die door de fabrikant zijn aanbevolen WAARSCHUWING Let op dat u het koelcircuit niet beschadigt WAARSCHUWIN...

Page 7: ...araat lucht kan circuleren Wacht ten minste 4 uur alvorens het apparaat aan de netstroom aan te sluiten Hierdoor kan de olie terug in de compressor stromen Installeer het apparaat niet in de nabijheid...

Page 8: ...iveau van het stopcontact Steek de stekker pas in het stopcontact als de installatie is voltooid Zorg ervoor dat het netsnoer na installatie bereikbaar is Pak altijd de stekker vast als u de kabel uit...

Page 9: ...t geen hete items op de kunststofonderdelen van het apparaat Bewaar geen ontvlambare gassen en vloeistoffen in het apparaat Plaats geen ontvlambare producten of items die vochtig zijn door ontvlambare...

Page 10: ...ren en huisdieren opgesloten raken in het apparaat Het koelcircuit en de isolatiematerialen van dit apparaat zijn ozonvriendelijk Het isolatieschuim bevat ontvlambare gassen Neem contact met uw plaats...

Page 11: ...innenzijde en alle accessoires schoongemaakt worden met lauw water met een neutraal reinigingsmiddel Neem na het reinigen de delen af met schoon water en droog ze zorgvuldig Als u het toestel voor de...

Page 12: ...n be nvloeden het energieverbruik nadelig Ook direct zonlicht of andere warmtebronnen in de buurt van het toestel hebben een ongunstige invloed op het energieverbruik Zorg voor voldoende ruimte rondom...

Page 13: ...opisch T 16 tot 43 Plaats het toestel niet in een ruimte waar de temperatuur kan dalen tot onder de laagst toegestane omgevingstemperatuur want dit kan een onjuiste werking veroorzaken Plaats het toes...

Page 14: ...ee personen worden verplaatst en ge nstalleerd Wees voorzichtig bij het verplaatsen van het toestel om te voorkomen dat de vloer beschadigd raakt Zorg ervoor dat het toestel tijdens de installatie de...

Page 15: ...en de afstand van het filter tot de koelkast 3 Snij de juiste lengtes van de meegeleverde waterslang af De lengte van de waterslang mag niet meer zijn dan 5 meter anders is de waterdruk te laag Probee...

Page 16: ...terugstroombeveiligingsunit C en zet vast met de borgclip 10 Zet de kraan open en controleer op lekkages Indien er lekkages optreden herhaalt u de stappen 7 8 en 9 Als de lekkage blijft adviseren wij...

Page 17: ...tsnet Het stopcontact moet geaard zijn De nominale spanning en de frequentie van het toestel vindt u op het typeplaatje label met basisinformatie op het toestel Het toestel moet in overeenstemming met...

Page 18: ...het ingevroren voedsel gebruiken of zorgen voor voldoende koeling in een vervangend toestel Deur en afstellen 2 1 3 Wanneer de beide deuren aan de boven en onderzijde niet in lijn liggen dan kan de r...

Page 19: ...estel niet van toepassing zijn 1 2 5 5 7 4 4 4 4 6 6 8 9 9 9 9 9 10 10 10 10 11 11 12 3 13 Vriezer 1 Interieurverlichting 2 IJsmaker 3 IJsreservoir 4 Draagplateau 5 Deurvak 6 Vrieslade 7 Deurvak Beste...

Page 20: ...7 3 6 1 9 10 11 12 2 8 1 IJsmakertoets 2 Alarm kinderslottoets 3 Insteltoets voor de temperatuur vriescompartiment en intensieve vriesfunctie 4 Weergave temperatuur vriescompartiment 5 Pictogrammen K...

Page 21: ...ieningspaneel druk 3 seconden op de alarm kinderslottoets 2 Druk meerdere keren op de insteltoets voor de temperatuur koelcompartiment of vriescompartiment om de temperatuur in te stellen De temperatu...

Page 22: ...stel beschikt over een intensieve vriesfunctie Deze functie zorgt ervoor dat de temperatuur in het vriescompartiment zo snel mogelijk daalt Schakel deze functie 24 uur van tevoren in voordat u een gro...

Page 23: ...oets Het pictogram gaat uit De functie is uitgeschakeld De temperatuur keert terug naar de meest recent ingestelde waarde De ECO functie is niet geschikt om vers voedsel in te vriezen of om ijsblokjes...

Page 24: ...3 Druk op de vakantiefunctietoets Het pictogram gaat uit De functie is uitgeschakeld Let op Het inschakelen van de vakantiefunctie schakelt de functies intensief koelen en intensief vriezen uit Als d...

Page 25: ...okjes Het pictogram wordt verlicht 2 Plaats een glas onder de water en ijsuitgang en druk voorzichtig met uw glas tegen de hendel Let erop dat het glas zich onder de dispenser bevindt om te voorkomen...

Page 26: ...nderhoud Ook als u gedurende lange tijd geen ijs uit de dispanser haalt kan het ijs in het reservoir gaan klonteren Gebruik de dispenser niet langer dan 1 minuut aaneengesloten voor het leveren van ij...

Page 27: ...bewaren van groente met een hoog watergehalte kan condensvorming veroorzaken op de glazen schappen van de groenten en fruitlade dit be nvloedt het correct functioneren van het toestel niet Bewaar fru...

Page 28: ...ers voedsel Om de kwaliteit van het verse voedsel te waarborgen is het belangrijk dat het voedsel goed verpakt is het toestel de juiste temperatuur heeft het toestel schoon is Let op de houdbaarheidsd...

Page 29: ...ine hoeveelheden vers voedsel ijsblokjes maken Zie hoofdstuk Aanbevolen indeling voor de beste locatie voor het invriezen van vers voedsel 1 2 kilo en het maken van ijsblokjes Invriezen van grote hoev...

Page 30: ...en voedsel in de vriezer Soort voedsel Bewaartijd Fruit rundvlees 10 tot 12 maanden Groenten kalfsvlees gevogelte 8 tot 10 maanden Hert 6 tot 8 maanden Varkensvlees 4 tot 6 maanden Fijngesneden of gem...

Page 31: ...k sneller Gebruik gedeeltelijk of geheel ontdooid voedsel zo snel mogelijk Nadat het voedsel is ontdooid worden bacteri n weer actief en bederft voedsel snel Dat geldt met name voor fruit groenten en...

Page 32: ...estel reinigen Schakel het toestel uit en haal de stekker uit het stopcontact voordat u het gaat schoonmaken Gebruik geen reinigingsmiddelen die schurende bestanddelen bevatten hierdoor kan het opperv...

Page 33: ...aan de achterkant van het toestel met een stofzuiger of een borstel Wanneer u het toestel langere tijd niet gebruikt schakelt u het uit en koppelt u het los van de stroomvoorziening Maak het toestel...

Page 34: ...1 Til het reservoir iets op 2 Haal het met een neerwaartse beweging uit de houders 1 2 3 Haal de deksel van de ijsmaker als u deze ook wilt schoonmaken 4 Controleer of de uitlaat niet verstopt zit me...

Page 35: ...pelingen zich in een geschikte hoek bevinden om een correcte aansluiting te maken Als dit niet het geval is draai dan de koppeling van het ijsreservoir in de juiste hoek zodat deze overeenkomt met de...

Page 36: ...de deurrubbers beschadigd zijn Toestel maakt lawaai Onjuiste plaatsing van levensmiddelen in het koel of vriescompartiment Plaats levensmiddelen op de juiste wijze in het koel of vriescompartiment Er...

Page 37: ...de dispenser De ijsmaker is uitgeschakeld Schakel de ijsmaker in Er zit ijs in de uitlaat Verwijder het ijs uit de uitlaat Het ijs in het reservoir is gaan klonteren Verwijder het ijs uit het ijsrese...

Page 38: ...he huishoudelijke apparaten afzonderlijk moeten worden afgedankt Dit houdt in dat het toestel aan het einde van zijn levensduur niet met het gewone huisvuil mag worden meegegeven Het toestel moet naar...

Page 39: ...NL 39...

Page 40: ...the location 13 Installing the water filter and connecting the water hoses 15 Connecting the water hose to the refrigerator 17 Connecting the appliance 17 Adjusting the door s 18 Description of the a...

Page 41: ...e freezer 29 Defrosting frozen food 30 Maintenance Defrosting the appliance 32 Cleaning the appliance 32 Cleaning the water and ice dispenser 33 Removing and cleaning the ice reservoir 34 Faults Fault...

Page 42: ...ly before you first use the appliance and keep the instructions for future use Link to the EU EPREL database The QR code on the energy label supplied with the appliance provides a web link to the regi...

Page 43: ...safety Children should be supervised to ensure that they do not play with the appliance Cleaning and user maintenance shall not be made by children without supervision Keep all packaging away from chi...

Page 44: ...chanical devices or other means to accelerate the defrosting process other than those recommended by the manufacturer WARNING Do not damage the refrigerant circuit WARNING Do not use electrical applia...

Page 45: ...east 4 hours before connecting the appliance to the power supply This is to allow the oil to flow back in the compressor Do not install the appliance close to radiators or cookers oven or hobs Do not...

Page 46: ...he mains plug to the mains socket only at the end of the installation Make sure that there is access to the mains plug after the installation Do not pull the mains cable to disconnect the appliance Al...

Page 47: ...t let hot items to touch the plastic parts of the appliance Do not store flammable gas and liquid in the appliance Do not put flammable products or items that are wet with flammable products in near o...

Page 48: ...and pets to be closed inside of the appliance The refrigerant circuit and the insulation materials of this appliance are ozone friendly The insulation foam contains flammable gas Contact your municip...

Page 49: ...should be cleaned with lukewarm water and a neutral cleaning agent Wipe the cleaned parts with a cloth with clean water and then dry them thoroughly If you use the appliance for the first time do not...

Page 50: ...e effect on the energy consumption Direct sunlight or other heat sources in the vicinity of the appliance also have an adverse effect on the energy consumption Provide sufficient space around the appl...

Page 51: ...the appliance in a room where the temperature can fall below the lowest permitted ambient temperature the appliance may not work properly Do not place the appliance in a room where the temperature ca...

Page 52: ...the appliance The appliance must be moved and installed by at least two people Use caution when moving the appliance to avoid damaging the floor Make sure the appliance does not damage the power cable...

Page 53: ...d the distance from the filter to the refrigerator 3 Cut the correct lengths from the supplied water hose The length of the water hose must not exceed 5 metres otherwise the water pressure will be too...

Page 54: ...tection unit C and secure it with the retaining clip 10 Open the tap and check for leaks If leaks occur repeat steps 7 8 and 9 If the leak remains we recommend that you contact the service centre 11 F...

Page 55: ...ppliance to the mains supply The socket must be earthed The nominal voltage and frequency required for the appliance are shown on the appliance s type plate label with basic information The appliance...

Page 56: ...must either use the frozen food or make sure that it is properly cooled for example by transferring it to another appliance Adjusting the door s 2 1 3 If the doors are not aligned at the top and botto...

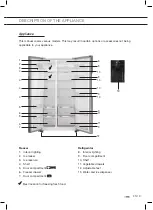
Page 57: ...r appliance 1 2 5 5 7 4 4 4 4 6 6 8 9 9 9 9 9 10 10 10 10 11 11 12 3 13 Freezer 1 Interior lighting 2 Ice maker 3 Ice reservoir 4 Shelf 5 Door compartment 6 Freezer drawer 7 Door compartment Best loca...

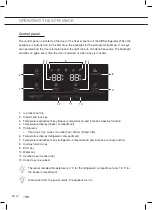
Page 58: ...tton 2 Alarm child lock key 3 Temperature adjustment key freezer compartment and intensive freezing function 4 Temperature display freezer compartment 5 Pictograms Child lock Ice cubes Crushed ice Wat...

Page 59: ...alarm child lock key for 3 seconds 2 Touch several times the temperature adjustment key refrigerator compartment or freezer compartment to set the temperature The temperature of the refrigerator will...

Page 60: ...ve freezing This appliance has an intensive freezing function This function decreases the temperature in the freezer compartment as quickly as possible Activate this function 24 hours before you put a...

Page 61: ...ated 3 Touch the ECO key The pictogram goes out The function is disabled The temperature returns to the latest temperature setting The ECO function is not suitable for freezing fresh food or making ic...

Page 62: ...e function is activated 3 Press the holiday function key The pictogram goes out The function is disabled Note Activating the holiday function deactivates the intensive cooling and intensive freezing f...

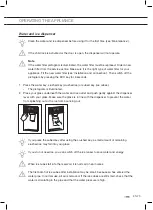
Page 63: ...togram is illuminated 2 Place your glass underneath the water and ice outlet and push gently against the dispenser lever with your glass Make sure the glass is in line with the dispenser to prevent th...

Page 64: ...d remove them see Maintenance Also if you do not remove ice from the dispenser for a long period of time the ice in the reservoir may start to clump Do not use the dispenser for ice delivery for more...

Page 65: ...note that the storage of vegetables with a high water content can cause condensation on the glass shelves of the fruit and vegetable drawer this will not affect the proper operation of the appliance D...

Page 66: ...he quality of fresh food it is important that the food is well packaged the appliance is at the correct temperature the appliance is clean Take good note of the use by date stated on the food packagin...

Page 67: ...f fresh food making ice cubes See the chapter Recommended distribution for the best location for freezing fresh food 1 to 2 kilograms and making ice cubes Freezing large quantities of fresh food Activ...

Page 68: ...torage times of frozen food in the freezer Type of food Storage life Fruit beef 10 to 12 months Vegetables veal poultry 8 to 10 months Venison 6 to 8 months Pork 4 to 6 months Finely chopped or minced...

Page 69: ...Use partially or completely thawed food as quickly as possible The bacteria in thawed food are reactivated and the food will spoil rapidly This applies in particular to fruit vegetables and ready mad...

Page 70: ...nd adjust the temperature to the required setting before you put the food back into the freezer Cleaning the appliance Switch off the appliance and remove the plug from the socket before you start cle...

Page 71: ...k of the appliance with a vacuum cleaner or a brush When you are not going to use the appliance for a longer period then switch it off with the appropriate key and disconnect it from the mains Empty d...

Page 72: ...e mains socket 1 Lift the reservoir slightly 2 Remove it from the holders with a downward movement 1 2 3 Remove the lid of the ice maker if you want to clean it too 4 Check that the outlet is not bloc...

Page 73: ...k check that the two couplings are at the correct angle so they will align properly If not turn the ice reservoir coupling to the correct angle so it is aligned with the motor coupling 8 Put the ice r...

Page 74: ...Call the service centre if the door seals are damaged Appliance makes a noise Incorrect positioning of food in the refrigerator or freezer Place foods in the proper manner in the refrigerator or free...

Page 75: ...dispenser The ice maker is switched off Switch on the ice maker There is ice in the outlet Remove the ice from the outlet The ice in the reservoir has started to clump Remove the ice from the ice rese...

Page 76: ...to draw your attention to the requirement for the separate disposal of domestic electrical appliances This means that the appliance may not be disposed of in unsorted household waste at the end of it...

Page 77: ...EN 39...

Page 78: ...EN 40...

Page 79: ...EN 41...

Page 80: ...860982 VER 1 16 04 2021 860982 860982 De gebruiksaanwijzing is ook te vinden op onze website The instructions for use can also be found on our website www etna nl www etna be...

Reviews: