background image

9

Para conectar otro smartphone, pulse una vez el botón restablecer en la 

parte posterior de la cámara. El indicador LED en la parte frontal de la cámara 

parpadeará alternando el verde y el naranja. Ya puede volver a iniciar el proceso a 

partir de la página 4 “Conexión de un smartphone a la cámara”.

Observación

Si ha pulsado por error el botón de restablecimiento en la parte posterior de la 

cámara y no desea conectar ningún otro smartphone, pulse de nuevo el botón 

de restablecer.

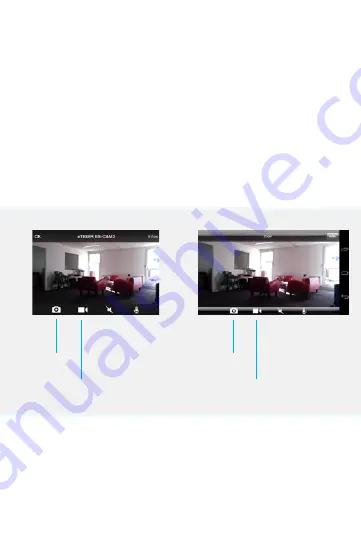
Controles de la cámara   

iOS

Android

Hacer foto

Grabar vídeo

Hacer foto

Grabar vídeo

Acercar, alejar imagen y rotar

Para acercar o alejar la imagen en pantalla, junte y separe el pulgar y el índice. 

Haga clic dos veces en la pantalla para restablecer el zoom.

Summary of Contents for ES-CAM3A

Page 1: ...www etiger com ES CAM3A Outdoor IP Camera EN ...

Page 2: ...MB Flash 16MB Wi Fi IEEE 802 11 b g n Audio compression G 711 PCM AAC Dimensions 205 x 73 5 x 96 mm Weight 546 g Operating conditions 20 C to 50 C humidity 20 80 non condensing Certified IP66 completely sealed from dust and protected against strong jets of water and rain Power supply 12V 1A 110 240V DC Jack Compatible with smartphones under iOS and Android Tablets PC Mac Reset button LED indicator...

Page 3: ... Google Play Plug the camera Plug the AC adaptor to your ES CAM3A and plug the former into the mains Initialization of the setup Two minutes after having plugged the ES CAM3A the LED indicator starts blinking alternately in green and orange This indicates that the camera is now in Connection mode ...

Page 4: ...etwork ES CAM3AXXXX the last 4 figures represent the last 4 figures of the MAC ID at the back of your camera Launch the app iSecurity iOS Android Once the connection has been made after around 30 seconds launch iSecurity iSecurity detects automatically your camera Select Yes to start the setup of your camera ...

Page 5: ... 1 Select Continue and follow the instructions of the installation assistant iOS Android 2 Preview of the camera What your camera views appears in the interface your camera is connected Select Connect camera to Internet iOS Android ...

Page 6: ...Select the Wi Fi network to which your camera will be connected ADSL box router etc iOS Android 2 Enter the password of the Wi Fi network selected and press Continue Note It may take a few minutes for the camera to access the Internet iOS Android ...

Page 7: ...7 Connection to iSecurity 1 Create an iSecurity account by filling in the fields iOS Android 2 Enter your iSecurity username and password to log in iOS Android ...

Page 8: ...your camera and press Continue Note The registration of your camera on the iSecurity server will only take a few seconds iOS Android Finalization of the installation You can use your Android or iOS smartphone tablet to access your camera using an Internet connection iOS Android ...

Page 9: ...om page 4 Connect your smartphone to the camera Remark If you have pressed the reset button at the back of the camera in error and you do not wish to connect another smartphone press the reset button again Controls on the camera iOS Android Take a picture Record a video Take a picture Record a video Zoom in zoom out You can zoom in zoom out by pinching the screen Click twice on the screen to reset...

Page 10: ...ection and Notifications When the camera is on the iSecurity app informs you when the camera detects an intrusion or a movement iSecurity is available for download on Google Play and the App Store By default this feature is disabled You can enable it in the settings of the iSecrurity app Access your camera from a computer Follow the link below to access your camera from a computer https app isecur...

Page 11: ...he box Reattach the camera to the base and screw them together see drawing below Reset Press the button at the back of the camera for more than 12 seconds until the front LED indicator blinks orange to restore factory settings If you notice connection issues try restarting the ES CAM3A by pressing the button at the back of the camera for 5 seconds ...

Page 12: ...e accompanying the product To prevent Fire or Shock Hazards Do Not Expose This PRODUCT to Rain or Moisture Apparatus shall not be exposed to dripping or splashing and no object filled with liquids such as vases shall be placed on the apparatus To avoid electrical shock do not open the cabinet Refer servicing to qualified personnel only Regulatory Notices for USA This equipment has been tested and ...

Page 13: ...rent from that to which the receiver is connected Consult the dealer or an experienced radio TV technician for help Safety instructions Do not point the camera directly at the sun to prevent damaging the image sensor Keep the camera away from heat to avoid electric shocks Keep the camera away from rain or moisture Do not attempt to open dismantle repair or service the camera Doing so may cause ele...

Page 14: ...rements and other relevant provisions of Directive 1999 5 EC R TTE This product was designed and manufactured in compliance with Directive 2002 95 EC of the European Parliament and of the Council on the restriction of use of certain hazardous substances in electrical and electronic equipment RoHS Directive RoHS and is deemed to comply with the maximum concentration values set by the European Techn...

Page 15: ...ETIGER EUROPE Rue de la Loi 25 7100 La Louvière Belgium service etiger com ...

Page 16: ...www etiger com ES CAM3A Outdoor IP Kamera DE ...

Page 17: ... IEEE 802 11 b g n Audiokomprimierung G 711 PCM AAC Abmessungen 205 x 73 5 x 96 mm Gewicht 546 g Betriebsbedingungen 20 Cbis50 C Feuchtigkeit 20 80 nichtkondensierend IP66 zertifiziert und vollständig versiegelt gegen Staub und geschützt gegen starkes Strahlwasser Stromversorgung 12 V 1 A 110 240 V DC Stecker Kompatibel mit Smartphones und iOS und Android Tablets PC Mac Reset Taste LED Anzeige Box...

Page 18: ...ay herunterladen Einstecken der Kamera Verbinden Sie den Stromadapter mit Ihrer ES CAM3A und dem Stromnetz Initialisierung der Einrichtung Zwei Minuten nach Einstecken der ES CAM3A beginnt die LED Anzeige abwechselnd grün und orange zu blinken Das bedeutet die Kamera befindet sich jetzt im Verbindungsmodus ...

Page 19: ...zwerk ES CAM3A XXX die letzten 4 Ziffern stehen für die letzten 4 Ziffern der MAC ID auf der Kamerarückseite Starten der App iSecurity iOS Android Sobald die Verbindung hergestellt ist nach etwa 30 Sekunden starten Sie iSecurity iSecurity erkennt Ihre Kamera automatisch Wählen Sie Ja um die Einrichtung der Kamera zu beginnen ...

Page 20: ...ie Weiter und folgen Sie den Anweisungen des Ins tallationsassistenten iOS Android 2 Vorschau der Kamera Vorschau Ihrer Kameraansicht in der Benutzeroberfläche Ihre Kamera ist verbunden Wählen Sie Kamera mit Internet verbinden iOS Android ...

Page 21: ...erk aus mit dem Ihre Kamera verbunden werden soll ADSL Box Router usw iOS Android 2 Geben Sie das Passwort für das ausgewählte WLAN Netzwerk ein und drücken Sie auf Weiter Hinweis Es kann ein paar Minuten dauern bis die Kamera auf das Internet zugreifen kann iOS Android ...

Page 22: ...7 Verbindung mit iSecurity 1 Erstellen Sie durch das Ausfüllen der Felder ein iSecurity Konto iOS Android 2 Geben Sie Benutzername und Passwort für iSecurity ein um sich anzumelden iOS Android ...

Page 23: ... und drücken Sie auf Weiter Hinweis Die Registrierung Ihrer Kamera auf dem iSecurity Server dauert nur wenige Sekunden iOS Android Abschluss der Installation Für den Zugriff auf die Kamera über eine Internetverbindung kann Ihr Android oder iOS Smartphone verwendet werden iOS Android ...

Page 24: ... der Kamera Anmerkung Haben Sie die Reset Taste auf der Kamerarückseite versehentlich gedrückt und kein weiteres Smartphone soll verbunden werden die Reset Taste erneut drücken Bedienelemente der Kamera iOS Android Bild aufnehmen Video aufzeichnen Bild aufnehmen Video aufzeichnen Vergrößern Verkleinern Drehen Das Bild kann durch Auf und Zuziehen des Bildschirms vergrößert verkleinert werden Klicke...

Page 25: ...inrichtung BewegungserkennungmitBenachrichtigungen Ist die Kamera eingeschaltet informiert Sie die App iSecurity sobald die Kamera ein Eindringen oder eine Bewegung erkennt iSecurity kann über Google Play und im App Store heruntergeladen werden Zugriff auf die Kamera von einem Computer Klicken Sie für den Zugriff auf Ihre Kamera von einen Computer aus auf den folgenden Link https app isecurityplus...

Page 26: ...a wieder an der Basis anbringen und zusammenschrauben siehe folgende Zeichnung Reset Die Taste auf der Kamerarückseite mindestens 12 Sekunden lang drücken bis die vordere LED Anzeige orange blinkt um die Werkseinstellungen wiederherzustellen TretenVerbindungsprobleme auf die ES CAM3A neu starten indem dieTaste auf der Kamerarückseite 5 Sekunden lang gedrückt wird ...

Page 27: ...dass für Personen das Risiko eines Stromschlags besteht Das Ausrufezeichen mit einem gleichseitigen Dreieck dient als Information für den Anwender bezüglich wichtiger Betriebs und Wartungsanweisungen in der dem Produkt beiliegenden Literatur Um die Gefahr eines Brands oder eines Stromschlags zu vermeiden dieses PRODUKT keiner Nässe oder Feuchtigkeit aussetzen Das Gerät darf keinem Tropfen oder Spr...

Page 28: ...h eine oder mehrere der nachstehend angegebenen Maßnahmen zu reduzieren Verändern Sie die Position der Empfangsantenne oder diese neu ausrichten Vergrößern Sie den Abstand zwischen Gerät und Empfänger Verbinden Sie das Gerät mit einer Steckdose die mit einem Stromkreis verbunden ist der von dem Stromkreis getrennt ist über den der Empfänger versorgt wird Wenden Sie sich bei Problemen an Ihren Händ...

Page 29: ...n der Richtlinie 1999 5 EC R TTE Dieses Produkt wurde in Übereinstimmung mit der Direktive 2002 95 EC des Europaparlaments und des Rats bezüglich der Verwendungseinschränkung bestimmter gefährlicher Substanzen in elektrischen und elektronischen Geräten RoHS Direktive RoHS entwickelt und hergestellt und erfüllt die Anforderungen für maximale Konzentrationswerte die vom EuropeanTechnical Adaptation ...

Page 30: ...ETIGER EUROPE Rue de la Loi 25 7100 La Louvière Belgium service etiger com ...

Page 31: ...www etiger com ES CAM3A Caméra IP extérieure FR ...

Page 32: ...128MB Flash 16MB Wi Fi IEEE 802 11 b g n Compression audio G 711 PCM AAC Dimensions 205 x 73 5 x 96 mm Poids 546 g Conditions d utilisation 20 C to 50 C humidité 20 80 sans condensation Certifiée IP66 complètement hermétique à la poussière et résiste aux fortes projections d eau et de pluie Alimentation 12V 1A 110 240V DC Jack Compatible smartphones avec iOS ou Android Tablettes PC Mac Reset Témoi...

Page 33: ...Store ou Google Play Brancher la caméra Connectez l adaptateur secteur à votre ES CAM3A puis branchez le à une prise électrique Initialisation de la configuration Deux minutes après avoir branché la ES CAM3A le témoin lumineux commence à clignoter en orange et vert la caméra est désormais en mode Connexion ...

Page 34: ...s 4 derniers chiffres correspondent aux 4 derniers chiffres du numéro MAC ID au dos de votre caméra Démarrer l application iSecurity iOS Android Une fois la connexion établie après 30 secondes environ lancez l application iSecurity iSecurity détecte automatiquement votre caméra Choisissez Oui pour commencer la configuration de la caméra ...

Page 35: ...tinuer et suivez les instructions de l Assistant d Installation iOS Android 2 Prévisualisation de la caméra Ce que visualise la caméra apparaît dans l interface votre caméra est bien connectée Sélectionnez Connecter la caméra à Internet iOS Android ...

Page 36: ...Choisissez le réseau Wi Fi auquel sera connectée votre caméra boîter ADSL routeur etc iOS Android 2 Entrez le mot de passe du point d accès Wi Fi puis appuyez sur Continuer Remarque L accès à internet nécessite quelques minutes iOS Android ...

Page 37: ...nexion à iSecurity 1 Créez un compte iSecurity Pour ce faire remplissez les champs requis iOS Android 2 Entrez les nom d utilisateur et mot de passe de votre compte iSecurity pour vous connecter iOS Android ...

Page 38: ...pour passer à l étape suivante Remarque L enregistrement de la caméra au serveur d iSecurity ne demandera que quelques secondes iOS Android Finalisation de l installation Vous pouvez désormais accéder au contenu de votre caméra depuis tout appareil Android ou iOS équipé d une connection Internet iOS Android ...

Page 39: ...necter votre smartphone à la caméra Remarque Si vous avez appuyé sur le bouton reset situé à l arrière de la caméra par erreur et ne souhaitez pas connecter un nouvel appareil appuyez sur le bouton reset à nouveau Contrôles sur la caméra iOS Android Prendre une photo Enregistrer une vidéo Prendre une photo Enregistrer une vidéo Zoom et zoom arrière Vous pouvez zoomer ou effectuer un zoom arrière e...

Page 40: ... la caméra est allumée l application iSecurity vous informe lorsque la caméra détecte une intrusion ou un mouvement iSecurity est disponible sur Google Play et l App Store Par défaut cette fonction est désactivée Vous pouvez l activer dans les paramètres de l application iSecurity Accéder à la caméra via un ordinateur Accédez au lien ci dessous depuis votre navigateur internet pour accéder à votre...

Page 41: ...ur sa base et vissez les l un à l autre dessin ci dessous Remise à zéro Appuyez sur le bouton situé à l arrière de la caméra pour plus de 12 secondes jusqu à ce que le témoin lumineux clignote en orange pour restaurer les paramètres d usine Si vous rencontrez des problèmes de connexion essayez de redémarrer la ES CAM3A en appuyant le bouton à l arrière de la caméra pendant 5 secondes ...

Page 42: ... d électrocution Le symbole représentant un point d exclamation à l intérieur d un triangle équilatéral signale à l utilisateur la présence d instructions importantes relatives au fonctionnement et à l entretien de l appareil dans cette notice d utilisation Pour limiter les risques d incendie ou d électrocution ne pas exposer l appareil à la pluie ou à l humidité Protéger l appareil de tout risque...

Page 43: ...gnant le matériel vous êtes invité à tenter de remédier au problème en prenant une ou plusieurs des mesures ci dessous Réorientez ou déplacez l antenne de réception Connectez la caméra à une prise située sur un circuit différent de celui auquel est connecté le récepteur Consultez votre revendeur ou un technicien radio TV expérimenté Informations de sécurité Ne pas pointer la caméra vers le soleil ...

Page 44: ...1999 5 EC R TTE Ce produit a été conçu et fabriqué en conformité avec la Directive 2002 95 EC du Parlement européen et du Conseil relative à la limitation de l utilisation de certaines substances dangereuses dans les équipements électriques et électroniques Directive RoHS et est déclaré satisfaisant aux valeurs de concentration maximum définies par le Comité technique d adaptation européen Europea...

Page 45: ...ETIGER EUROPE Rue de la Loi 25 7100 La Louvière Belgium service etiger com ...

Page 46: ...www etiger com ES CAM3A Cámara IP de exterior ES ...

Page 47: ... IEEE 802 11 b g n Compresión de audio G 711 PCM AAC Dimensiones 205 x 73 5 x 96 mm Peso 546 g Condiciones de funcionamiento 20 C a 50 C humedad 20 80 sin condensación Certificación IP66 producto completamente hermético al polvo y protegido de la lluvia y los chorros directos de agua Alimentación 12V 1A toma CC 110 240V Compatible con smartphones con iOS y Android tabletas PC Mac Botón Restablecer...

Page 48: ...y Conecte la cámara Conecte el adaptador de alimentación a la cámara ES CAM3A y enchufe el primero a una toma de corriente Iniciando configuración Dos minutos después de haber conectado la ES CAM3A el indicador LED empieza a parpadear alternando el verde y el naranja lo que significa que la cámara está ahora en modo Conexión ...

Page 49: ...s últimas 4 cifras representan las últimas 4 cifras del número MAC en la parte posterior de la cámara Ejecute la aplicación iSecurity iOS Android Una vez establecida la conexión tras aproximadamente 30 segundos abra iSecurity que automáticamente detectará su cámara Seleccione Yes Sí para iniciar la configuración de la cámara ...

Page 50: ...tinuar y siga las instrucciones del asistente de instalación iOS Android 2 Previsualización de la cámara La cámara está conectada cuando la imagen enfocada aparece en la interfaz Seleccione Connect camera to Internet Conectar cámara a Internet iOS Android ...

Page 51: ...cione la red Wi Fi a la que conectará la cámara módem ADSL router etc iOS Android 2 Introduzca la contraseña de la red Wi Fi seleccionada y pulse Continue Continuar Nota La cámara puede tardar varios minutos en conectarse a Internet iOS Android ...

Page 52: ...7 Conexión a iSecurity 1 Cree una cuenta en iSecurity rellenando los campos correspondientes iOS Android 2 Introduzca su nombre de usuario y contraseña de iSecurity para iniciar sesión iOS Android ...

Page 53: ...ámara y pulse Continue Continuar Nota El registro de su cámara en el servidor de iSecurity le llevará unos segundos iOS Android Finalización de la instalación Puede utilizar su smartphone o tableta Android o iOS para acceder a la cámara utilizando una conexión Internet iOS Android ...

Page 54: ...n de un smartphone a la cámara Observación Si ha pulsado por error el botón de restablecimiento en la parte posterior de la cámara y no desea conectar ningún otro smartphone pulse de nuevo el botón de restablecer Controles de la cámara iOS Android Hacer foto Grabar vídeo Hacer foto Grabar vídeo Acercar alejar imagen y rotar Para acercar o alejar la imagen en pantalla junte y separe el pulgar y el ...

Page 55: ... Wi Fi Detección de movimiento con notificaciones La aplicación iSecurity le informará cuando la cámara detecte un intruso o un movimiento siempre que la cámara permanezca encendida Puede descargar iSecurity en las tiendas Google Play o App Store Acceda a su cámara desde un ordenador Haga clic en el siguiente enlace para acceder a su cámara a través de un ordenador https app isecurityplus com app ...

Page 56: ...mara a su base y sujétela con los tornillos ver diagrama siguiente Restablecimiento Apriete el botón en la parte posterior de la cámara durante más de 12 segundos para restaurar la configuración de fábrica hasta que el indicador LED frontal parpadee en naranja Si tiene problemas de conexión pruebe a volver a iniciar la ES CAM3A apretando el botón posterior de la cámara durante 5 segundos ...

Page 57: ...como para constituir un riesgo de descarga eléctrica para las personas El signo de exclamación dentro de un triángulo equilátero tiene por objeto alertar al usuario sobre la presencia de instrucciones de funcionamiento y mantenimiento reparación importantes en la documentación que acompaña el producto Para evitar el riesgo de fuego o descargas NO exponga este PRODUCTO a la lluvia o a la humedad No...

Page 58: ...s interferencias adoptando una o varias de las siguientes medidas Reoriente o cambie de lugar la antena receptora Aumente la distancia entre el equipo y el receptor Conecte el equipo a una toma de corriente distinta a la toma del receptor Consulte a su distribuidor o a un técnico con experiencia en radio TV para obtener ayuda Instrucciones de seguridad No apunte la cámara directamente al sol para ...

Page 59: ...99 5 EC R TTE Este producto ha sido diseñado y fabricado cumpliendo la Directiva 2002 95 CE del Parlamento Europeo y del Consejo sobre la restricción de uso de determinadas sustancias peligrosas en equipos eléctricos y electrónicos Directiva RoHS y se considera que cumple con los valores de concentración máximos publicados por el Comité Europeo de Adaptaciones Técnicas TAC Esta cámara de exterior ...

Page 60: ...ETIGER EUROPE Rue de la Loi 25 7100 La Louvière Belgium service etiger com ...

Page 61: ...www etiger com ES CAM3A Telecamera IP da esterno IT ...

Page 62: ... 128 MB Flash 16 MB Wi Fi IEEE 802 11 b g n Compressione audio G 711 PCM AAC Dimensioni 205 x 73 5 x 96 mm Peso 546 g Condizioni operative da 20 C a 50 C umidità 20 80 senza condensa Certificazione IP66 protezione totale contro la polvere e i getti di acqua e pioggia intrusivi Alimentazione 12 V 1 A 110 240 V CC Jack CompatibileconsmartphoneiOSeAndroid tablet PC Mac Pulsante di ripristino Indicato...

Page 63: ...gare la telecamera Collegare l alimentatore CA a ES CAM3A quindi collegarlo alla rete elettrica Inizializzazione della configurazione Due minuti dopo aver collegato ES CAM3A l indicatore LED inizia a lampeggiare alternando la luce verde a quella arancione In questo momento la fotocamera è in modalità Connessione ...

Page 64: ...ES CAM3A XXXX le ultime 4 cifre rappresentano le ultime 4 cifre del MAC ID sul retro della telecamera Avviare l app iSecurity iOS Android Una volta stabilita la connessione dopo circa 30 secondi avviare iSecurity iSecurity rileva automaticamente la telecamera Selezionare Yes Sì per iniziare la configurazione della telecamera ...

Page 65: ...ua e seguire le istruzioni dell installazione guidata iOS Android 2 Anteprima della telecamera La visuale della telecamera viene mostrata nell interfaccia la telecamera è connessa Selezionare Connect camera to Internet Connetti la telecamera a Internet iOS Android ...

Page 66: ...la rete Wi Fi a cui connettere la telecamera modem ADSL router ecc iOS Android 2 Immettere la password della rete Wi Fi selezionata e premere Continue Continua Nota Potrebbero essere necessari alcuni minuti perché la telecamera acceda a Internet iOS Android ...

Page 67: ...7 Connessione a iSecurity 1 Creare un account iSecurity compilando i campi iOS Android 2 Immettere nome utente e password iSecurity per accedere iOS Android ...

Page 68: ...remere Continue Continua Nota Per la registrazione della telecamera sul server iSecurity occorreranno solo pochi secondi iOS Android Finalizzazione dell installazione È possibile utilizzare uno smartphone tablet Android o iOS per accedere alla videocamera tramite una connessione Internet iOS Android ...

Page 69: ...a 4 Collegare lo smartphone alla fotocamera Nota Se è stato premuto per errore il pulsante di ripristino sul retro della fotocamera e non si desidera connettere un altro smartphone premere di nuovo il pulsante di ripristino Comandi sulla telecamera iOS Android Scatta fotografia Registra filmato Scatta fotografia Registra filmato Zoom avanti zoom indietro rotazione È possibile ingrandire rimpicciol...

Page 70: ...iare la configurazione Wi Fi Rilevamento del movimento con notifiche Quando la telecamera è attiva l app iSecurity avvisa l utente nel momento in cui la fotocamera rileva un intrusione o un movimento iSecurity si può scaricare su Google Play e sull App Store Accesso alla telecamera da un computer Seguire il link qui riportato per accedere alla telecamera da un computer https app isecurityplus com ...

Page 71: ...e la telecamera sulla base e avvitarla vedere il disegno seguente Reset Per ripristinare le impostazioni di fabbrica premere il pulsante sul retro della telecamera per più di 12 secondi finché l indicatore LED non inizia a lampeggiare di arancione Sesiverificanoproblemidiconnessione provareariavviareES CAM4Apremendo il pulsante sul retro della telecamera per più di 5 secondi ...

Page 72: ...l prodotto Per evitare il rischio di incendio o di folgorazione non esporre il PRODOTTO a pioggia o umidità L apparecchio non deve essere esposto a gocciolamento o spruzzi non collocare oggetti pieni di liquidi per esempio vasi sull apparecchio Per evitare il rischio di folgorazione non aprire l apparecchio Rivolgersi esclusivamente a personale qualificato per la manutenzione Informativa a norma d...

Page 73: ...evitore rivolgersi al rivenditore o a un tecnico radio TV esperto Istruzioni di sicurezza Non puntare la telecamera direttamente verso il sole per prevenire danni al sen sore immagine Tenere la telecamera lontana da fonti di calore per evitare il rischio di folgorazione Tenere la telecamera lontana da pioggia e umidità Non tentare di aprire smontare riparare o sottoporre a manutenzione la tele cam...

Page 74: ... CE R TTE Questo prodotto è stato progettato e realizzato in conformità alla Direttiva 2002 95 CE del Parlamento europeo e del Consiglio in materia di limitazione dell uso di determinate sostanze pericolose nelle apparecchiature elettriche ed elettroniche Direttiva RoHS RoHS e risulta conforme ai valori massimi di concentrazioni stabiliti dal Comitato europeo per l adeguamento al progresso scienti...

Page 75: ...ETIGER EUROPE Rue de la Loi 25 7100 La Louvière Belgium service etiger com ...

Page 76: ...www etiger com ES CAM3A IP buitencamera NL ...

Page 77: ...128MB Flash 16MB Wi Fi IEEE 802 11 b g n Audiocompressie G 711 PCM AAC Afmetingen 205 x 73 5 x 96 mm Gewicht 546 g Gebruiksvoorwaarden 20 C tot 50 C vochtigheid 20 80 niet condenserend IP66 gecertificeerd volledig stofdicht en bestand tegen krachtige waterstralen en regen Voeding 5V 1A 110 240V DC aansluiting Compatibel met smartphones met iOS en Android Tablets PC Mac Reset knop LED lampje Inhoud...

Page 78: ... Google Play De camera aansluiten Sluit de AC adapter aan op de ES CAM3A en op het stopcontact Initialisatie van de configuratie Twee minuten na het aansluiten van de ES CAM3A begint het LED lampje afwisselend groen en oranje te knipperen Dit betekent dat de camera zich nu in de verbindingsmodus bevindt ...

Page 79: ...netwerk ES CAM3A XXXX de laatste 4 cijfers staan voor de laatste 4 cijfers van de MAC ID achter op de camera De app iSecurity starten iOS Android Nadat verbinding is gemaakt na ongeveer 30 seconden opent u iSecurity iSecurity detecteert de camera automatisch Kies Yes Ja om de configuratie van de camera te starten ...

Page 80: ...n volg de instructies van de installatie assistent iOS Android 2 Voorbeeldweerga ve van de camera Wat de camera waarneemt wordt weergegeven op de interface de camera is verbonden Kies Connect camera to Internet Camera verbinden met het internet iOS Android ...

Page 81: ...k waarmee de camera verbinding moet maken ADSL modem router enz iOS Android 2 Voer het wachtwoord in van het gekozen Wi Fi netwerk en druk op Continue Doorgaan Opmerking Het kan enkele minuten duren voordat de camera verbinding heeft gemaakt met het internet iOS Android ...

Page 82: ...7 Verbinding met iSecurity 1 Maak een iSecurity account aan door de velden in te vullen iOS Android 2 Voer uw iSecurity gebruikersnaam en wachtwoord in om in te loggen iOS Android ...

Page 83: ...a en druk op Continue Doorgaan Opmerking De registratie van de camera op de iSecurity server duurt slechts enkele seconden iOS Android Voltooien van de installatie U kunt uw Android of iOS smartphone tablet gebruiken voor toegang tot de camera via een internetverbinding iOS Android ...

Page 84: ...era Opmerking Wanneer u onbedoeld op de reset knop achter op de camera heeft gedrukt en u geen verbinding wilt maken met een andere smartphone druk dan nogmaals op de reset knop Bedieningsfuncties op de camera iOS Android Een foto maken Een video opnemen Een foto maken Een video opnemen Inzoomen Uitzoomen U kunt in en uitzoomen door uw duim en wijsvinger op het scherm naar elkaar toe of van elkaar...

Page 85: ...tie en waarschuwingen Als de camera is ingeschakeld waarschuwt de iSecurity app u wanneer de camera een indringer of een beweging detecteert U kunt iSecurity downloaden via Google Play en de App Store Deze functie is standaard uitgeschakeld U kunt de functie inschakelen in de instellingen van de iSecrurity app Toegangtotdecameravanafeencomputer Klik op onderstaande link voor toegang tot de camera ...

Page 86: ...de camera opnieuw aan op de voet en schroef ze vast zie tekening hieronder Reset Druk langer dan 12 seconden op de knop achter op de camera totdat het LED lampje aan de voorkant oranje begint te knipperen om de fabrieksinstellingen te herstellen Bij verbindingsproblemen kunt u de ES CAM3A opnieuw opstarten door 5 seconden lang op de knop achter op de camera te drukken ...

Page 87: ... in een driehoek wijst de gebruiker op belangrijke gebruiks en onderhoudsinstructies in de meegeleverde documentatie Om brand en elektrische schokken te voorkomen mag dit PRODUCT niet worden blootgesteld aan regen of vocht Het apparaat mag niet worden blootgesteld aan druppels of spatten Voorwerpen gevuld met vloeistof zoals een vaas mogen niet op het apparaat worden geplaatst Om elektrische schok...

Page 88: ...der uit elkaar Sluit het apparaat aan op een wandcontactdoos die is aangesloten op een ander circuit dan dat van de ontvanger Neem contact op met de dealer of met een erkende radio of televisiemonteur voor hulp Veiligheidsinformatie De camera niet rechtstreeks op de zon richten om beschadiging van de beeldsensor te voorkomen De camera niet blootstellen aan hitte om elektrische schokken te voorkome...

Page 89: ...nte bepalingen van de Richtlijn 1999 5 EG R TTE Dit product is ontworpen en vervaardigd volgens de richtlijn 2002 95 EG van het Europees Parlement en de Raad ten aanzien van het gebruik van bepaalde gevaarlijke stoffen in elektrische en elektronische apparatuur RoHS richtlijn RoHS Er wordt vanuit gegaan dat het product voldoet aan de maximum concentratievoorschriften die zijn vastgesteld door het ...

Page 90: ...ETIGER EUROPE Rue de la Loi 25 7100 La Louvière België service etiger com ...

Page 91: ...www etiger com ES CAM3A Наружная IP камера RU ...

Page 92: ... G 711 PCM AAC Размеры 205 x 73 5 x 96 мм Масса 546 г Эксплуатационные условия от 20 до 50 C влажность 20 80 без конденсации Сертификат соответствия стандарту IP66 полная герметичность обеспечивающая защиту от пыли и направленных струй обычной и дождевой воды Источник питания 12 В 1 А 110 240 В штекер постоянного тока Совместимость со смартфонами под управлением iOS и Android а также с планшетными...

Page 93: ...ay Подключите камеру к электросети Подключите адаптер переменного тока к ES CAM3A а также к электросети Инициализация настроек В течение двух минут после подключения ES CAM3A светодиодный индикатор начнет попеременно мигать зеленым и оранжевым Указанное поведение свидетельствует о переходе камеры в подключенный режим ...

Page 94: ...еть ES CAM3A XXXX последние 4 цифры совпадают с последними 4 цифрами MAC ID на задней стороне вашей камеры Запустите приложение iSecurity iOS Android Если связь будет установлена после 30 секунд запустите iSecurity iSecurity автоматически обнаружит вашу камеру Выберите Yes чтобы начать настройку вашей камеры ...

Page 95: ... Continue и следуйте инструкциям мастера установки iOS Android 2 Предварительный просмотр краткое содержание Если на экране вашей камеры появились приложения значит она подключена Выбрать Подключение камеры к интернету iOS Android ...

Page 96: ...ь Wi Fi к которой необходимо подключить камеру через розетку ADSL маршрутизатор и т п iOS Android 2 Введите выбранный пороль сети WI FI и нажмите кнопку Continue Примечание Процесс подключения камеры к интернету может занять несколько минут iOS Android ...

Page 97: ...7 Подключение к iSecurity 1 Создать аккуант iSecurity заполнив необходимые поля iOS Android 2 Введите ваш логин и пароль для входа в iSecurity iOS Android ...

Page 98: ...камеры и нажмите Continue Примечание Регистрация вашей камеры на сервере iSecurity займет несколько секунд iOS Android Завершение установки Вы можете использовать ваш Android или iOS смартфон планшет для подключения камеры используя сеть интернета iOS Android ...

Page 99: ... камере описанный на стр 17 Примечание При ошибочном нажатии кнопки сброса сзади камеры то есть без необходимости подключить другой смартфон нажмите кнопку сброса еще раз Кнопки управления камеры iOS Android Фотография Запись видео Фотография Запись видео Увеличение уменьшение масштаба и вращение Для увеличения или уменьшения масштаба разведите или сведите пальцы на экране Сброс масштаба производи...

Page 100: ...Готовность к запуску настройки Wi Fi Обнаружение движения с отправкой уведомлений на мобильное устройство Если камера включена приложение iSecurity оповестит об обнаружении взлома или движения iSecurity можно загрузить в Google Play или App Store Доступ к камере с помощью компьютера Для получения доступа к камере с помощью компьютера проследуйте по приведенной ниже ссылке https app isecurityplus c...

Page 101: ...прикрепите камеру к основанию и соедините их вместе винтами см схему ниже Сброс настроек Для сброса настроек до заводских нажмите кнопку сзади камеры и удерживайте ее в течение 12 секунд пока светодиодный индикатор на передней панели не начнет мигать оранжевым При наблюдении проблем с подключением попробуйте перезапустить ES CAM3A нажав кнопку сзади камеры и удерживая ее в течение 5 секунд ...

Page 102: ...начен для предупреждения пользователя о наличии важных инструкций по эксплуатации и техническому обслуживанию ремонту в литературе прилагаемой к устройству Для предотвращения пожара или удара тока не допускайте пребывания камеры под дождем или в условиях высокой влажности Не допускайте попадания на устройство капель или брызг жидкостей с какого либо объекта например чашка помещенная на устройство ...

Page 103: ...е электропитания с помощью которой может быть обеспечена работв антенны Проконсультироваться с производителем или радио ТВ специалистом для окозания помощи Инструкции по технике безопасности Не направляйте камеру непосредственно на солнечный свет чтобы предотвратить повреждение датчика изображений Не подвергайте камеру воздействию высоких температур во избежание удара электрического тока Не допуск...

Page 104: ...бованиям и прочим положениям Европейской директивы 1999 5 ЕС Товар был разработан и произведен в соответствии с Директивой Европарламента 2002 95 EC и Совета по органичениям использования некоторых вредных веществ в электрическом и электронном оборудовании Директива RoHS RoHS и соответствует требованиям о предельных мерах концентрации установленным комитетом European Technical Adaptation Committee...

Page 105: ...ETIGER EUROPE Rue de la Loi 25 7100 La Louvière Belgium service etiger com ...

Reviews: