


ETC Setup and Connect Guide
Paradigm 18 inch Touchscreen
P-TS18 Touchscreen
Page 11 of 15
ETC
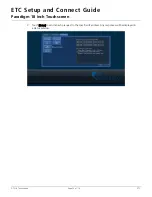
[File Manager]
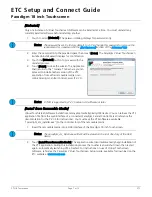
Touch the [File Manager] button to display an interface for basic management of files including copy,
move, delete and creation of new folders between the touchscreen internal hard drive and any connected
or removable media.
Copy or Move a File
1:
To copy or move a file between connected removable media and the Paradigm 18 inch Touchscreen,
touch to select the file from the list then touch the desired action.
- When copying or moving from the P-TS18 to removable media, select the [Copy>] or [Move>>]
button.
- When copying or moving from removable media to the P-TS18, select the [<Copy] or [<<Move]
button.
2:
Touch [Done] to close the File Manager.
New Folder
Create a new folder on either the P-TS18 or the removable media using the related [New Folder] button
beneath each section.
1:
Touch the [New Folder] button beneath the desired directory. An alphanumeric keypad displays for
naming of the new folder.
2:
Use the keypad to specify the new folder name.
3:
Touch the [Enter] button when done. The new folder displays in the directory.
4:
Touch [Done] to close the File Manager.
Delete
Delete a folder or file from either the P-TS18 or the removable media using the related [Delete] button
beneath each section.
1:
Select the desired folder or file from the directory.
2:
Touch the [Delete] button beneath the related directory. Confirmation is required before the file is
deleted.
3:
Touch [Yes] to delete the selected file or [No] to cancel.
4:
Touch [Done] to close the File Manager.