ESSENCORE KLEVV CRAS C700 series Installation Manual Download Page 7

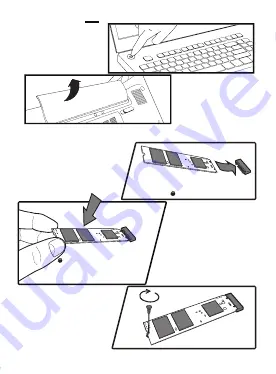
Power off your laptop.

Disconnect power cord 

and remove the battery.

Remove the existing M.2 SSD from the M.2 socket (if applicable). 

Refer to your owner’s manual for how to safely remove the existing 

M.2 drive.

Align the notches on the KLEVV

NVMe M.2 SSD with the ridges

in the M.2 socket, then insert 

as shown.

Hold KLEVV NVMe M.2 SSD 

along the side edges 

and lower it until it

sits on top of the

support assembly.

Insert screw into the support

assembly and securely 

fasten the KLEVV NVMe

M.2 SSD in.

Replace the cover and power on the computer

1.

2.

3.

4.

5.

6.

Swap Your Drives

Summary of Contents for KLEVV CRAS C700 series

Page 1: ...LATION Install Migration Tool Migrate Your Data Swap or Install Your Drives Change the Boot Order of the Drives from BIOS Install Migration Tool Migrate Your Data Swap Your Drives LAPTOP INSTALLATION...

Page 2: ...to consult your owner s manual or contact your motherboard or PC manufacturer for detailed information 1 System BIOS is capable of supporting NVMe SSD You may need to consult your owner s manual or co...

Page 3: ...or disassemble the SSD these actions void the SSD warranty Hardware Item 1 USB to NVMe M 2 2280 adaptor and USB cable 2 Screwdriver 3 Screws Laptop desktop computers to migrate your data Laptop deskto...

Page 4: ...are for the data migration Install Migration Tool Acronis True Image 2018 If your KLEVV NVMe M 2 SSD provides Migration Tool Acronis True Image 2018 please download the software and its user s manual...

Page 5: ...2 SSD along the side edges and lower it until it sits on top of the support assembly 6 Insert screw into the support assembly and securely fasten the KLEVV NVMe M 2 SSD in 7 Locate your computer s NVM...

Page 6: ...V NVMe M 2 SSD to the USB to NVMe M 2 2280 adaptor You may need to consult the user manual of your USB to NVMe M 2 2280 adaptor 2 Connect the KLEVV NVMe M 2 SSD to your laptop using the USB to NVMe M...

Page 7: ...the existing M 2 drive Align the notches on the KLEVV NVMe M 2 SSD with the ridges in the M 2 socket then insert as shown Hold KLEVV NVMe M 2 SSD along the side edges and lower it until it sits on top...

Page 8: ...For more information about warranty go to KLEVV website To apply for an RMA Return Material Authorization please contact technical support at support essencore com Warranty and Technical Support...

Reviews: