background image

U

N

SP

O

O

K B

RA

N

DI

N

G D

ES

IG

N M

AN

UA

L

>> 

PA

GE

 1

5 /

/ 4

4

U

NS

PO

OK


BR

AN

DI

NG

 M

AT

ERI

AL

CORP

OR

AT

E D

ESI

GN

AN

D G

U

ID

EL

IN

ES

>> 

PA

GE

 1

4 /

/ 3

6

U

N

SP

O

O

K B

RA

N

DI

N

G D

ES

IG

N M

AN

UA

L


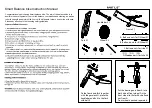
Remove the packaging from the seatpost and saddle. 


Make sure the seatpost collar is loose, then insert the seatpost into the seat tube. 


If the seatpost collar has a lever, that operates the same as the quick release skewer for the 

front wheel.  Hold the lever open 90°, make the adjustment nut finger tight, then close the lever 

pointing forwards, so it is parallel with the seatpost collar. 


If the seatpost collar only has a hex bolt, that can be tightened with the provided hex wrenches.  

Make sure that the gap in the seatpost collar is lined up with the gap in the seat tube. 


The saddle angle and position can be adjusted by loosening the large hex bolt directly under-

neath the saddle, where the seatpost clamps onto the saddle rails.  A good starting point for 

making saddle adjustments is to have the saddle angle flat, and the saddle clamp in the middle 

of the rails.  From there most riders like to angle the saddle down a bit and move the saddle fur-

ther forward. 


To adjust the saddle height, stand next to the bike and raise the saddle up to hip level.  When 

seated on the saddle and pedaling, the balls of your feet should be in the center of the pedal.  At 

the bottom of the pedal stroke, your leg should be almost fully extended but still slightly bent.  

With correct saddle height, you should NOT be able to rest your feet flat on the ground while 

seated. This would indicate too low of a saddle height and can cause knee damage. You should 

only be able to touch the ground with your toes while seated. When stopping on a bicycle, you 

will always need to stand up off the saddle until you start going again. 


Before the first ride, please make sure the following are tight and secure: 


All bolts on the stem and stem faceplate (DO NOT tighten the top cap bolt unless adjusting the 

headset) 


 Seatpost Collar and Saddle Bolt 


 Front Wheel Axle Nut or Quick Release 


 Pedals (right side/drive side clockwise, left side/non-drive side counter-clockwise) 


 All electronic plugs, including the motor cable plug behind the pedals, as well as the plugs by 

the handlebar for the display and brake motor cutoffs.  All the plugs have arrows on the male and 

female sides that should be aligned when plugged in.

7

  INSTALL THE SADDLE AND ADJUST  

     THE SADDLE HEIGHT

14

15

8

  SAFETY CHECKS

Summary of Contents for Aero

Page 1: ...CONTACT US HELLO ESPINBIKES COM PHONE NUMBER 888 296 4550 effortlessly electric Quick Start Guide ...

Page 2: ...ate the Tires 13 7 Install the Saddle and Adjust the Saddle Height 14 8 Safety Checks 15 9 Test Ride 16 10 Caring for Your Bike 17 11 Display Settings 18 AERO ASSEMBLY GUIDE Thank you for your purchase and welcome to the Espin family This guide will help you assemble operate maintain and enjoy your Espin for as long as possible For any questions or issues along the way please reach out to us onlin...

Page 3: ... from clamping to gether accidentally 1 3 To remove the bike lift the bike straight up out of the box Two people might be need ed for this Remember NEVER PLACE THE BOX ON ITS SIDE This can damage the derailleur and other components 1 6 Remove the metal or plastic dummy axle from the fork dropouts where the front wheel mounts This is there to protect the fork arms from damage during shipping If the...

Page 4: ...attery can take up to 7 hours The battery has overcharge protec tion so it will stop charging as soon as it is full This means it can safely be left plugged in overnight 2 4 While charging leave the charger on a smooth hard surface like wood or tile The charger may get fairly warm if left on carpet or other insulating materials When done charging always cover the charging port with the rubber cap ...

Page 5: ...e front wheel axle so that the quick release le ver is on the same side as the disc brake rotor as shown in Figure 2 Figure 2 8 9 Figure 3 3 4 Once the wheel is in the fork put the spring back on the quick release skewer with the small end facing inwards and thread the adjustment nut back on While holding the quick release lever at 90 to the fork as shown in Figure 3 screw the adjustment nut all t...

Page 6: ... shown in Figure 7 pro ceed to installing the handlebar in 4 4 4 2 To rotate the stem around first loosen the two bolts clamping the stem onto the steerer tube labeled in Figure 11 Once the bolts are loose brace the fork with your feet or legs and rotate the stem around clockwise as shown in Figure 6 After rotating the stem around if the fork seems harder to turn tight headset bearings then the to...

Page 7: ...pin uses tires with the standard level of puncture protection but for maximum puncture protection we recommend using either Tannus Armour Inserts or Mr Tuffy Tire Liners Check your tire size and the charts on their websites to see which sizes to get To maximize traction in icy winter conditions there are options available in most tire sizes for studded tires For specific recom mendations for which...

Page 8: ...rd To adjust the saddle height stand next to the bike and raise the saddle up to hip level When seated on the saddle and pedaling the balls of your feet should be in the center of the pedal At the bottom of the pedal stroke your leg should be almost fully extended but still slightly bent With correct saddle height you should NOT be able to rest your feet flat on the ground while seated This would ...

Page 9: ...essary for a bicycle is to inflate the tires once a week and to keep the chain clean and lubricated Any bicycle chain lube can be used but most mechanics use Tri Flow If the chain gets dirty or gunked up good chain cleaners are either isopropyl alcohol or Clean Streak These can be sprayed directly onto the chain and wiped clean with a rag or paper towel Most bicycle shops offer complete drivetrain...

Page 10: ...SPINBIKES COM PHONE NUMBER 888 296 4550 Quick Start Guide OK BRANDING DESIGN MANUAL GE 19 44 SCRYPE BRANDING MATERIAL CORPORATE DESIGN AND GUIDELINES ISSUE 01 GE 18 36 OK BRANDING DESIGN MANUAL 11 DISPLAY SETTINGS 18 19 ...

Reviews: