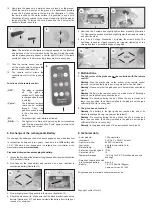
10. Now place the globe onto a water surface or place it on the ground.
When the lamp is mounted on the ground it is additionally possible
to use the 2 ground spikes to fasten it in the (illustration 7). When
the lamp is used on the water surface, it is possible to use a cord
(illustration 8) (not enclosed in the scope of supply) to limit the globe’s
range of motion. To fasten the cord, please use the 2 holes at the
bottom to thread the cord in.
Note: The duration of illumination strongly depends on the intensity
and duration of the solar radiation during the day. During the winter
months please generally expect a shorter light ON time. If the lamp
should not shine on the first evening, please wait for a sunny day.
11. Take the remote control and pull
out the plastic strip to activate the
remote control (illustration 9).
12. The remote control allows the
comfortable control of the globe at
night.
Functions of the remote control:
„OFF“:
The globe is switched
off. The globe is
switched off. The battery
is charged when the sun
is shining!
„Cycle“:
The individual luminous
colors can be switched
through. Then, the
globe continues running
in the alternating color
mode.
„W“:
Permanent light color white is activated.
„R,G,B ....“: The light color is firmly set by pressing the corresponding
color. Simply press the button “Cycle” again to return to the
alternating color mode.
6. Exchange of the rechargeable Battery
On average, the battery pack has to be exchanged by a new and identical
in construction battery every two years.
Used here is a NiMh battery with
1.2 V/ 1300 mAh.
A new battery pack is available from your retailer or the
manufacturer under
www.esotec.de
Proceed as follows when exchanging the battery:
1. Loosen the 4 screws at the bottom of the globe one after the other (illustration
10) and take off the lid.
2. Now take out the used battery and replace it by a new, identical in
construction battery (illustration 11).
3. Now precisely insert the gasket into the groove (illustration 12).
4. Attach the aluminum lid. Make sure that the black bracket is above the
battery (illustration 13). The bracket protects the battery from falling out
in case of convulsions.
5. Now take the 4 screws and slightly tighten them manually (illustration
14). Now take the enclosed tool and slightly tighten the screws clockwise
one after the other.
6. In a 2. and 3. stage (illustration 15) tighten the screws firmly. The
tightening in several stages prevents an irregular tightening of the
screws and thus a potential leakage of the globe.
7. Malfunctions
1. The light color of the globe can not be controlled with the remote
control!
Remedy: Was the plastic strip on the bottom of the remote control
removed (only when the lamp is put into operation for the first time)?
Remedy: Please note that the globe can only be remoted controlled at
night!
Remedy: Battery in the remote control too weak or used? Exchange
battery by an identical in construction type!
Remedy: No sunshine during the day. When the sky is cloudy and
there is no sunshine, the battery installed in the globe is not charged
sufficiently! Wait for a sunny day!
2. The glove has no function!
Remedy: The battery in the light globe has reached the end of its
lifetime (exchange it every two years at the latest!)?
Remedy: No sunshine during the day. When the sky is cloudy and
there is no sunshine, the battery installed in the globe is not charged
sufficiently! Wait for a sunny day!
Remedy: Is the globe switched on? See instructions item 4. part 5.
8. Technical data
• Solar module:
1 Wp crystalline
• Illuminants:
2 LEDs (1 x RGB; 1 x white)
• Light color white:
6500 K (cold-white)
• Luminosity:
with light color white 14 lm
• Material lamp:
PMMA
• Protection type light globe: IP 66
• Protection class:
III
• Temperature range:
-10°C up to +40°C (frost-free when used
floating!)
• Duration of illumination with
a fully charged battery:
max. 8 h
• Battery:
1,2 V/ 1300 mAh (Mignon)
Spare part art.-no: 901022
All spare parts are available under www.esotec.de
Copyright, esotec GmbH
9.
10.
11.
12.
13.
14.
15.
2-3x
8.
7.


