background image

- 18 -

Taking the microscope into use

Utilisation with table stand 

 (Model 33213)

In the variant with a table stand the appliance is largely pre-assembled.

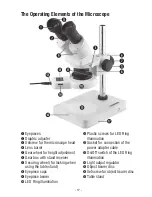
Move the microscope head a few centimetres upwards with the gear 

• 

wheel 

t

.

Loosen the setscrew for the microscope head 

• 

e

 and turn the microscope 

head so that the eyepieces are directed towards you. Then tighten them 
back up.
Place the two eyepiece cups 

• 

i

 onto the eyepieces.

Unscrew the protective cap of the lens barrel 

• 

r

 anti-clockwise.

Look through the two eyepieces 

• 

q

. Adjust the eyepiece spacing to your 

eye spacing by turning the eyepiece bearer 

o

 either inwards or outwards.

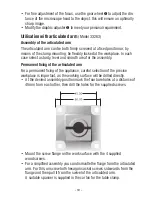
For the individual optimal contrast select either the black or the white side 

• 

of the object bearer disc 

h

.

To secure the disc, turn the setscrew 

• 

j

 until it is hand-tight.

Place the object that is to be examined by microscope on the object bearer 

• 

disc.
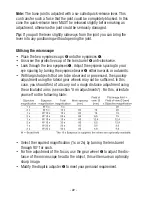
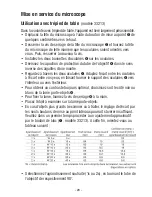
With largish objects that are to be observed or processed, the spacing-

• 

adjustment using the lateral gear wheels may not be sufficient. In this 
case, you should first of all carry out a rough distance adjustment by 
using the securing wheel (

u

, Model 33213). For this, orientate yourself 

on the following table: 

Select the required magnification (1x or 2x) by turning the lens barrel 

• 

through 90° for each.

Summary of Contents for 33213

Page 1: ...1 Bedienungsanleitung User Manual Mode d emploi Instrucciones de uso Modell Model Mod le Modelo 33213 33263 Stereomikroskop Stereo Microscope St r omicroscope Estereomicroscopio...

Page 2: ...2 Deutsch 3 English 14 Fran ais 25 Espa ol 36...

Page 3: ...g 12 Entsorgung 13 Sicherheitshinweise Gefahr eines elektrischen Schlages Schlie en Sie die Ringbeleuchtung des Ger tes ausschlie lich ber den mitgelieferten Netzadapter an eine ordnungsgem angeschlos...

Page 4: ...nassen H nden an da dies einen Kurzschluss oder elektrischen Schlag verursachen kann Achten Sie darauf dass das Kabel nicht eingeklemmt wird Machen Sie niemals einen Knoten in das Kabel und binden Sie...

Page 5: ...lett mit X X Triebkasten Tischstativ X X LED Ringbeleuchtung X X Netzadapter X X Staubschutzhaube X X 2 Okularmuscheln X X Hakenschl ssel X X Bedienungsanleitung X X Gew hrleistung Wir gew hren im Rah...

Page 6: ...t Stativaufnahme u Feststellknopf zur Arretierung bei Verwendung mit Tischstativ i Okularmuscheln o Okulartr ger a LED Ringbeleuchtung s Kunststoffschrauben f r LED Ringbeleuchtung d Buchse zum Anschl...

Page 7: ...lare q Passen Sie den Okularabstand Ihrem Augenabstand an indem Sie die Okulartr ger o einw rts oder ausw rts drehen F r jeweils optimalen Kontrast w hlen Sie entweder die schwarze oder wei e Seite de...

Page 8: ...und glatte Fl che zur Montage aus Festmontage des Gelenkarms Bei der Festmontage des Ger tes ist eine sorgf ltige Wahl des Arbeitsplatzes wichtig da die Arbeitsplatte direkt angebohrt wird Markieren...

Page 9: ...hen ihn vom Drehzapfen des Gelenkarms ab Ein passender Schl ssel liegt im Karton der Tischklemme bei Richten Sie den Aufschraubflansch mit den Bohrl chern bereinander aus und schrau ben Sie ihn mit de...

Page 10: ...d fixieren Sie dessen Sitz mit der Arretierschraube e Gelenkeinstellung Der Arm wurde mit Reibungsgelenken ausgestattet die in der Mitte und im Fu durch zus tzliche innenliegende Federn unterst tzt we...

Page 11: ...n ab Schauen Sie durch die beiden Okulare q Passen Sie den Okularabstand Ihrem Augenabstand an indem Sie die Okulartr ger o einw rts oder ausw rts drehen Bei gr eren zu betrachtenden oder zu bearbeite...

Page 12: ...uchtleistung mit dem MAX MIN Regler g ein Nach Gebrauch schalten Sie die LED Ringbeleuchtung wieder ab indem Sie den Ein Ausschalter in die 0 Position bringen Pflege und Wartung Verwenden Sie zur Rein...

Page 13: ...linie 2002 96 EC Entsorgen Sie das Produkt oder Teile davon ber einen zugelassenen Entsor gungsbetrieb oder ber Ihre kommunale Entsorgungseinrichtung Beachten Sie die aktuell geltenden Vorschriften Se...

Page 14: ...intenance and care 23 Disposal 24 Safety instructions Risk of electric shock Connect the ring illumination of the appliance exclusively via the supplied power adapter to a correctly installed mains po...

Page 15: ...ins adapter with wet hands this could result in a short circuit or you receiving an electric shock Ensure that the cable cannot be trapped in any way Never tie knots in the power cable and do not join...

Page 16: ...nd X X LED Ring illumination X X Power adapter X X Dust protection cover X X 2 Eyepiece cups X X Hook wrench X X Operating instructions X X Warranty We vouchsafe within the scope of current statutory...

Page 17: ...x with stand receiver u Securing wheel for locking when using the table stand i Eyepiece cups o Eyepiece bearer a LED Ring illumination s Plastic screws for LED Ring illumination d Socket for connecti...

Page 18: ...ece spacing to your eye spacing by turning the eyepiece bearer o either inwards or outwards For the individual optimal contrast select either the black or the white side of the object bearer disc h To...

Page 19: ...ea for the assembly Permanent fixing of the articulated arm For a permanent fixing of the appliance careful selection of the precise workplace is important as the working surface will be drilled direc...

Page 20: ...it from the swivel of the articulated arm A suitable spanner is supplied in the carton for the table clamp Align one above the other the screw on flange with the boreholes and and then firmly screw it...

Page 21: ...ad back on to the gear box and secure its seating with the setscrew e Arm adjustments The arm is equipped with friction joints which in the middle and in the base are additionally supported by interio...

Page 22: ...hrough the two eyepieces q Adjust the eyepiece spacing to your eye spacing by turning the eyepiece bearer o either inwards or outwards With largish objects that are to be observed or processed the spa...

Page 23: ...switch the appliance on Adjust the required light output with the MAX MIN regulator g After use switch the LED Ring illumination off by placing the On Off switch at the 0 position Maintenance and care...

Page 24: ...provisions of European Directive 2002 96 EC Arrange for the product or parts of it to be disposed of by a professional waste disposal company or by your communal waste facility Observe the currently a...

Page 25: ...en 34 Mise au rebut 35 Consignes de s curit Danger d lectrocution Raccordez l clairage annulaire de l appareil exclusivement par l adaptateur secteur compris dans la livraison une prise secteur raccor...

Page 26: ...et ne saisissez jamais l adaptateur secteur avec des mains mouill es dans la mesure o ceci peut causer un court circuit ou un choc lectrique Veillez ce que le cordon ne so pas coinc Ne faites jamais u...

Page 27: ...r de mise au point Tr pied de table X X Eclairage annulaire LED X X Adaptateur secteur X X Housse anti poussi re X X 2 bonnettes d oculaires X X Cl ergot X X Manuel d utilisation X X Garantie Dans le...

Page 28: ...tr pied u Bouton de blocage pour le blocage en cas d usage d un tr pied de table i Bonnettes d oculaires o Supports d oculaires a Eclairage annulaire LED s Vis en plastique pour l clairage annulaire...

Page 29: ...d une montre Regardez travers les deux oculaires q Adaptez l cart entre les oculaires l cart entre vos yeux en faisant tourner le support des oculaires o vers l int rieur ou vers l ext rieur Pour obte...

Page 30: ...Montage fixe du bras articul En cas de montage fixe de l appareil il faut veiller soigneusement choisir le poste de travail dans la mesure o le plan de travail est directement perfor Sur l emplacement...

Page 31: ...rer celle ci du pivot du bras articul Une cl adapt e se trouve dans le carton du dispositif de clampage Orientez la platine de fixation au dessus des perforations et vissez la fermement la m choire l...

Page 32: ...de de la vis de blocage e R glage de l articulation Le bras a t quip d articulations rainures qui sont soutenues par des ressorts suppl mentaires situ s l int rieur au milieu et dans le pied Pour r gl...

Page 33: ...sens inverse des aiguilles d une montre Regardez travers les deux oculaires q Ajustez l cart entre les oculaires l cart entre vos yeux en faisant tourner le support des oculaires o vers l int rieur ou...

Page 34: ...irage annulaire Mettez le bouton marche arr t de l clairage annulaire LED f en position I pour allumer l appareil R glez la puissance d clairage souhait e avec le r gulateur MAX MIN g Apr s usage teig...

Page 35: ...inverse Mise au rebut Ne jetez en aucun cas l appareil dans les ordures m nag res normales lorsqu il n est plus utilisable Cet appareil est soumis aux imp ratifs de la directive europ enne 2002 96 CE...

Page 36: ...rvaci n y mantenimiento 45 Evacuaci n 46 Indicaciones de seguridad Riesgo por descarga el ctrica Conecte el alumbrado circular del aparato exclusivamente mediante el adaptador de red suministrado a un...

Page 37: ...ble y no toque nunca el adaptador de red con las manos mojadas ya que esto podr a causar un cortocircuito o una descarga el ctrica Tenga cuidado de no aprisionar el cable No haga nunca un nudo en el c...

Page 38: ...do circular LED X X Adaptador de red X X Cubierta para el polvo X X 2 bordes de oculares X X Llave de gancho X X Instrucciones de uso X X Garant a Dentro del marco de las disposiciones legales garanti...

Page 39: ...del pie u Mando de fijaci n para bloquear en caso de uso con pie de sobremesa i Bordes del ocular o Soporte del ocular a Alumbrado circular LED s Tornillos de pl stico para el alumbrado circular LED...

Page 40: ...rio Mire a trav s de ambos oculares q Adapte la distancia de los oculares a la de sus ojos girando el soporte de los oculares o hacia dentro o hacia fuera Para obtener un contraste ptimo escoja el lad...

Page 41: ...re una superficie firme horizontal y lisa Montaje fijo del brazo articulado Para el montaje fijo del aparato es importante escoger cuidadosamente el puesto de trabajo ya que la placa de trabajo se per...

Page 42: ...lado En la caja de cart n de la abrazadera para mesa se adjunta la llave apropiada Alinee la brida con rosca con los taladros superpuestos y atorn llela con los pernos ordinarios en el soporte de apri...

Page 43: ...iento con el tornillo de bloqueo e Ajuste de articulaci n El brazo se dot de articulaciones por fricci n que se apoyan en el centro y en el pie con muelles internos adicionales Para regular el brazo n...

Page 44: ...sentido antiho rario Mire a trav s de ambos oculares q Adapte la distancia de los oculares a la de sus ojos girando el soporte de los oculares o hacia dentro o hacia fuera Si los objetos a observar o...

Page 45: ...minosa deseada con el regulador MAX MIN g Despu s de usar el aparato apague de nuevo el alumbrado circular LED poniendo el interruptor en la posici n 0 Conservaci n y mantenimiento Para la limpieza no...

Page 46: ...uropea 2002 96 EC Evac e el producto o las piezas del mismo en un centro de evacuaci n autorizado o a trav s de las instalaciones de evacuaci n comunitarias Preste atenci n a las normas en vigor En ca...

Page 47: ...47...

Page 48: ...48...

Reviews: