background image

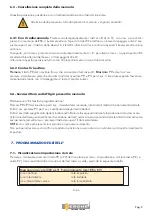
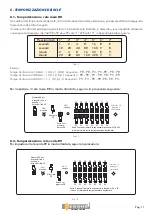
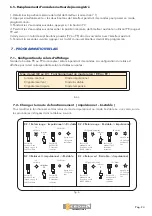
7.1 - Visualizzazione impostazione dei relè

Premere e mantenere premuto il tasto PR (o PV) del ricevitore per 4 sec. L'impostazione  del relè rosso RR ( o 
verde RV ) viene mostrata dalle accensioni dei led rosso o verde, secondo la seguente tabella:

Messaggio visivo led (LR o LV) Funzionamento relè ( RR o RV )

Luce continua

relè impulsivo

Luce intermittente

relè bistabile

luce intermittente veloce

relè temporizzato

6.4 - Sovrascrittura codici TX già presenti in memoria

Effettuare una  "Richiesta di programmazione".
Premere 

PR

 o 

PV

 del ricevitore per 4 sec. , il relativo led si accende, indicando il modo di funzionamento del relè.

Entro 2 sec. premere 

PV

 per 1 sec e verificare lo spegnimento del led.

Entro 2 sec dallo spegnimento del led, iniziare ad introdurre la sequenza indicante la posizione da sovrascrivere. 
Al termine della sequenza verificare l'accensione del led ( verde o rosso a seconda del relè attivato dal codice da 
sovrascrivere ) ed entro 4 sec. premere il tasto del nuovo TX da memorizzare.

NOTA

 : Un codice già presente in memoria non può essere reinserito.

Non può quindi essere sovrascritto né spostato di posizione o associato ad un relè diverso da quello inizialmente 
impostato.

7 - PROGRAMMAZIONE DEI RELE’

Tab.4

6.3  - Cancellazione completa della memoria

Questa operazione è possibile sia con il radiocomando sia con i tasti del ricevitore.

Al termine della procedura 

 tutti i dati presenti in memoria  vengono cancellati!

6.3.1 Con il radiocomando

 :Premere contemporaneamente i tasti 

A

 e 

B

 di un TX   con uno   o più codici 

presenti in memoria dell’RX; il buzzer emette un bip ed i led del RX emettono un breve lampeggio; entro 2 sec. 
premere per 4 sec. il tasto A dello stesso TX: il led LR si illumina di luce continua rossa ed il buzzer emette un bip 
continuo. 
Di seguito , entro 4 sec. premere di nuovo contemporaneamente A + B  per ulteriori 4 sec. ; a questo punto il RX 
emetterà 3 bip alternati del buzzer  e 3 lampeggi di LR e LV. 

Al termine di questa operazione tutti i codici TX presenti in memoria sono stati cancellati.

!

6.3.2 Con tasti ricevitore

:

Premere

 il tasto 

PR


del ricevitore fino a che si accende il led rosso LR; 

Rilasciare

 PR

 ed entro 2 sec. 

premere e mantenere premuti entrambi i tasti del ricevitore 

PR

 e 

PV

 per 4 sec. Il ricevitore segnala l'avvenuta 

cancellazione totale con 3 lampeggi dei 2 led e 3 bip del buzzer.

T H E S M A R T L I V I N G

Pag. 9

Summary of Contents for SEL2641F433C2P

Page 1: ...ZA 2 RELE 2 RELAY POWER RECEIVER RECEPTEUR 2 RELAYS PLUS LEISTUNGSEMPF NGER 2 KANAL Manuale d installazione ed uso Italiano Pag 4 Use and installation Manual English Pag 13 Notices d installation et u...

Page 2: ...L39R30 P4 est conforme la directive 2014 53 UE Le texte int gral de la d claration de conformit est disponible l adresse internet suivante www erone com Declaration of Conformity SEL2641R433 P4 SEL39R...

Page 3: ...F1 SicherungF1 Contatti Rel Verde Green relay contacs Contacts relais vert Kontakt gr n 5 Rel Verde Green relay Relais vert Leistungsrelais Morsetti alimentazione12 24 Vac dcModelli C2P Power supply t...

Page 4: ...di radiofrequenza e di compatibilit elettromagnetica CE Il codice ricevuto dal trasmettitore cambia ad ogni attivazione evitando cos il rischio della copia e successiva riproduzione Un sistema interno...

Page 5: ...portante 433 92 MHz 433 92 MHz Frequenza oscillatore locale 6 6128 MHz 6 6128 MHz Modulazione AM ASK FM FSK AM ASK FM FSK Impedenza d ingresso 50 Ohm 50 Ohm Larghezza di canale 25 KHz 25 KHz Frequenza...

Page 6: ...6 NA 3 4 Rel RV 8 9 NC C Rel RR NA 3 Collegare l antenna come segue fig 8 se collegate un antenna non in dotazione collegare la calza al morsetto 14 ed il centrale al morsetto 13 oppure collegare il f...

Page 7: ...o A B dello stesso TX per 4 sec il led LR LV si accende di luce continua rossa verde ed il buzzer emette un bip continuo Biiiiiiip alternato Bip Bip Bip Fase 3 Memorizzazione Premere entro 2 sec il ta...

Page 8: ...za possibile risalire alla posizione di memoria in base alla tabella seguente Led acceso 1 2 3 4 5 6 7 Peso colore verde 1 2 4 8 16 32 64 Peso colore rosso 0 0 0 0 0 0 0 Esempio Sequenza di accensione...

Page 9: ...re sovrascritto n spostato di posizione o associato ad un rel diverso da quello inizialmente impostato 7 PROGRAMMAZIONE DEI RELE Tab 4 6 3 Cancellazione completa della memoria Questa operazione possib...

Page 10: ...re le procedure indicate delle tabelle seguenti Tenere premuto PR per 4 sec fino a quando LR si accende LR si accende Rilasciare PR Entro 2 sec premere ancora PR LR si spegne Dopo 4 sec LR lampeggia l...

Page 11: ...equenza PV PV PR PR PR PR PV 8 TEMPORIZZAZIONE DEI RELE Tab 5 Per impostare il rel rosso RR in modo ritardato seguire la procedura seguente LR si accende LR si spegne Entro 2 sec premere ancora PR Pre...

Page 12: ...o the device to control gate garage door rolling shutters awnings anti burglar appliances lighting etc The receiver has 2 output relays with NO Normally open and NO NC Normally open and normally close...

Page 13: ...n 2 receivers should be more than 1 5 m Tab 2 2 TECHNICAL SPECIFICATIONS The Series R433 use AM ASK demodulation The Series F433 use AM ASK demodulation Characteristics Mod AM SEL 2641F433C2V SEL2641F...

Page 14: ...1 12 fig 2 Terminal 10 24 Vac dc terminal 11 12 Vac dc terminal 12 0 2 Connect the loads to the relay outputs according the following table fig 3 terminal 5 C relay green RV terminal 6 NO relay green...

Page 15: ...a while Phase 2 Programming enabling Keep the key A B pressed down for 4 sec of the same TX the led LR remains lit the led LV start to flash and the buzzer emits a long bip starts to bip Bip Bip Bip...

Page 16: ...t 1 2 3 4 5 6 7 Green colour weight 1 2 4 8 16 32 64 Red colour weight 0 0 0 0 0 Example Led sequence LR LR LV LV LR LR LR Equivalence to calculate 0 0 4 8 0 0 0 12 The transmitter key was been memori...

Page 17: ...e led LV turn on Within 2 sec press again PR After 4 sec LV flashes slowly Keep PR pressed down for 4 sec until the led LR turn on LR flashes Release PR Within 2 sec press again PR LR turns off After...

Page 18: ...4 5 6 7 Seconds 1 2 4 8 16 PR PR Seconds 10 20 40 80 160 PV PR Minutes 2 4 8 16 32 PR PV Minutes 20 20 80 160 320 PV PV That means that if the release time to set is 2 seconds the sequence of pressur...

Page 19: ...teurs de la gamme ERONE 433 peuvent emmagasiner dans le EEPROM un num ro de s rie une clef industrielle et un algorithme synchronis d autres metteurs La programmation peut tre faite sur le mode automa...

Page 20: ...r quence de l oscillateur local 6 6128 MHz 6 6128 MHz D modulation AM ASK FM FSK AM ASK FM FSK Imp dence 50 Ohm 50 Ohm Largeur canal 25 KHz 25 KHz Fr quence interm diaire 10 7 MHz 10 7 MHz Sensibilit...

Page 21: ...3 4 Relais RV 8 9 NC C Relais RR NA 3 si vous connectez une antenne option brancher l me sur la borne 13 et la tresse sur la borne 14 a d faut brancher le fil fourni sur la borne 13 Brancher le fil d...

Page 22: ...x boutons et pousser imm diatement les clefs A ou B afin de s lectionner le contact correspondant cette programmation et maintenir la pression pendant 4 secondes La LED du contact correspondant s allu...

Page 23: ...oir du r cepteur 2 1 Pousser en m me temps les clefs A et B d un TX dont les codes sont pr sents dans la m moire du RX le buzzer met un bip et les leds s allument pour un instant pendant les deux seco...

Page 24: ...s 2 secondes suivantes LR s t int Apr s 4 sec LR clignote lentement 8 2 1 Relais rouge Impulsionnel Bi stable 8 2 3 Relais vert Impulsionnel Bi stable Pousser PR pendant 4 sec jusqu ce que la led LR s...

Page 25: ...quence PV PV PR PR PR PV PR 8 CONFIGURATION DU TEMPS DES RELAIS Tab 5 Pour programmer le relais rouge RR comme temporis suivre la proc dure suivante Fig 7 LR s allume LR s et int Pousser PR pendant le...

Page 26: ...Programmierung erfolgt selbstlernend durch 2 Tasten 2 TECHN DATEN Tab 2 Tab 1 1 EINLEITUNG DEUTSCH Daten SEL2641R433C2P SEL2641R433C2V Empf ngertyp Superheterodyne Superheterodyne Modulation AM ASK AM...

Page 27: ...ramm 380 Gramm Abmessung 140x115 x 52 mm 140x115x52mm Modell 3 FUNKTION Funkfernprogrammierung ber Handsender Einlernen und L schen der Codes 85 100 Codes speicherbar Anzeige der gespeicherten Codes A...

Page 28: ...24V Klemme 11 12V Klemme 12 0 V Minus 10 11 13 24 Abb 2 14 12 12 0 AC Sicherung F1 315 mA nur Model XX C2V F1 Abb 3 Relaisausg nge Klemme 5 Relais 1 C Klemme 6 Relais 1 NO Klemme 7 Relais 2 NC Klemme...

Page 29: ...et kontinuierlich auf rot gr n und der Summer gibt einen kontinuierlichen piep Ton aus Wechsel piep piep Speicherung des neuen Handsenders innerhalb 2 Sek dr cken der zu speichernden Taste Die LED erl...

Page 30: ...urz Innerhalb 2 Sek f r 4 Sek die Taste A des Handsenders erneut bet tigen die LED LR leuchtet st ndig und der Summer piept st ndig Innerhalb 4 Sek nochmals Taste A und B des Handsenders gleichzeitig...

Page 31: ...rieben 8 4 Timerprogrammierung rotes Relais RR Die Programmierung der Zeitverz gerung kann nur vom Zustand monostabil erfolgen Die Taste PR des Empf ngers f r 4 Sek bet tigen die rote LED LR leuchtet...

Page 32: ...vom inneren angezeigten Herstellungsdatum W hrend solcher Periode wenn das Ger t nicht korrekt wegen eines defekten Bauelements arbeitet wird es beseitigt oder nach Hersteller Entscheidung ersetzt Die...

Reviews: