background image

Before Use

How to Read This Manual

This manual uses illustrations to explain its operations.
The pictures shown in this manual are for reference only, the actual items are 
the standards.

To ensure your safety and the safety of your car and others, please make sure you 
follow the basic requirements below:

Warning

Before using the unit, please read all the relative instructions carefully. 
Warranty does not apply to any damage caused by noncompliance with the 
instruction.

To ensure driving safety and avoid breaking traffic regulation, please do not 
watch program or operate the unit while you are driving.

Do not expose the unit to rainwater in case of short circuit.

To prevent a short circuit, never put or left any metallic objects (such as coins 
or metal tools) inside the unit.

Please use the unit according to this instruction manual. Do not open the 
unit to repair by yourself. If necessary, please go to the professional repair 
station for help.

Do not use the car audio for a long time after the engine is turned off, 
otherwise the battery shall be used up.

Do not insert any object into the ventilation slot or other openings.

Do not touch, rub or knock the screen with sharp objects.

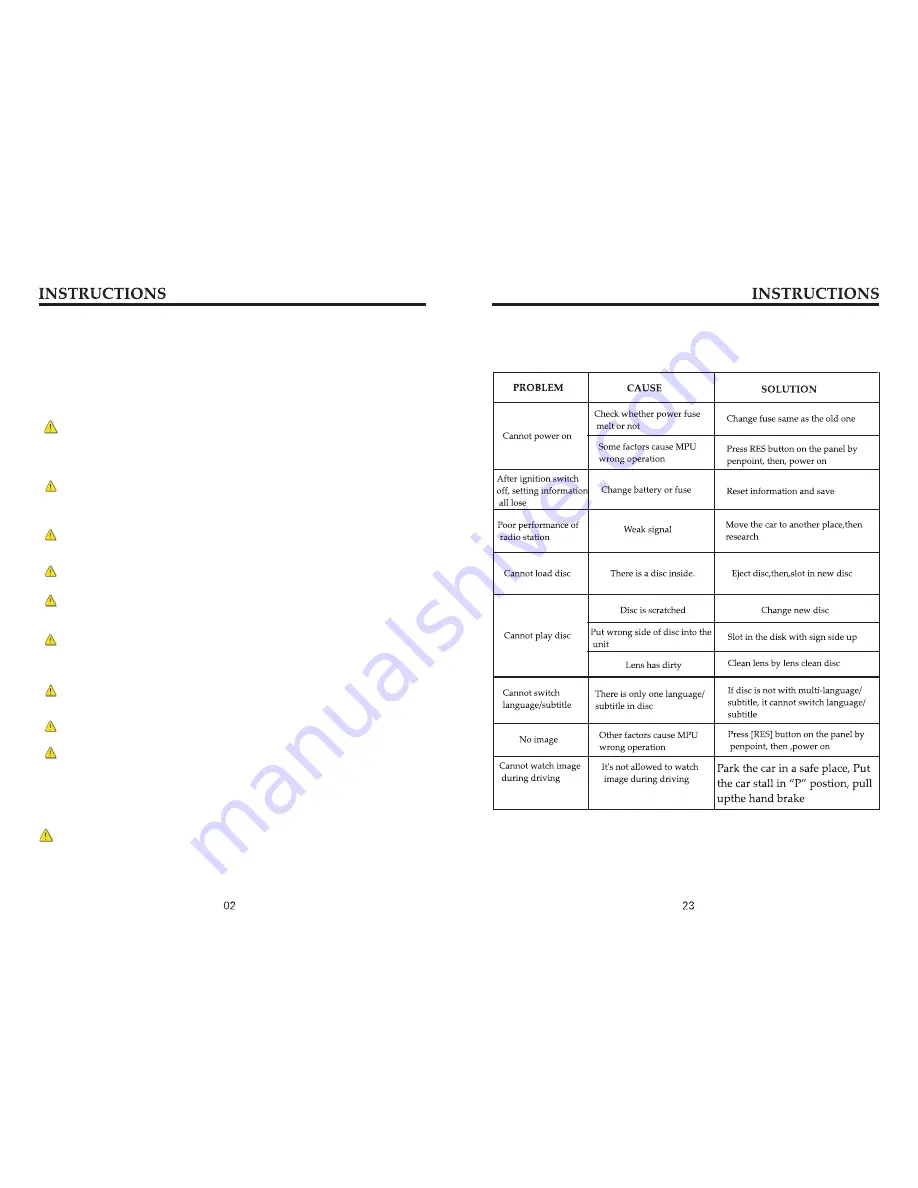
Reset Device

If the unit or the connected unit fails to operate properly, press the reset hole with 
a pointed tool. The unit returns to factory settings after the unit is restarted.

        Applying spray cleaner directly to the 
Wiping the faceplate with a hard cloth or using a volatile fluid such as thinner 
or alcohol may scratch the surface or erase characters.  

unit may affect its mechanical parts. 

Additional Information

Trouble shooting

Summary of Contents for ES812G

Page 1: ......

Page 2: ......

Page 3: ...SD Card Function Operation Bluetooth Function Operation Analog TV Function Operation GPS Navigation Function Operation Other Function Operations 4 Basic operation of setup menu Navigation Path Setup V...

Page 4: ...ft any metallic objects such as coins or metal tools inside the unit Please use the unit according to this instruction manual Do not open the unit to repair by yourself If necessary please go to the p...

Page 5: ...tively Touch Setup icon in the main interface Enter into setup interface Switch page touch Steering Wheel Setup icon Enter into steering wheel setup nterface Steering Wheel Setup Setup method Click bu...

Page 6: ...just the display screen brightness according to the intensity of light of the environment to achieve satisfactory effect At the same time to ensure that the driver s sight will not be affected during...

Page 7: ...touch the screen Tweeter woofer subwoofer adjust volume level of tweeter woofer subwoofer Left front speaker attenuate adjust volume level of left front speaker Right front speaker attenuate adjust vo...

Page 8: ...ff When the unit supports bluetooth function press the button to hang up a call after the call is completed 10 BAND P N in radio mode press the button to switch the band Under playback and TV status p...

Page 9: ...mode press the button to switch among different setup options 26 OSD Press the button to display title chapter playing time and remaining time 27 ZOOM Under VCD DVD reading status press the button to...

Page 10: ...tion in the pre stored station list in the radio main interface the searched station will be stored in the selected position such as Search store browse station Enter exit Touch in the main interface...

Page 11: ...fic announcement is completed it will automatically switch to the previous mode 2 PTY PTY function allows searching for special program types Touch PTY button to select searched program type Three sec...

Page 12: ...ng name to select and play you can also click the numeric keypad button and enter song number to selected your favorite song to play During playback of disc touch the bottom center area of the screen...

Page 13: ...ve the dialing answering function and the function of phonebook on the screen Touch icon in the main interface to enter the bluetooth interface Touch icon to exit bluetooth interface Pair link The fir...

Page 14: ...nit by a USB connecting cable 2 When there is a need to eject the USB device exit the USB device playback screen first and then take out the device Insert eject SD card 1 Insert a SD card recorded wit...

Reviews: