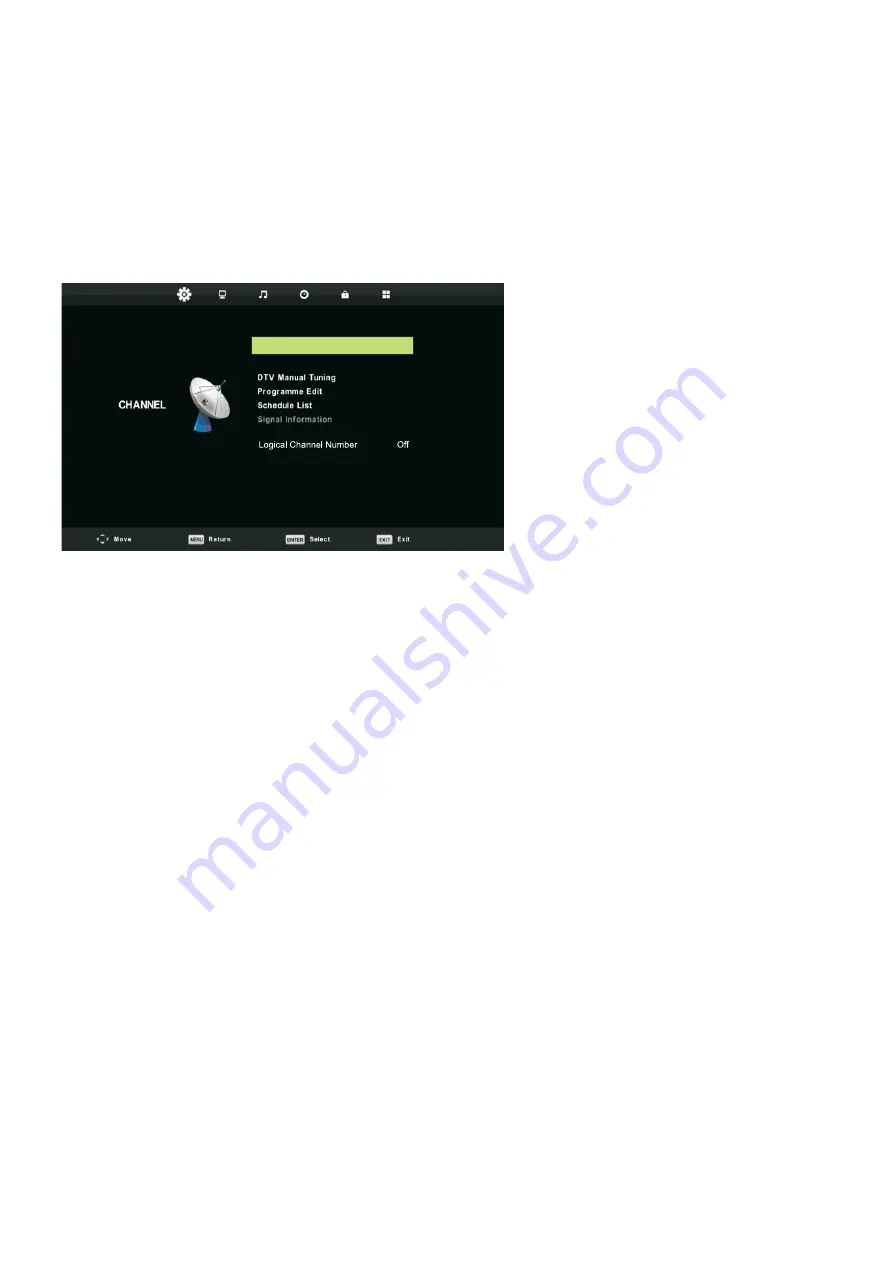
background image

8. Channel setting

Channel menu

Press MENU on the remote control to display the main Menu.

1. Press


 / 


button select CHANNEL in the main menu,then press 

OK / 

 to enter.

2. Press


 / 


button to select the option that you want to adjust in the CHANNEL menu.

3. Press 

OK/

 / 

 button to adjust.

4. Aft

er finishing y

our adjustment, Press MENU button to return back to the previous menu.

1.Auto Tuning

Press


 / 


button to select Auto Tuning, then press 

OK/

 button to enter.

2.ATV Manual Tuning

Press 

 / 

 button to select ATV Manual Tuning, then press OK button to enter sub-menu.

Press


 / 


button to select channel, then press OK button to search program.

3.DTV Manual Tuning

Press 

 / 

 button to select DTV Manual Tuning, then press OK button to enter sub-menu.

Press 

 / 


button to select channel, then press OK button to search program.

4.Program Edit

Press


 / 


button to select Program Edit, then press OK button to enter sub-menu.

5.Schedule List

Press 

 / 

 button to select Schedule List, then press OK button to enter sub-menu. It is

available in source.

6.Signal Information

Press 

 / 

 button to select Signal Information, press the OK button to see the detail

information about the signal. Only available when there is signal in DTV.

7.CI Information

Press 

 / 

 button to select CI Information, press the OK button to see the CI information about

the signal.

 18

Auto Tuning

ATV Manual Tuning

CI Information

Summary of Contents for LE43CT5000AK

Page 1: ...UA LED LE43CT5000AK...

Page 2: ...1 2 3 2 6 3 7 4 8 9 5 10 HDMI 10 Y Pb Pr L R 11 L R 11 VGA HDMI 12 6 13 13 14 15 7 16 16 16 16 17 17 17 8 18 9 19 10 20 11 21 12 22 13 23 14 USB 24 15 27 16 29 1...

Page 3: ...1 1 2 3 4 5 6 7 8 9 10 11 12 13 14 15 16 17 18 2...

Page 4: ...1 1 2 3 4 5 6 7 8 9 10 3...

Page 5: ...1 11 12 13 810 ANSI NFPA 70 14 15 4 NEC Section 810 21 NEC Art 250 Part H NEC NEC Section 810 20...

Page 6: ...1 16 17 18 a 5...

Page 7: ...2 6 2 SOURCE P MODE S MODE FAV SLEEP FREEZE CH LIST AUTO ASPECT TEXT EPG REVEAL HOLD INDEX SUBPAGE SIZE SUBTITLE MENU EXIT DISPLAY CH VOL Audio MINI YPBPR IN...

Page 8: ...3 1 1 2 2 3 3 1 2 4 2 3 3 7 1 2 3 1 2 3...

Page 9: ...1 2 MENU 3 INPUT 4 CH 5 VOL 4 8...

Page 10: ...RGB RGB 2 PC Audio input RGB Audio Out 3 AV OUT CVBS L R AV OUT 4 RF VHF UHF 5 HDMI Input Terminal HDMI 6 COAX OUT 7 MINI AV IN V L R L R YPbPr 8 MINI YPbPr IN YPbPr 9 CI SLOT CI CI 10 USB 11 EARPHON...

Page 11: ...HDMI 75 VHF UHF HDMI Blu Ray HDMI VHF UHF 5 75 HDMI HDMI 10 HDMI...

Page 12: ...5 Y Pb Pr L R 11 DVD DVD L R...

Page 13: ...YPbPr VGA HDMI 480i 640 x 480 60 480i 576i 800 x 600 60 576i 480P 1024 x 768 60 480P 576P 576P 720P 50 1366 x 768 60 1920 x 1080 60 720P 50 720P 60 720P 60 1080i 50 1080i 50 1080i 60 1080i 60 1080P 5...

Page 14: ...6 1 2 3 t t t t t t 1 2 4 8 30 13 30 30 MUTE POWER SOURCE P MODE S MODE FAV SLEEP FREEZE CH LIST AUTO ASPECT TEXT EPG REVEAL HOLD INDEX SUBPAGE SIZE SUBTITLE MENU EXIT DISPLAY CH VOL Audio...

Page 15: ...ODE FAV SLEEP FREEZE CH LIST AUTO ASPECT TEXT EPG REVEAL HOLD INDEX SUBPAGE SIZE SUBTITLE MENU EXIT DISPLAY CH VOL Audio 7 4 19 9 13 17 14 24 10 25 27 22 3 5 6 2 18 8 1 11 12 15 16 20 28 26 30 21 23 2...

Page 16: ...0 5 7 6 4 S MODE 3 P MODE 19 DISPLAY 8 CH LIST 9 AUTO VGA 16 17 OK 11 ATV 12 2 3 13 20 22 TEXT 27 HOLD 29 SUBTITLE 26 INDEX 28 SIZE 25 REVEAL 23 EPG 33 SUBPAGE 24 AUDIO 30 35 37 36 34 31 32 FAV SLEEP...

Page 17: ...2 3 4 5 MENU 1 MENU 2 3 4 5 MENU 1 Channel CH 16 P MODE S MODE FAV SLEEP FREEZE CH LIST AUTO ASPECT SOURCE TEXT EPG REVEAL HOLD INDEX SUBPAGE SIZE SUBTITLE DISPLAY CH VOL Audio Auto Tuning ATV Manual...

Page 18: ...MUTE 1 SOURCE 2 DTV ATV AV HDMI Media 3 OK 1 MENU 2 3 4 OK 5 MENU 17 SOURCE TEXT EPG REVEAL HOLD INDEX SUBPAGE SIZE SUBTITLE DISPLAY CH VOL Audio Auto Tuning ATV Manual Tuning CI Information Input So...

Page 19: ...8 MENU 1 OK 2 3 OK 4 MENU 1 OK 2 ATV ATV OK 3 DTV DTV OK OK 4 OK 5 OK 6 OK DTV 7 CI CI OK CI 18 Auto Tuning ATV Manual Tuning CI Information...

Page 20: ...9 MENU 1 2 3 4 OK 5 MENU 1 OK 2 NTSC 3 4 OK 5 HDMI Mode 19...

Page 21: ...10 MENU 1 2 1 MODE 2 3 4 Auto Volume Level OK On Off 5 SPDIF SPDIF OK PCM 6 AD Switch AD Switch OK 20...

Page 22: ...11 MENU 1 2 OK 1 OK 2 OK 3 OK 15 30 45 60 90 120 240 4 OK 5 OK 21...

Page 23: ...12 1 MENU 2 OK 1 OK 3 0000 2 3 OK 4 OK 5 6 22...

Page 24: ...13 MENU 1 OK 2 3 OK 4 1 2 OK 3 OK 4 OK 5 6 PVR OK PVR OK USB 7 OK 4 3 16 9 Zoom1 Zoom2 8 OK 9 10 OK 11 USB USB USB USB 12 HDMI CEC HDMI CEC OK 23...

Page 25: ...13 USB SOURCE USB 2 II 3 I I 24 Pause RepeatALL Info jlbhd jpg Play Play Aa Char Set Time 14 30 58 Date Fri Mar 14 2014 Music Playlist Aa Char Set Previous...

Page 26: ...13 USB t 51 t t 64 5 64 5 5 4 t 64 64 64 64 64 64 t 64 t 64 64 64 t t t 64 t t 1 3 D 3 t h t 64 t 64 t 64 25...

Page 27: ...MPEG 4 H 264 ts trp MPEG 2 H 264 mpg MPEG 1 MPEG 2 mkv mov MPEG 1 2 4 H 264 dat MPEG 1 352 288 20 vob MPEG 2 720 576 20 jpg JPEG 1024 768 jpeg JPEG 15360 8640 bmg 9600 6400 1 4 8 16 24 32 png 9600 640...

Page 28: ...14 27 t t t t t t t t t t t t t h t 65 t t t t t t t t 6 t...

Page 29: ...14 28 AVC 1 2 HDMI 13 AIR CABLE CATV WIDE...

Page 30: ...2 60 3 5 CI Slot 3xHDMI VGA In D Sub AV in PC Audio In YPBPR In mini RF USB 2 0 Coaxial PAL SECAM DVB C T T2 USB MPEG 1 2 Xvid MJPEG H 263 H 264 MP3 AC3 PCM JPEG BMP 8 8 110 240 50 75 0 75 IP20 A 966...

Page 31: ...30 ERGO LE43CT5000A A 43 109 48 __ 15 XYZ 365 70 1920 1080...

Page 32: ...RU LED LE43CT5000AK...

Page 33: ...1 2 3 2 6 3 7 4 8 9 5 10 HDMI 10 Y Pb Pr L R 11 L R 11 VGA HDMI 12 6 13 13 14 15 7 16 16 16 16 17 17 17 8 18 9 19 10 20 11 21 12 22 13 23 14 USB 24 15 27 16 29 1...

Page 34: ...1 1 2 3 4 5 6 7 8 9 10 11 12 13 14 15 16 17 18 2...

Page 35: ...1 1 2 3 4 5 6 7 8 9 10 3...

Page 36: ...1 11 12 13 810 ANSI NFPA 70 14 15 4 NEC Section 810 21 NEC Art 250 Part H NEC NEC Section 810 20...

Page 37: ...16 17 18 a 5...

Page 38: ...2 6 2 SOURCE P MODE S MODE FAV SLEEP FREEZE CH LIST AUTO ASPECT TEXT EPG REVEAL HOLD INDEX SUBPAGE SIZE SUBTITLE MENU EXIT DISPLAY CH VOL Audio MINI YPBPR IN...

Page 39: ...3 1 1 2 2 3 3 1 1 2 4 2 3 3 7 1 2 3 1 2 3...

Page 40: ...1 2 MENU 3 INPUT 4 CH 5 VOL 4 8...

Page 41: ...RGB RGB 2 PC Audio input RGB Audio Out 3 AV OUT CVBS L R AV OUT 4 RF VHF UHF 5 HDMI Input Terminal HDMI 6 COAX OUT 7 MINI AV IN V L R L R YPbPr 8 MINI YPbPr IN YPbPr 9 CI SLOT CI CI 10 USB 11 EARPHON...

Page 42: ...HDMI 75 VHF UHF HDMI Blu Ray HDMI VHF UHF 5 75 HDMI HDMI 10 HDMI...

Page 43: ...5 Y Pb Pr L R 11 DVD DVD L R...

Page 44: ...YPbPr VGA HDMI 480i 640 x 480 60 480i 576i 800 x 600 60 576i 480P 1024 x 768 60 480P 576P 576P 720P 50 1366 x 768 60 1920 x 1080 60 720P 50 720P 60 720P 60 1080i 50 1080i 50 1080i 60 1080i 60 1080P 5...

Page 45: ...6 1 2 3 t t t t t t 1 4 8 30 13 30 30 MUTE POWER SOURCE P MODE S MODE FAV SLEEP FREEZE CH LIST AUTO ASPECT TEXT EPG REVEAL HOLD INDEX SUBPAGE SIZE SUBTITLE MENU EXIT DISPLAY CH VOL Audio...

Page 46: ...ODE FAV SLEEP FREEZE CH LIST AUTO ASPECT TEXT EPG REVEAL HOLD INDEX SUBPAGE SIZE SUBTITLE MENU EXIT DISPLAY CH VOL Audio 7 4 19 9 13 17 14 24 10 25 27 22 3 5 6 2 18 8 1 11 12 15 16 20 28 26 30 21 23 2...

Page 47: ...0 5 7 6 4 S MODE 3 P MODE 19 DISPLAY 8 CH LIST 9 AUTO VGA 16 17 OK 11 ATV 12 2 3 13 20 22 TEXT 27 HOLD 29 SUBTITLE 26 INDEX 28 SIZE 25 REVEAL 23 EPG 33 SUBPAGE 24 AUDIO 30 35 37 36 34 31 32 FAV SLEEP...

Page 48: ...2 3 4 5 MENU 1 MENU 2 3 4 5 MENU 1 Channel CH 16 P MODE S MODE FAV SLEEP FREEZE CH LIST AUTO ASPECT SOURCE TEXT EPG REVEAL HOLD INDEX SUBPAGE SIZE SUBTITLE DISPLAY CH VOL Audio Auto Tuning ATV Manual...

Page 49: ...MUTE 1 SOURCE 2 DTV ATV AV HDMI Media 3 OK 1 MENU 2 3 4 OK 5 MENU 17 SOURCE TEXT EPG REVEAL HOLD INDEX SUBPAGE SIZE SUBTITLE DISPLAY CH VOL Audio Auto Tuning ATV Manual Tuning CI Information Input So...

Page 50: ...8 MENU 1 OK 2 3 OK 4 MENU 1 OK 2 ATV ATV OK 3 DTV DTV OK OK 4 OK 5 OK 6 OK DTV 7 CI CI OK CI 18 Auto Tuning ATV Manual Tuning CI Information...

Page 51: ...9 MENU 1 2 3 4 OK 5 MENU 1 OK 2 NTSC 3 O 4 OK 5 HDMI Mode 19...

Page 52: ...10 MENU 1 r 2 1 MODE 2 3 4 Auto Volume Level OK 5 SPDIF SPDIF OK PCM 6 AD Switch AD Switch OK 20...

Page 53: ...11 MENU 1 2 OK 1 OK 2 OK 3 OK 15 30 45 60 90 120 240 4 OK 5 OK 21...

Page 54: ...12 1 MENU 2 OK 1 OK 3 0000 2 3 OK 4 OK 5 6 22...

Page 55: ...13 MENU 1 OK 2 3 OK 4 1 2 OK 3 OK 4 OK 5 6 PVR OK PVR OK USB 7 OK 4 3 16 9 Zoom1 Zoom2 8 OK 9 10 OK 11 USB USB USB USB 12 HDMI CEC HDMI CEC OK 23...

Page 56: ...13 USB SOURCE USB 2 II 3 I I 24 Pause RepeatALL Info jlbhd jpg Play Play Aa Char Set Time 14 30 58 Date Fri Mar 14 2014 Music Playlist Aa Char Set Previous...

Page 57: ...13 USB t 51 t t 64 5 64 5 5 4 t 64 64 64 64 64 64 t 64 t 64 64 64 t t t 64 t t 1 3 3 t t 64 t 64 t 64 25...

Page 58: ...4 ts trp MPEG 2 H 264 mpg MPEG 1 MPEG 2 mkv mov MPEG 1 2 4 H 264 dat MPEG 1 352 288 20 vob MPEG 2 720 576 20 jpg JPEG 1024 768 jpeg JPEG 15360 8640 bmg 9600 6400 1 4 8 16 24 32 png 9600 6400 1200 800...

Page 59: ...14 27 t t t t t t t t t t t t t t 65 t t t t t t t t 6 t...

Page 60: ...14 28 AVC 1 2 HDMI 13 AIR CABLE CATV WIDE...

Page 61: ...2 60 3 5 CI Slot 3xHDMI VGA In D Sub AV in PC Audio In YPBPR In mini RF USB 2 0 Coaxial PAL SECAM DVB C T T2 USB MPEG 1 2 Xvid MJPEG H 263 H 264 MP3 AC3 PCM JPEG BMP 8 8 110 240 50 75 0 75 IP20 A 966...

Page 62: ...User manual Read this manual carefully before using TV set please EN LED TV SET MODEL LE43CT5000AK...

Page 63: ...ace 12 6 Using the Remote Control Inserting Remote Control Batteries 13 Operating the Remote Control 13 Remote Control 14 Remote Control function buttons 15 7 Basic operation of the TV Turning the TV...

Page 64: ...ods of time 14 Refer all servicing to qualified service personnel Servicing is required when the apparatus has been damaged in any way such as power supply cord or plug is damaged liquid has been spil...

Page 65: ...a child or adult and serious damage to the TV 7 Transporting the Television A TV and cart combination should be moved with care Quick stops excessive force and uneven surfaces may cause the TV and car...

Page 66: ...r cable system is connected to the TV be sure the antenna or cable system is ground ed so as to provide some protection against voltage surges and built up static charges Article 810 of the National E...

Page 67: ...the wall outlet and refer servicing to qualified service personnel under the following conditions a If the power supply cord or plug is damaged b If liquid has been spilled or objects have fallen int...

Page 68: ...Please make sure the following items are included with your LED TV If any items are missing please contact your dealer 6 SOURCE P MODE S MODE FAV SLEEP FREEZE CH LIST AUTO ASPECT TEXT EPG REVEAL HOLD...

Page 69: ...rews see Figure 2 3 Stand the TV up see Figure 3 Disconnecting the Stand 1 Lay the TV flat on a table with the LED screen face down To prevent the TV from being scratched put a piece of soft cloth on...

Page 70: ...witch OSD menu ON OFF 3 INPUT Select input source 4 CH Channel up down when source is TV or select a control while in OSD menu 5 VOL Increase Decrease sound volume or adjust a highlighted control whil...

Page 71: ...vice 6 COAX OUT Connects to the coaxial audio input of your digita stereo equipment 7 MINI AV IN Connect a external device to the composite VIDEO V and AUDIO L R out jacks on most video equipment L R...

Page 72: ...shown in below diagram Please use the correct type of antenna cable We strongly recommend that you connect the antenna cable input using a 75 ohm coaxial cable not supplied to ensure the best picture...

Page 73: ...Pb Pr Audio L R Interface 11 TV REAR PANEL Optional Component cables not included Digital set top box gaming console or DVD Audio Video Cable not included Digital set top box gaming console or DVD Co...

Page 74: ...jack to the PC using a 15 pin cable and audio cable If the PC is connected to TV and no signal has been input from PC for more than 5 seconds the TV will enter standby mode automatically Supporting si...

Page 75: ...in accordance with local laws and regulations Keep the batteries away from children or pets When the remote control will not to be used for an extended period remove the batteries Operating the Remot...

Page 76: ...14 SOURCE P MODE S MODE FAV SLEEP FREEZE CH LIST AUTO ASPECT TEXT EPG REVEAL HOLD INDEX SUBPAGE SIZE SUBTITLE MENU EXIT DISPLAY CH VOL Audio 7 4 19 9 13 17 14 24 10 25 27 22 3 5 6 2 18 8 1 11 12 15 16...

Page 77: ...remove the content that is hidden in teletext mode 23 Press to display electronic program guide menu EPG 33 Display the submenu of the teletext mode SUBPAGE 24 Press audio to PAL BG Stereo or PAL BG M...

Page 78: ...OSD languages 5 Press MENU to return Install TV Channels Automatically 1 Press MENU on the Remote Control to display the main Menu 2 Press or to locate the CHANNEL Setting 3 Press to highlight Auto Sc...

Page 79: ...ATV AV PC Component HDMI or Media Access to the On Screen Display Menu 1 Press MENU on the remote control to display the main Menu The icons on the top of main menu stand for SOUND TIME LOCK SETUP 2 P...

Page 80: ...nnel then press OK button to search program 3 DTV Manual Tuning Press button to select DTV Manual Tuning then press OK button to enter sub menu Press button to select channel then press OK button to s...

Page 81: ...he picture but the shadow of the picture is invariable Brightness Adjust the optical fiber output of the entire picture it will effect the dark region of the picture Color Adjust the saturation of the...

Page 82: ...or a rich sound experience Sports Enhances vocals for sports Personal Select to customize picture settings 2 Treble Bass Press button to select option Press button to adjust Note The treble and bass a...

Page 83: ...ub menu 3 Sleep Timer Press button to select Sleep Timer then press OK button to enter sub menu Press button to select Available options are Off 15Min 30Min 45Min 60Min 90Min 120Min 240Min 4 Auto Stan...

Page 84: ...utton to enter sub menu to set new password 3 Channel Lock Press button to select Channel Lockthen press OK button to enter sub menu to select Press Green button to lock or unlock the channel 4 Parent...

Page 85: ...primary of Subtitle Language Press button to select the Subtitle Language 5 Hearing Impaired Press button to select Key Lock then press button to select Off or On When Key Lock s statue is on you can...

Page 86: ...C MOVIE TEXT operation basic same 1 Press or to choose the sub folder if necessary then press OK to enter the folder Press OK button to play press the exit button to return back Press OK button to sel...

Page 87: ...ase back up yPVS les to prevent them from damage or loss of data AnZ EBUB MF EBNBHF PS EBUB MPTT JT BU Zour own risk The higher the resolution of the image the longer it takes to display on the screen...

Page 88: ...mov MPEG 1 2 4 H 264 dat MPEG 1 MP2 The Max Resolution 352 288 Max Data Rate 20 Mbps vob MPEG 2 The Max Resolution 720 576 Max Data Rate 20 Mbps PHOTO jpg Progressive JPEG Max Resolution 1024 768 jpeg...

Page 89: ...ar dim in a brightly lit room Adjust brightness contrast saturation color and tint referring to the user guide Check the input signal setting No sound Check your audio connections are properly connect...

Page 90: ...mperature of the unit has increased Remove any objects blocking the vent or clean as necessary No CATV reception or no reception above CH13 Is the AIR CABLE option set correctly Please set the AIR CAB...

Page 91: ...MPEG 1 2 Xvid MJPEG H 263 H 264 Audio MP3 AC3 PCM Image JPEG BMP Features Speakers 8 W 8 W Power source 110 240 V 50 Hz 75 W 0 75 Class of protection against electric shock II Degree of protection she...

Reviews: