background image

21

20

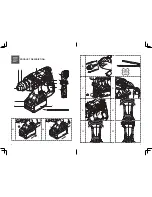
INSERTING AND REMOVING DRILL BIT IN SDS (B)

Take care that the dust protection cap (2) is not damaged when changing tools.

INSERTING 

Clean and lightly oil the bit before inserting. Insert the dust-free bit into the bit holder with 

a twisting motion until it latches.
The bit locks itself. Check the locking by pulling on the bit.

NOTE: 

This tool is only to be used with SDS PLUS drill bits unless an 

additional keyed chuck adaptor (not supplied) is used.

WARNING!


Your new Rotary Hammer generates powerful forces to get 

your job done quickly and effectively. These forces may cause inferior quality 

SDS bits to break and jam in the chuck.
We therefore recommend that only high quality SDS bits be used with this 

tool.

REMOVING 

Retract back the bit holder locking sleeve (3) and pull out the bit.

AUXILIARY HANDLE (C)

Slide the handle onto the hammer and rotate to the desired working position. To clamp 

the auxiliary handle, rotate the handle clockwise. To loosen the auxiliary handle, rotate 

the handle anti-clockwise.

WARNING!


Always use the auxiliary handle.

DEPTH STOP (D)

•  Depress the quick clamp (12) then insert the depth stop (11) through the hole. Make sure 

the rippled part is on the bottom side.

•  Align the tip of the depth stop (11) with the drill tip. Now pull the depth stop (11) back by the 

required drilling depth.

•  Release the quick clamp (12) to lock the depth stop (12) in position.

02


UNPACKING

Unpack all parts and lay them on a flat, stable surface.

•  Remove all packing materials and shipping devices, if applicable.
• 

Make sure the delivery contents are complete and free of any damage. If you find that parts 

are missing or show damage do not use the product but contact your dealer. Using an 

incomplete or damaged product represents a hazard to people and property.

•  Ensure that you have all the accessories and tools needed for assembly and operation. This 

also includes suitable personal protective equipment

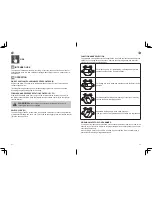
WARNING!


The product and the packaging are not children’s toys! 

Children must not play with plastic bags, sheets and small parts! There is a 

danger of choking and suffocation!

03


ASSEMBLING THE MACHINE

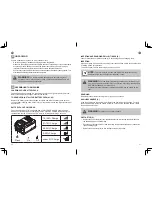
CHARGING YOUR BATTERY PACK

The battery has been shipped in a low charge condition. Charge it fully before first use. 

Refer to the charger instruction manual for the details.

TO REMOVE OR INSTALL THE BATTERY PACK (A1, A2)

Depress the battery pack release button to release and slide the battery pack out from 

your tool. After recharge, slide it back into your tool. A simple push and slight pressure will 

be sufficient.

BATTERY PACK POWER BAR

The Li-Ion battery pack (8) is equipped with a POWER BAR which is used to give an 

indication of the battery pack’s remaining charge. Press the POWER BAR button (9) to 

check battery charge as below. The LED will stay lit for approximately 5 seconds

.

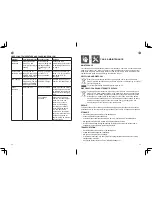
9

76-100% Charge

51-75% Charge

26-50% Charge

5-25% Charge

under 5% Charge

Flash

On

Off

Summary of Contents for ERH18-Li

Page 1: ...MNL_ERH18 Li_V01_180608 ERH18 Li EAN 3663602794783 ORIGINAL INSTRUCTIONS ...

Page 2: ...ease read all safety warnings carefully and be sure that they are fully understood before handling the tool x1 Safety instructions Product description Assembly Use Care maintenance Guarantee Declaration of Conformity ...

Page 3: ...5 4 PRODUCT DESCRIPTION 4 6 7 5 1 2 3 12 13 13a 9 10 11 8 A1 2 1 A2 B C D E F1 F2 F3 ...

Page 4: ...ng power tools that have the switch on invites accidents d Remove any adjusting key or wrench before turning the power tool on A wrench or a key left attached to a rotating part of the power tool may result in personal injury e Do not overreach Keep proper footing and balance at all times This enables better control of the power tool in unexpected situations SAFETY INSTRUCTIONS GENERAL POWER TOOL ...

Page 5: ...xhibit unpredictable behaviour resulting in fire explosion or risk of injury f Dress properly Do not wear loose clothing or jewellery Keep your hair clothing away from moving parts Loose clothes jewellery or longhair can be caught in moving parts g If devices are provided for the connection of dust extraction and collection facilities ensure these are connected and properly used Use of dust collec...

Page 6: ...otherwise subject it to strong impacts or shocks d Do not solder directly onto the battery e Do not expose battery to water or salt water or allow the battery to get wet f Do notexposeabatterypackortooltofireorexcessive temperature Exposure to fire or temperature above 130 C may cause explosion g Follow all charging instructions and do not charge the battery pack or tool outside the temperature ra...

Page 7: ... a battery for a period without use then store battery at room temperature 19 C to 25 C charged to about 30 50 of capacity When storing for very long periods boost charge the battery once per year to prevent over discharge The following information applies to professional users only but is good practice for all users ADDITIONAL SAFETY WARNING FOR CONSTRUCTION DUST The updated Control of Substances...

Page 8: ... vibration exposure risk ALWAYSuse sharp chisels drills and blades Maintain this tool in accordance with these instructions and keep well lubricated whereappropriate WARNING Some dust particles created by power sanding sawing grinding drill and other construction jobs contain chemicals known to cause cancer birth defects or other reproductive harm Some examples of these chemicals are Lead from lea...

Page 9: ...low Battery pack model EBAT18 Li 2 EBAT18 Li 4 EBAT18 Li 5 Charger model EC18 Li EFC18 Li EMC18 Li Avoid using tools in temperatures of 10ºC or less Plan your work schedule to spread any high vibration tool use across a number of days Note The use of other tools will reduce the users total working period on this tool HEALTH SURVEILLANCE All employees should be part of an employer s health surveill...

Page 10: ... Battery Technology SDS Plus Chuck yyWxx Manufacturing date code Year of manufacturing 20yy and week of manufacturing Wxx NOISE DATA A weighted sound pressure LpA 90 5dB A A weighted sound power LwA 101 5dB A Uncertainty KPA KWA 3 0dB A The noise for the operator may exceed 80 dB A and ear protection measures are necessary VIBRATION DATA Hammer drilling into concrete ah HD 13 8m s Chiselling ah CH...

Page 11: ...lamp 12 to lock the depth stop 12 in position 02 UNPACKING Unpack all parts and lay them on a flat stable surface Remove all packing materials and shipping devices ifapplicable Make sure the delivery contents are complete and free of any damage If you find that parts are missing or show damage do not use the product but contact your dealer Using an incomplete or damaged product represents a hazard...

Page 12: ...Where possible use a pilot hole before drilling a large diameter hole USE 01 INTENDED USE The machine is intended for hammer drilling in concrete brick and stone as well as for light chiseling work It is also suitable for drilling without impact in wood metal ceramic and plastic 02 OPERATION ON OFF SWITCH WITH VARIABLE SPEED CONTROL E Depress the ON OFF switch 6 to start and release to stop your t...

Page 13: ...ct in a place that is inaccessible to children We recommend using the original package for storage or covering the product with a suitable cloth or enclosure to protect it againstdust TRANSPORTATION Switch the product off and remove the battery pack Attach transportation guards if applicable Always carry the product by its handle Protect the product from any heavy impact or strong vibrations which...

Page 14: ... sales receipt or purchase invoice Please keep your proof of purchase in a safe place This guarantee covers product failures and malfunctions provided the Erbauer power tool was used for the purpose for which it is intended and subject to installation cleaning care and maintenance in accordance with standard practice and with the information contained above and in the user manual This guarantee do...

Page 15: ...heldon Square London W2 6PX United Kingdom www kingfisher com products DISTRIBUTOR B Q plc Chandlers Ford Hants SO53 3LE United Kingdom www diy com Screwfix Direct Limited Trade House Mead Avenue Yeovil BA22 8RT United Kingdom www screwfix com To view instruction manuals online visit www kingfisher com products ...

Reviews: