


20
02
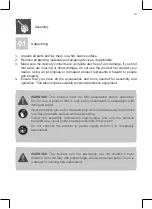
Auxiliary handle (Fig. A)
WARNING!
For all work with the machine, the auxiliary handle (7) must
always be mounted.
Do not make any changes or modifications to the auxiliary handle.
Do not continue to use the power tool when the auxiliary handle is
damaged.
1. Turn the adjustment knob of auxiliary handle (8) anti-clockwise to loosen the
auxiliary handle (7).
2. Adjust the auxiliary handle (7) forward/backward to appropriate position depending
on your application.
3. Turn adjustment knob of auxiliary handle (8) clockwise to clamp the auxiliary
handle (7) firmly in position.
03
Chisel (Fig. B, C, D, E, F)
WARNING!
• Observe the technical requirements of this product (see section
“Technical data”) when purchasing and using chisels!
• The chuck and chisel can become very hot after working, do not
assemble/disassemble them before cooling down!
Inserting
1. Ensure that chuck (1) is open. Pull the locking pin (2) out and turn it 180º if
necessary. (Fig. B)
2. Insert the chisel (9/10) into the chuck until stop as shown in Fig. C and D.
3. Lock the chisel in the chuck by pulling the locking pin out and turning it 180º and
then releasing it back into locked position in chuck. (Fig. E)
4. Check that the chisel is securely fastened. The chisel should be locked in the
chuck and shall not be possible to be pulled out.
5. Ensure that the locking pin (2) stays in locked position. (Fig. F)
Removing / Replacing
1. Open the chuck by pulling the locking pin out and turning it 180°.
2. Pull the chisel out of chuck.
3. Insert a new chisel as described above, if desired.
Summary of Contents for 3663602795193
Page 1: ...EBR1750 EAN 3663602795193 ORIGINAL INSTRUCTIONS V4 ...
Page 4: ...4 Product description 1 2 9 10 1 8 7 12 3 4 5 6 A 4 1 2 3 8 7 B 1 2 2 1 180 ...
Page 5: ...5 C 9 10 D 9 10 E 1 2 2 1 180 F G 1 2 3 4 5 H 11 ...
Page 29: ...29 ...
Page 30: ...30 ...
Page 31: ...31 ...


