background image

Introduction

-6-

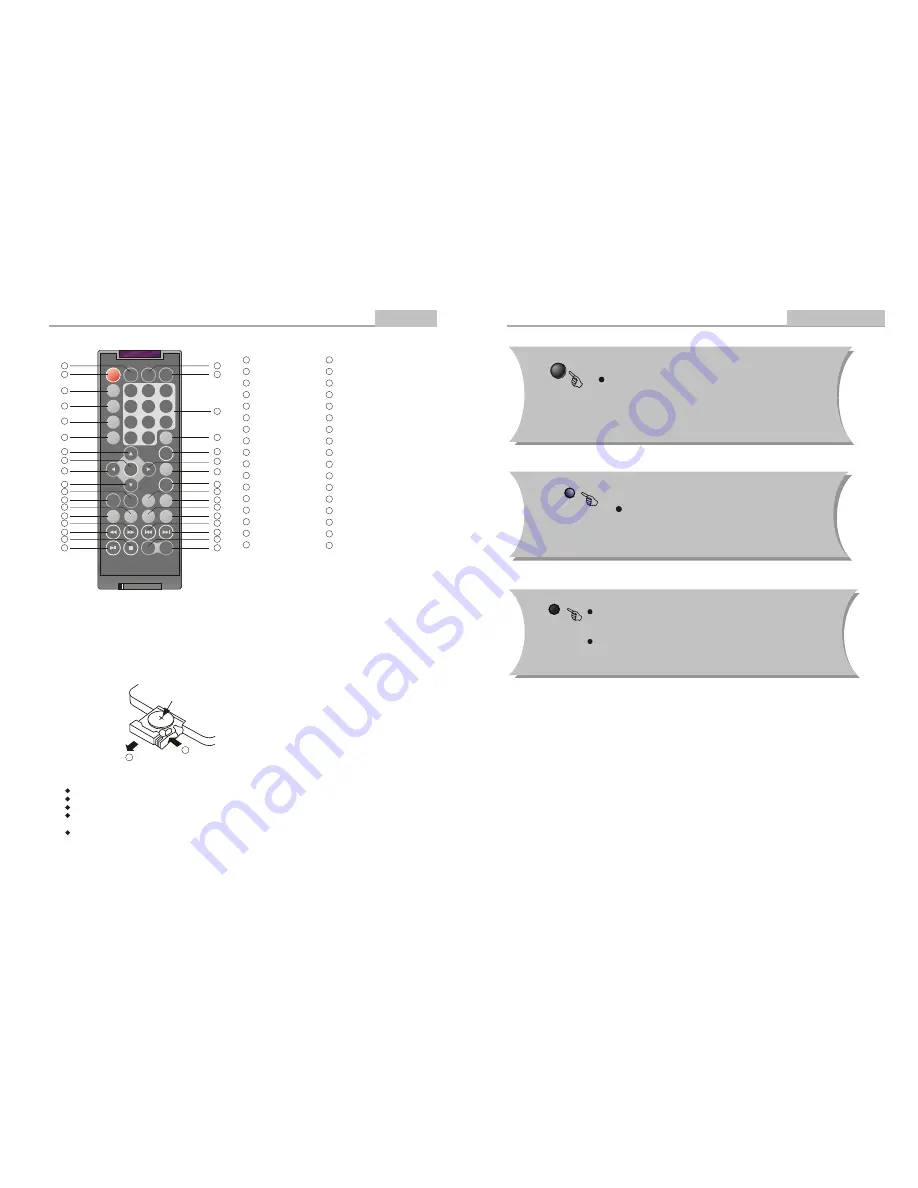
Remote Control 

 1

2

CR2025

HOW TO REPLACE THE BATTERY

STEP 1: PUSH THE BUTTON TOWARD LEFT;

STEP 2: PULL THE BATTERY LOADER OUT.

PROGRAM

NTSC/PAL

SUBTITLE

LANGUAGE

ANGLE

UP

LEFT

ENTER

L/R CHANNEL

DOWN

RETURN

STOP

REV

FORWARD

MUTE

SETUP

ZOOM

DISPLAY

NUMBER KEY SELECT

TIME

MENU/PBC

TITLE

FUNCTION

RIGHT

SLOW

STEP

A-B REPEAT

REPEAT

VOLUME -

NEXT

PREV

TFT POWER ON/OFF

34

33

32

31

30

29

28

26

27

25

24

23

22

21

20

PLAY/PAUSE

19

18

17

16

15

14

13

12

11

10

9

8

7

6

5

4

3

2

1

Using the Remote Control
Point the remote control at the remote sensor in order for the player to function correctly. The 
remote will function to approximately 21' from the remote sensor at an angle of approximately 
30 each direction.
Note: Directing the remote sensor toward any light source, such as direct sunlight, may cause
the unit to malfunction. Do not spill water or put wet items on the remote control. Never 
disassemble remote control.

BATTERIES
INCORRECT USE OF BATTERIES MAY CAUSE THEM TO LEAK, CORRODE OR EXPLODE.
    Be sure to place the batteries in the correct direction.
    It is dangerous to charge/heat/open or short-circuit the batteries.
    Do not leave dead or expired batteries or mix old/new batteries.
    When not using the remote control for a long duration of time, remove the batteries. When 
    operating range becomes reduced, replace all batteries with new, fresh ones.
    If leakage from the battery occurs, wipe the battery liquid from the battery compartment, then 
    replace.


PROG

DISPLAY

A-B

N

/

P

SUBTITLE

ANGLE

SETUP

MENU

/

PBC

STEP

L

/

R

TITLE

REPEAT

ZOOM

MUTE

ENTER

SLOW

FUNCTION

1

2

3

4

5

6

7

8

9

+

10

0

RETURN

LANGUAGE

TIME

VOL

-

VOL

+

TFT

ON

/

OFF

1

2

3

4

5

6

7

8

9

10

11

12

13

14

15

16

17

18

19

20

21

22

23

24

25

26

27

28

29

30

31

32

33

34

Remote Control Operation

Advanced Features

-23-

16:9/4:3

 Switch the display mode of 16:9 or 4:3 format.

TFT ON/OFF

 Press TFT ON/OFF key to TFT-LCD display

press it again to TFT-LCD turn off.

L/R

 When  a  DVD  is played, the active dubbing language  will  

be shown. When a SVCD or VCD is  played  the  left track, right

track or stereo will be displayed accordingly.

 When  a  bilingual  story  VCD is played, you may  press  the

button  to  select  the  language desired.

Summary of Contents for DVD2012E

Page 1: ...User Manual Please read this User Manual carefully to ensure proper use of this product and keep this manual for further reference DVD2012E...

Page 2: ...TV set Connecting to an AV Receiver with Digital Audio Input Connections 7 8 Basic Operation Basic Playback Modes and Features Setup Remote Control Operation MP3 Playback KODAK Picture CD playback Ad...

Page 3: ...DEFEATED DO NOT STARE INTO THE LASER BEAMS THE LIGHTNING FLASH WITH ARRO WHEAD SYMBOL WITHIN AN EQUIL ATERAL TRIANGLE IS INTENDED TO ALERT THE USER TO THE PRESEN CE OF UNINSULATED DANGEROUS VOLTAGE WI...

Page 4: ...other sources refer to the operating instructions 12 Grounding or Polarization This product may be equipped with a polarized alternating current line plug a plug having one blade wider than the other...

Page 5: ...lines or circuits When installing an outside antenna system extreme care should be taken to keep from touching such power lines or circuits as contact with them might be fatal 17 Overloading Do not o...

Page 6: ...0 01 Press to select the file when the cursor appears in the file window Press ENTER to play the current file selected by the cursor Press to switch between the directory window and the file window No...

Page 7: ...LEAK CORRODE OR EXPLODE Be sure to place the batteries in the correct direction It is dangerous to charge heat open or short circuit the batteries Do not leave dead or expired batteries or mix old ne...

Page 8: ...AGE Note This function is discspecific During DVD playback Press LANGUAGE repeatedly to select from up to 8 audio languages formats ANGLE During DVD playback Press ANGLE to view scenes from different...

Page 9: ...e normal audio output VOL VOL Press Volume VOL button to increase Volume Press VOL button to reduce volume till to no volume output 8 Connecting to an AV Amplifier with Digital Audio Input Connections...

Page 10: ...select Play Program and press ENTER to play the chapters in the order you have set Select Clear All and press ENTER to clear all the numbers you have input Others PROG Play Program Clear All Function...

Page 11: ...ol Operation SLOW Press slow repeatedly to slow motion playback at variable speeds Language Video Audio Rating English French OSD Menu Subtitle Audio DVD Menu English English English English Modes and...

Page 12: ...o confirm B Press SETUP to exit the Setup Menu A Press ENTER to confirm B Press SETUP to exit the Setup Menu A Press ENTER to confirm B Press SETUP to exit the Setup Menu Language Setup OSD Menu Subti...

Page 13: ...ect in the Setup Menu and press ENTER to display menu Video Setup A Press ENTER to confirm B Press SETUP to exit the Setup Menu Press to change your selection Press to select the menu item Note Not al...

Page 14: ...e digital output SPDIF output Set Digital out to PCM Tooutput 2 channel digital from the Coaxial digital audio outputs e g to a Minidisc recorder RAW Tooutput the raw 5 1 channel digital bitstream for...

Page 15: ...ws you to block playback of inappropriate content with a password protected Rating system not all discs are rated A From Stop mode press SETUP B Select Rating and press ENTER C Select Rating and press...

Reviews: