background image

Thickness
(for plain paper)

0.08 to 0.11 mm (0.003 to 0.004 in.)

Weight
(for plain paper)

64 g/m2 (17 lb) to 90 g/m2 (24 lb)

Envelopes:

Size

Envelope #10 4 1/8 

×

 9 1/2 in.

Envelope DL 110 

×

 220 mm

Envelope C6 114 

×

 162 mm

Paper types

Plain paper

Weight

75 g/m2 (20 lb) to 90 g/m2 (24 lb)
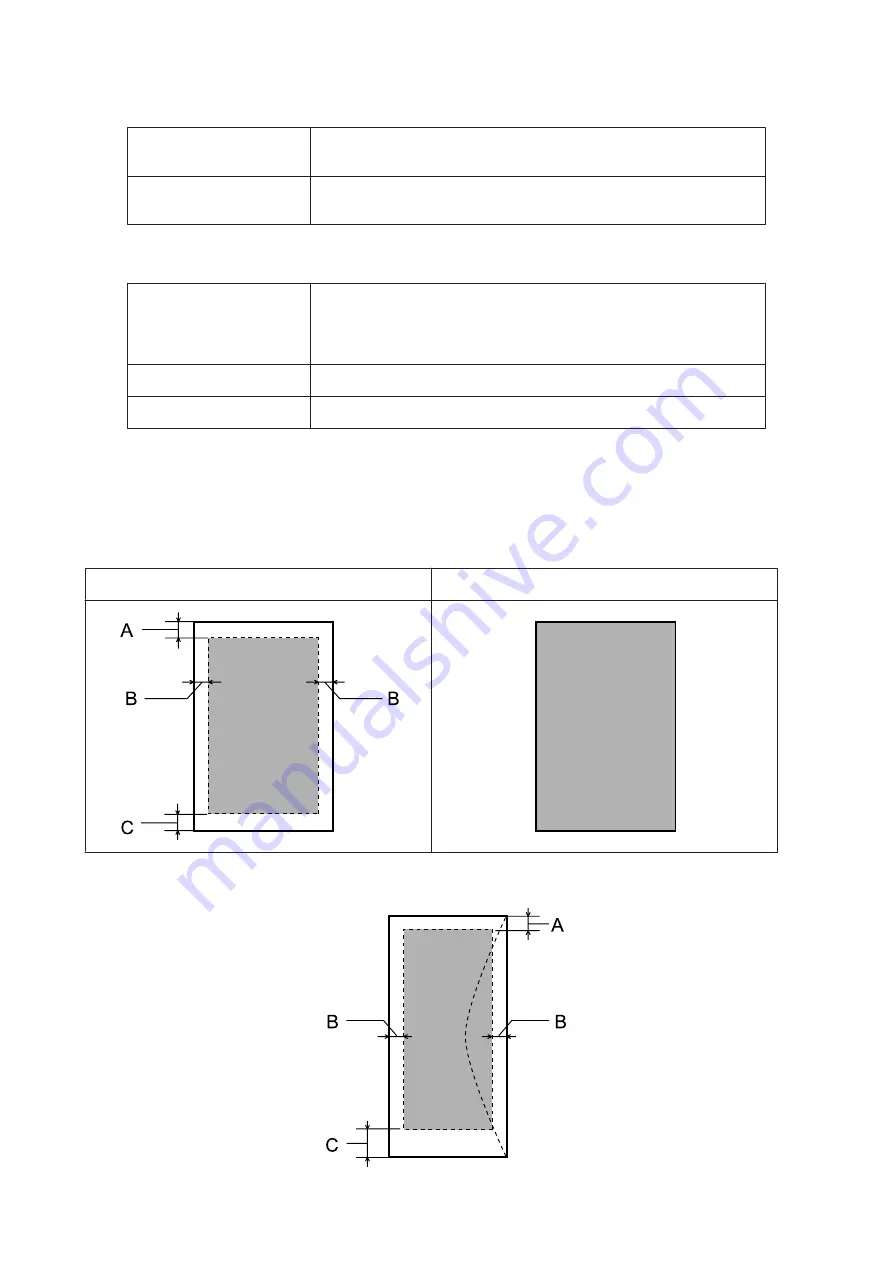
Printable area

Highlighted portions show printable area.

Single sheets:

Normal

Borderless

Envelopes:

     User’s Guide

Product Information

141

Summary of Contents for XP-210 Series

Page 1: ...User s Guide NPD4863 00 EN ...

Page 2: ... Corporation Seiko Epson Corporation shall not be held liable for any damage resulting from electromagnetic interference that occurs from the use of any interface cables other than those designated as Epson Approved Products by Seiko Epson Corporation EPSON isaregisteredtrademark andEPSONEXCEEDYOURVISIONorEXCEEDYOURVISIONisatrademark of Seiko Epson Corporation PRINT Image Matching and the PRINT Im...

Page 3: ...the U S and other countries AirPrint is a trademark of Apple Inc Google Cloud Print is a registered trademark of Google Inc Adobe Adobe Reader Acrobat and Photoshop are trademarks of Adobe systems Incorporated which may be registered in certain jurisdictions SDXC Logo is a trademark of SD 3C LLC Memory Stick Duo Memory Stick PRO Duo Memory Stick PRO HG Duo Memory Stick Micro and MagicGate Memory S...

Page 4: ...0 Series 29 Basic copying for XP 210 Series 29 Copy Mode Menu List 30 Printing Basic Operation from the Control Panel XP 310 Series XP 410 Series only 31 Printing photos from a memory card 31 Print photos mode menu list 32 Printing using the More Functions Personal Stationery menus 32 More Functions Personal Stationery mode menu list 33 Basic Operation from Your Computer 33 Printer driver and stat...

Page 5: ...r Mac OS X 94 Using the control panel XP 310 Series XP 410 Series 95 Using the control panel XP 210 Series 95 Cleaning the Print Head 96 Using the Head Cleaning utility for Windows 97 Using the Head Cleaning utility for Mac OS X 97 Using the control panel XP 310 Series XP 410 Series 97 Using the control panel XP 210 Series 98 Aligning the Print Head 98 Using the Print Head Alignment utility for Wi...

Page 6: ...130 Increasing the Print Speed For Windows Only 131 Other Problem 132 Printing plain papers quietly 132 Troubleshooting for Scanning Problems Indicated by Messages on the LCD Screen or Status Light 133 Problems When Starting a Scan 133 Using the button 134 Using scanning software other than Epson Scan driver 135 Problems When Feeding Paper 135 The paper gets dirty 135 Multiple sheets of paper are ...

Page 7: ...or later or Adobe Reader Network Guide PDF Provides network administrators with information on both the printer driver and network settings Caution Important and Note Caution Important and Note in this manual are indicated as below and have the following meaning Caution must be followed carefully to avoid bodily injury cImportant must be observed to avoid damage to your equipment Note contain usef...

Page 8: ... services youcaneasily print directly from your smartphone tablet PC or laptop anytime and practically anywhere even across the globe The services available vary by product Available Features on page 13 For more information about the printing and other services visit the following URL https www epsonconnect com Epson Connect portal site http www epsonconnect eu Europe only Note You can make networ...

Page 9: ...ing instructions Place the product near a wall outlet where the plug can be easily unplugged Do not place or store the product outdoors near excessive dirt or dust water heat sources or in locations subject to shocks vibrations high temperature or humidity Take care not to spill liquid on the product and not to handle the product with wet hands Keep this product at least 22 cm away from cardiac pa...

Page 10: ...ble ensure the correct orientation of the connectors Each connector has only one correct orientation Inserting a connector in the wrong orientation may damage both devices connected by the cable Place the product on a flat stable surface that extends beyond the base of the product in all directions If you place the product by the wall leave more than 10 cm between the back of the product and the w...

Page 11: ...notthereforecoverthecostofthisreplacement Ifyourproductneedsthepad replacing this can be performed for you by any authorised Epson service provider It is not a user serviceable part Using the product with a wireless connection Do not use this product inside medical facilities or near medical equipment Radio waves from this product may adversely affect the operation of electrical medical equipment ...

Page 12: ...re Replacing Ink Cartridges section Replacing Ink Cartridges on page 77 Restrictions on Copying Observe the following restrictions in order to ensure the responsible and legal use of the product Copying of the following items is prohibited by law Bankbills coins government issuedmarketablesecurities governmentbondsecurities andmunicipalsecurities Unused postage stamps pre stamped postcards and oth...

Page 13: ...from product to a PC from product to a memory card Epson Connect services iPrint Email Print Remote Print Driver Scan to Cloud Other companies services AirPrint Google Cloud Print XP 212 XP 213 do not support these functions Note The illustrations in this manual are from a similar product model Although they may differ from your actual product the method of operation is the same User s Guide Getti...

Page 14: ...Product Parts a Paper support b Output tray c Stopper d Feeder guard e Edge guide f Sheet feeder User s Guide Getting to Know Your Product 14 ...

Page 15: ...a Document cover b Scanner glass c Control panel d Release lever rear of the control panel e Memory card slot f Memory card light User s Guide Getting to Know Your Product 15 ...

Page 16: ...Scanner Unit b Ink cartridge holder c Print head under the ink cartridge holder d Scanner unit support a USB connector for connecting to a computer b AC inlet User s Guide Getting to Know Your Product 16 ...

Page 17: ...rging ink or cleaning the print head b Returns to the top menu c LCD screen 2 5 inch d LCD screen 1 44 inch e Cancels returns to the previous menu f l u r d OK Press l u r d to select menus Press OK to confirm the setting you have selected and go to next screen g Sets the number of copies and prints h Starts the operation you selected i Stops the ongoing operation or initialize the current setting...

Page 18: ... strength Good Connected to a Wi Fi network signal strength Excellent Indicates Ad Hoc Connection is on Displays the printer is connected via Simple AP mode Displays the printer is connected via Wi Fi Direct mode Processing a Wi Fi connection XP 310 Series Icons Status Wi Fi network error searching Connected to a Wi Fi network signal strength Fair Connected to a Wi Fi network signal strength Good ...

Page 19: ...d thisbuttondownfor3 seconds untilthepowerlightflashes torunprintheadcleaning When the ink light turns on press this button to start the ink cartridge replacement process Whenyouneedtoreplaceaninkcartridgebeforeitisexpended whentheinklightisoff hold this button down for 6 seconds until the print head moves to start the replacement process Replacing an Ink Cartridge on page 86 h b Error Indications...

Page 20: ... glossier See the instruction sheetspacked with the paper formore information Some types of paper have cut cornersto help identify the correct loading direction If the paper is curled flatten it or curl it slightly in the opposite direction before loading Printing on curled paper may cause ink to smear on your prints Do not use the paper that is folded wavy or torn Storing paper Return unused pape...

Page 21: ...5 Epson Bright White Ink Jet Paper A4 2 80 40 Epson Photo Quality Ink Jet Paper A4 80 40 Epson Matte Paper Heavyweight A4 20 20 Epson Photo Paper A4 20 10 10 15 cm 4 6 in 20 10 13 18 cm 5 7 in 20 10 Epson Premium Glossy Photo Paper A4 20 10 10 15 cm 4 6 in 20 10 13 18 cm 5 7 in 20 10 16 9 wide size 102 181mm 20 10 Epson Premium Semigloss Photo Paper A4 20 10 10 15 cm 4 6 in 20 10 Epson Ultra Gloss...

Page 22: ...ype setting is so important It tells your product what kind of paper you are using and adjusts the ink coverage accordingly The table below lists the settings you should choose for your paper For this paper LCD paper type Plain paper Plain Paper Epson Bright White Ink Jet Paper Epson Ultra Glossy Photo Paper Photo Paper Epson Premium Glossy Photo Paper Epson Premium Semigloss Photo Paper Epson Glo...

Page 23: ...er Epson Photo Epson Matte Paper Heavyweight Epson Matte Epson Photo Quality Ink Jet Paper Envelopes Envelope These paper types are compatible with Exif Print and PRINT Image Matching For more information refer to the documentation that came with the Exif Print or PRINT Image Matching compatible digital camera Loading Paper and Envelopes Follow these steps to load paper Note The illustrations in t...

Page 24: ... the stopper Note The XP 210 Series does not have a stopper C Slide the edge guide to the left D Fan and align the edges of the paper sheets Then load them with the printable side up against the right side of the sheet feeder User s Guide Paper and Media Handling 24 ...

Page 25: ...re you adjust the size of your file to avoid printing over the binding holes When loading envelopes load the short edge first with the flap facing down Do not use envelopes that are curled folded or glued or that have plastic windows Flatten the envelope and the flaps before loading Flatten the leading edge of the envelope before loading Avoid using envelopes that are too thin as they may curl dur...

Page 26: ...vent foreign materials from getting into the product make sure you flip the feeder guard back when you have finished printing Inserting a Memory Card This function is available with XP 310 Series XP 410 Series You can print photos in a memory card or save a scanned data in a memory card The following memory cards are supported SD SDHC SDXC Memory Stick Duo Memory Stick PRO Duo Memory Stick PRO HG ...

Page 27: ... before inserting the card into the slot otherwise the card may get stuck miniSD microSD miniSDHC microSDHC microSDXC Memory Stick Micro A Insert one card at a time B Check the light stays on on flashing User s Guide Paper and Media Handling 27 ...

Page 28: ...en the document cover and place your original face down on the scanner glass B Slide the original to the corner Note See the following sections if any problems occur with the scanning area or the scanning direction when using EPSON Scan The edges of your original are not scanned on page 137 Multiple documents are scanned into a single file on page 137 C Close the cover gently User s Guide Paper an...

Page 29: ...e 28 C Enter the Copy mode from the Home menu D Set the number of copies using the or button use u or d for XP 310 Series E Select Color or B W F Press OK to display the copy setting menus For XP 310 Series press OK and then press d G Selectthe appropriatecopysettingssuchaslayout paper size paper type andcopy quality Useu ord to select a setting item and use l or r to change the setting For XP 310...

Page 30: ...or 3 seconds to copy in draft mode For users in Belgium draft mode is not available Press x r or r x and y at the same time to make 20 copies Copy Mode Menu List Refer to the section below for the Copy mode menu list Copy Mode on page 70 User s Guide Copying 30 ...

Page 31: ...ll the photos you want to print Note for XP 410 Series If you have more than 999 images on your memory card images are automatically divided into groups and the groupselection screenis displayed Select thegroup that contains theimageyouwantto print Imagesare sorted by the date they were taken To select another group select Print Photos on the Home menu Then press d and select Select Group E Displa...

Page 32: ...u can make faithful copies of your originals If your original photo is faded you can restore color to bring it back to life You can copy one photo or multiple photos of different sizes at the same time as long as they are larger than 30 40 mm Photo Layout Sheet XP 410 Series only You can printphotos stored ona memory card in various layouts Follow the on screen instructions to print Lined Papers Y...

Page 33: ...instructions If the button does not appear in the Maintenance window point at All Programs or Programs in the Windows Start menu and check in the EPSON folder For Windows 8 If the button does not appear in the Maintenance window right click on the Start screen or swipe from the bottom or top edge of the Start screen and select All apps then select Software Update from EPSON category If you want to...

Page 34: ...trol Panel Printers and Other Hardware then Printers and Faxes Select the product then click Printing Preferences on the File menu From the shortcut icon on the taskbar Right click the product icon on the taskbar then select Printer Settings To add a shortcut icon to the Windows taskbar first access the printer driver from the desktop as described above Next click the Maintenance tab the Extended ...

Page 35: ...nd then click Open Printer Utility ForMacOSX10 5 clickSystemPreferencesontheApplemenuandthenclickPrint Fax Select your product from the Printers list box click Open Print Queue and then click Utility button Basic Printing Note The screen shots in this manual may vary depending on the model Before you print load paper properly Loading Paper and Envelopes on page 23 Refer to the section below for th...

Page 36: ... want to print borderless photos Selecting Paper on page 20 Ifyouwanttocontroltheamountoftheimagethatextendsbeyondtheedgesofthepaper clickthePageLayout tab select Auto Expand as the Enlargement Method and then adjust the Expansion slider F Select the appropriate Size setting You can also define a custom paper size For details see the online help G Select Portrait tall or Landscape wide to change t...

Page 37: ... shots of the printer driver windows in this manual are from Mac OS X 10 7 A Open the file you want to print B Access the Print dialog box Accessing the printer driver for Mac OS X on page 34 Note If the simplified dialog box is displayed click the Show Details button for Mac OS X 10 8 or 10 7 or the d button for Mac OS X 10 6 or 10 5 to extend this dialog box User s Guide Printing 37 ...

Page 38: ... File menu of your application and then make suitable settings D Select the appropriate Paper Size setting Note Select XXX Borderless as the Paper Size if you want to print borderless photos Selecting Paper on page 20 E Select the appropriate Orientation setting Note Select landscape orientation when printing envelopes F Select Print Settings from the pop up menu User s Guide Printing 38 ...

Page 39: ...sing the control panel Press y to cancel a print job in progress For Windows Note You cannot cancel a print job that has been completely sent to the product In this case cancel the print job by the product Using the progress meter When you start printing the progress meter appears on your computer screen Click the Cancel button to cancel printing Using EPSON Status Monitor 3 A Access the EPSON Sta...

Page 40: ...inting from the computer Press y on the product s control panel to cancel a print job To solve this problem see the online Network Guide A Click your product icon in the Dock B In the Document Name list select the document which is printing C Click the Delete button to cancel the print job For Mac OS X 10 8 Click the button to cancel the print job User s Guide Printing 40 ...

Page 41: ...Click the start button point to All Programs click Epson Software and then click Easy Photo Print For Windows XP Click Start point to All Programs point to Epson Software then click Easy Photo Print For Mac OS X Double click the Applications folder on your Mac OS X hard drive then double click in turn on the Epson Software and Easy Photo Print folders and finally double click the Easy Photo Print ...

Page 42: ...0 Only use papers that are suitable for 2 sided printing Otherwise the printout quality may deteriorate Depending on the paper and the amount of ink used to print text and images ink may bleedthrough to the other side of the paper The surface of the paper may be smeared during 2 sided printing ThisfeatureisavailableonlywhenEPSONStatusMonitor3isenabled Toenablethestatusmonitor accesstheprinter driv...

Page 43: ...y not be available at some settings Product settings for Windows A Access the printer settings Accessing the printer driver for Windows on page 33 B Select Reduce EnlargeDocumentandByOutputPaperSize inthe Page Layouttab and thenselect thesize of the paper you are using from the drop down list C Check the other settings and print Product settings for Mac OS X A Access the Print dialog box Accessing...

Page 44: ...indows on page 33 B Select Multi Page and then select the Pages per Sheet in the Page Layout tab C Choose the desired number of pages and page order D Check the other settings and print Product settings for Mac OS X A Access the Print dialog box Accessing the printer driver for Mac OS X on page 34 B Select the desired number of Pages per Sheet and the Layout Direction page order in the Layout pane...

Page 45: ...ndows XP you must log on to a Computer Administrator account Follow the steps below on the computer that is connected directly to the product A Windows 8 Select Control Panel from Settings Then select Devices and Printers from the Hardware and Sound category Windows 7 Click the start button select Devices and Printers Windows Vista Click the start button select Control Panel and then select Printe...

Page 46: ...K or Close if you installed additional drivers Adding the product to the other network computers Follow these steps to add the product to each network computer that will access it Note Your product must be set up as a shared printer on the computer to which it is connected before you can access it from another computer Setting up the product as a shared printer on page 45 A Windows 8 Select Contro...

Page 47: ...a Click Add a network wireless or Bluetooth printer and then click Next Windows XP Select A network printer or a printer attached to another computer then click Next D Follow the on screen instructions to select the product you want to use Note Dependingontheoperatingsystemandtheconfigurationofthecomputertowhichtheproductisconnected theAddPrinter Wizard may prompt you to install the printer driver...

Page 48: ...scanner glass Placing Originals on page 28 B Start Epson Scan Windows 8 Select the EPSON Scan icon on the desktop or select EPSON Scan from the Start screen Windows 7 Vista and XP Double click the Epson Scan icon on the desktop Mac OS X Select Applications Epson Software EPSON Scan C Select Home Mode User s Guide Scanning 48 ...

Page 49: ...D Select Text Line Art as the Document Type setting E Click Preview F Click Scan User s Guide Scanning 49 ...

Page 50: ...ffers a variety of settings for improving color sharpness contrast and other aspects affecting image quality See the Help for more details on Epson Scan Histogram Provides a graphical interface for adjusting highlight shadow and gamma levels individually User s Guide Scanning 50 ...

Page 51: ... Provides a graphical interface for adjusting mid tone levels such as skin tones without affecting the highlight and shadow areas of the image Unsharp Mask Sharpens the edges of image areas for an overall clearer image Descreening Removesrippledpatterns knownasmoiré thatcanappearinsubtlyshadedimageareas such as skin tones Color Restoration Restores the colors in faded photos automatically User s G...

Page 52: ...tion Makes Black White images clearer and text recognition more accurate by separating the text from the graphics Color Enhance Enhance a certain color You can select from red blue or green Basic Scanning from the Control Panel You can scan documents and send the scanned image from the product to a connected computer Make sureyou have installed software for the product on your computer and connect...

Page 53: ...d to a network you can select the computer to which you want to save the scanned image You can change the computer name displayed on the control panel using Epson Event Manager For XP 410 Series Ifyouwant touse the ScantoCloud service see the Epson Connect guide which is available on the Epson Connect portal site Using Epson Connect Service on page 8 E Press x to start scanning Your scanned image ...

Page 54: ...rimage Thismodeis useful when you need to scan your originals at 100 size Note This mode is not available when the Automatic Document Feeder is installed See the Help for more details on Epson Scan A Place your original s B Start Epson Scan Starting Epson Scan Driver on page 68 C Select Full Auto Mode from the Mode list User s Guide Scanning 54 ...

Page 55: ...ng in Full Auto Mode Epson Scan previews each image detects what type of original it is and selects the scan settings automatically Your scanned image is saved Scanning in Home Mode HomeModeletsyoucustomizesomescanningsettingsandcheckthechangesyouhavemadeinapreviewimage This mode is useful for basic scanning of photos and graphics Note In Home Mode you can only scan from the scanner glass See the ...

Page 56: ... Driver on page 68 C Select Home Mode from the Mode list D Select the Document Type setting E Select the Image Type setting F Click Preview Previewing and Adjusting the Scan Area on page 61 G Adjust the exposure brightness and other image quality settings H Click Scan User s Guide Scanning 56 ...

Page 57: ... immediately without displaying the File Save Settings window Your scanned image is saved Scanning in Office Mode Office Mode lets you quickly scan text documents without previewing your image Note See the Help for more details on Epson Scan A Place your original s Placing Originals on page 28 B Start Epson Scan Starting Epson Scan Driver on page 68 User s Guide Scanning 57 ...

Page 58: ...D Select the Image Type setting E Select the Document Source setting F Select the size of your original as the Size setting G Select an appropriate resolution for your original s as the Resolution setting H Click Scan User s Guide Scanning 58 ...

Page 59: ...gs window Your scanned image is saved Scanning in Professional Mode Professional Mode gives you total control of your scanning settings and lets you check the changes you have made in a preview image This mode is recommended for advanced users Note See the Help for more details on Epson Scan A Place your original s Placing Originals on page 28 B Start Epson Scan Starting Epson Scan Driver on page ...

Page 60: ...elect the type of original s you are scanning as the Document Type setting E Select the Document Source setting F If you select Reflective as the Document Type setting select Photo or Document as the Auto Exposure Type setting User s Guide Scanning 60 ...

Page 61: ...p for more details on Epson Event Manager L Click Scan M In the File Save Settings window select the Type setting and then click OK Note If the Show this dialog box before next scan check box is cleared Epson Scan starts scanning immediately without displaying the File Save Settings window Your scanned image is saved Previewing and Adjusting the Scan Area Selecting a preview mode Once you have sel...

Page 62: ... hairs over the image to the opposite corner of the desired scan area To draw the marquee automatically click the auto locate icon You can only use this icon when you are viewing a normal preview and you only have one document on the scanner glass To draw the marquee at a specified size type in a new width and height in the Document Size setting For best results and image exposure make sure all si...

Page 63: ... you move the marquee To restrict the size of the marquee to the current proportions hold down the Shift key as you resize the marquee Ifyoudrawmultiplemarquees makesureyouclickAllinthePreviewwindowbeforeyouscan Otherwise onlythearea inside the last marquee you drew will be scanned Various Types of Scanning Scanning a Magazine First of all place your magazine and start Epson Scan Starting a Scan o...

Page 64: ...ng C Click Preview D Adjust the exposure brightness and other image quality settings See the Help for more details on Epson Scan E Click Scan F Select PDF as the Type setting and then click OK Your scanned image is saved User s Guide Scanning 64 ...

Page 65: ...d start Epson Scan Starting a Scan on page 48 A Select Professional Mode from the Mode list B Select the Document Source setting C Click Preview D Adjust the exposure brightness and other image quality settings See the Help for more details on Epson Scan User s Guide Scanning 65 ...

Page 66: ...ared Epson Scan automatically saves your document without displaying the Add Page Confirmation window G Epson Scan starts scanning your document H If you want to scan more pages click Add page Load the document and scan again repeating as necessary for each page If you have finished scanning go to step 9 User s Guide Scanning 66 ...

Page 67: ...dow to select rotate reorder and delete pages See the Help for more details on Epson Scan Click OK when you are finished editing your pages Save File Select this button when you are finished The pages are saved in one PDF file Scanning a Photo First of all place your photo on the scanner glass and start Epson Scan Starting a Scan on page 48 User s Guide Scanning 67 ...

Page 68: ...See the Help for more details on Epson Scan E Click Scan F Select JPEG as the Type setting and then click OK Your scanned image is saved Software Information Starting Epson Scan Driver This software lets you control all aspects of scanning You can use this as a standalone scanning program or use it with another TWAIN compliant scanning program User s Guide Scanning 68 ...

Page 69: ...Manager This lets you assign any of the product buttons to open a scanning program You can also save frequently used scanning settings which can really speed up your scanning projects How to start Windows 8 Right click on the Start screen or swipe from the bottom or top edge on the Start screen and select All apps Epson Software Event Manager Windows 7 Vista and XP Select the start button or Start...

Page 70: ...A5 Custom Size Paper Size A4 A5 10 15cm 4 6in 13 18cm 5 7in Paper Type Plain Paper Photo Paper Quality Draft 2 Standard Quality Best XP 310 Series Press d to see the menu Menu Setting item and description Settings Layout With Border Borderless 1 Reduce Enlarge Actual Size Auto Fit Custom Custom Size Specify a percentage to reduce or enlarge your copy Disabled when Auto Fit is selected Paper Size A...

Page 71: ...arrow buttons and buttons Select Group If you have more than 999 images on your memory card images are automatically divided into groups and the group selection screen is displayed Select the group that contains the image you want to print Images are sorted by the date they were taken Use this menu to select another group XP 310 Series Press d to see the menu Menu Setting item and description Sett...

Page 72: ...sing Epson Connect Service on page 8 Scan to PC JPEG Basic Scanning from the Control Panel on page 52 Scan to PC PDF Scan to PC Email Scan to PC WSD This feature is only available for English versions of Windows 8 7 Vista 1 If the edges of the photo are faint try changing this setting XP 310 Series Menu Setting and Options To PC JPEG Basic Scanning from the Control Panel on page 52 To PC PDF To PC...

Page 73: ...e Photo Paper Plain Paper Layout Method Place photos manually allows you to lay out photos confirming a layout view Select Photos Print Photo Mode on page 71 Display Options Print Settings Crop Zoom Slide Show Imagesinamemory cardaredisplayedontheLCDscreenonebyone PressOKtoprintadisplayed image Personal Stationery Lined Papers You can print lined paper graph paper or music paper Writing Papers You...

Page 74: ...ee the current network settings and print a network status sheet Disable Wi Fi Network problems may be resolved by disabling or initializing the Wi Fi settings and then making the settings again For details see the online Network Guide XP 310 Series Menu Setting item and description Wi Fi Setup Wizard For details on the setting items see the online Network Guide Push Button WPS PIN Code WPS Wi Fi ...

Page 75: ...etup from the Home menu Manual Wi Fi Setup 1 Wi Fi Connection Check You can check the network connection status and print the report If there is any problem with the connection the report helps you find the solution Confirm Wi Fi Settings 2 You can see the current network settings and print a network status sheet Epson Connect Services 1 Status You can check whether your printer is registered or c...

Page 76: ...oogle Cloud Print settings to the factory default settings File Sharing Setup USB Wi Fi Select which type of computer you want to give write access to the memory card You can select a USB connected or a Wi Fi connected computer Restore Default Settings Wi Fi Settings InitializesWi Fisettingstothefactorydefaultsettings All except Wi Fi Settings Initializes all settings except for Wi Fi settings to ...

Page 77: ...soap and water If ink gets into your eyes flush them immediately with water If discomfort or vision problems continue after a thorough flushing see a doctor immediately If ink gets into your mouth spit it out immediately and see a doctor right away Do not remove or tear the label on the cartridge this can cause leakage Do not remove the transparent seal from the bottom of the cartridge otherwise t...

Page 78: ...or each cartridge This means that even if the cartridge is removed from the product before it is expended you can still use the cartridge after reinserting it back into the product However when reinserting a cartridge some ink may be consumed to guarantee product performance You cannot use the cartridge that came with your product for the replacement Tomaintainoptimumprintheadperformance someinkis...

Page 79: ...facing upward Do not store cartridges upside down Ink Cartridge Specifications Epson recommends using the ink cartridge before the date printed on the package The ink cartridges packaged with your product are partly used during initial setup In order to produce high quality printouts the print head in your product will be fully charged with ink This one off process consumes a quantity of ink and t...

Page 80: ...s check box To check the ink cartridge status do one of the following Double click the product shortcut icon on your Windows taskbar To add a shortcut icon to the taskbar see the following section From the shortcut icon on the taskbar on page 34 Open the printer driver click the Maintenance tab then click the EPSON Status Monitor 3 button A graphic displays the ink cartridge status Note If EPSON S...

Page 81: ...us Monitor appears Note Thegraphicdisplaystheinkcartridge statuswhen EPSON StatusMonitorwasfirstopened Toupdatetheinkcartridge status click Update The order in which ink cartridges are listed varies depending on the product The ink levels displayed are an approximate indication Using the control panel Note This function is available with XP 310 Series XP 410 Series A Enter Setup mode from the Home...

Page 82: ...xpended ink cartridge s as soon as possible See the following section to continue printing temporarily with black ink Note This feature is not available when photos and documents are printed or copied directly from the printer without using a computer Theactual amountof timewill varydepending on theusage conditions imagesprinted print settings andfrequencyof use For Windows Follow the steps below ...

Page 83: ...ct If the product is not equipped with an LCD screen press the y button on the product for three seconds to cancel the print job B Load plain paper or envelope C Access the printer settings Accessing the printer driver for Windows on page 33 D Click the Main tab and make suitable settings E Select plain papers or Envelope as the Type setting F Select the Grayscale check box in Print Options G Clic...

Page 84: ...r ink cartridge is expended originates with another computer on the network you may need to cancel the print job at the product If the product is not equipped with an LCD screen press the y button on the product for three seconds to cancel the print job For Mac OS X 10 8 Click the button and if an error message appears click OK Follow the steps bellow to reprint the document with black ink B Open ...

Page 85: ...lick Print to close the Print dialog box Conserving Black Ink When the Cartridge Is Low For Windows Only The window below appears when black ink runs low and there is more color ink than black ink It appears only when plain papers is selected as the paper type and Normal is selected as the Paper Quality Options in the Advanced tab The window gives you the option to either continue using black ink ...

Page 86: ...e Using the control panel XP 310 Series XP 410 Series A When prompted to replace an ink cartridge open the scanner unit and press OK The ink cartridge holder moves to the ink cartridge replacement position When you replace an ink cartridge before it is expended select the following menu Setup Maintenance Ink Cartridge Replacement cImportant Do not move the ink cartridge holder by hand otherwise yo...

Page 87: ... the new cartridge four or five times and then unpack cImportant Be careful not to break the hooks on the side of the ink cartridge when you remove it from the package Do not touch the green IC chip or the small window on the side of the cartridge Doing so may prevent normal operation and printing D Remove only the yellow tape User s Guide Replacing Ink Cartridges 87 ...

Page 88: ...ridge otherwise ink will leak E Insert the cartridge and press it until it clicks Make sure the top surface of the ink cartridges align F Close the scanner unit slowly and press the x button Ink charging starts Note ThePlightcontinuestoflashwhiletheproductischargingink Donotturnofftheproductduringinkcharging If the ink charging is incomplete you may not be able to print Ifyouhadtoreplaceaninkcartr...

Page 89: ...button for six seconds until the ink cartridge holder moves The ink cartridge holder moves to the ink cartridge check position The cartridge indicated by the icon is expended or low cImportant Do not move the ink cartridge holder by hand otherwise you may damage the product Always press the y button to move it User s Guide Replacing Ink Cartridges 89 ...

Page 90: ...rtridges have been indicated the ink cartridge holder moves to the ink cartridge replacement position when you press the y button D Pinch and remove the ink cartridge Note Removed ink cartridges may have ink around the ink supplyport so be careful not to get any ink on the surrounding area when removing the cartridges E Gently shake the new cartridge four or five times and then unpack User s Guide...

Page 91: ...the yellow tape from the cartridge before installing it otherwise print quality may decline or you may not be able to print If you have installed an ink cartridge without removing the yellow tape take the cartridge out of the product remove the yellow tape and then reinstall it Do not remove the transparent seal from the bottom of the cartridge otherwise the cartridge may become unusable Do not re...

Page 92: ...e to print Ifyouhadtoreplaceaninkcartridgeduringcopying toensurecopyqualityafterinkchargingisfinished cancel the job that is copying and start again from placing the originals Ink cartridge replacement is complete The product will return to its previous status For Windows Whenyouneedtoreplaceanexpendedinkcartridge clickHowtointhestatusmonitorwindow Followtheon screen instructions to replace the ca...

Page 93: ...enyouneedtoreplaceanexpendedinkcartridge clickHowtointhestatusmonitorwindow Followtheon screen instructions to replace the cartridge For more information on using your computer to replace ink cartridges see the section below For Mac OS X on page 117 Ifyouneedtoreplaceaninkcartridgebeforeitisloworexpended accesstheEpsonPrinterUtility4 ThenclicktheInk Cartridge Replacement icon Accessing the printer...

Page 94: ...ure that A4 size paper is loaded in the sheet feeder C Right click the product icon on the taskbar then select Nozzle Check If the product icon does not appear refer to the following section to add the icon From the shortcut icon on the taskbar on page 34 D Follow the on screen instructions Using the Nozzle Check utility for Mac OS X Follow the steps below to use the Nozzle Check utility A Make su...

Page 95: ...sample shown below If there are no print quality problems such as gaps or missing segments in the test lines the print head is fine If any segment of the printed lines is missing as shown below this could mean a clogged ink nozzle or a misaligned print head Cleaning the Print Head on page 96 Aligning the Print Head on page 98 Using the control panel XP 210 Series Follow the steps below to check th...

Page 96: ... driver or from the product by using the buttons cImportant Do not open the scanner unit or turn off the product during head cleaning If the head cleaning is incomplete you may not be able to print Note Because print head cleaninguses some ink from all cartridges clean the print head only if quality declines for example if the printout is blurry or the color is incorrect or missing Use the Nozzle ...

Page 97: ...steps below to clean the print head using the Head Cleaning utility A Make sure that no warnings or errors are indicated in the control panel B Access the Epson Printer Utility 4 Accessing the printer driver for Mac OS X on page 34 C Click the Head Cleaning icon D Follow the on screen instructions Using the control panel XP 310 Series XP 410 Series Follow the steps below to clean the print head us...

Page 98: ...ote Do not press y to cancel printing while printing a test pattern with the Print Head Alignment utility Using the Print Head Alignment utility for Windows Follow the steps below to align the print head using the Print Head Alignment utility A Make sure that no warnings or errors are indicated in the control panel B Make sure A4 size paper is loaded in the sheet feeder C Right click the product i...

Page 99: ...are indicated in the control panel B Make sure that A4 size paper is loaded in the sheet feeder C Enter Setup mode from the Home menu D Select Maintenance E Select Head Alignment and follow the instructions in the LCD screen to print the patterns F Find the most solid pattern in each of 1 to 4 groups G Enter the pattern number for the most solid pattern in 1 group H Repeat step 7 for the other gro...

Page 100: ...tes 5 minutes 10 minutes or 15 minutes as the Sleep Timer setting and click the Send button E Click the OK button For Mac OS X A Access the Epson Printer Utility 4 Accessing the printer driver for Mac OS X on page 34 B Click the Printer Settings button The Printer Settings screen appears C Select Off 30 minutes 1 hour 2 hours 4 hours 8 hours or 12 hours as the Power Off Timer setting D Select 3 mi...

Page 101: ...that is connected to the same network as the product Enter the product s IP address in the address bar of the Web browser and search for the product Example IPv4 http 192 168 11 46 IPv6 http fe80 226 abff feff 37cd Note You can check your product s IP address on the product s control panel or by printing a network status sheet For products with an LCD screen Setup Mode on page 75 For products with...

Page 102: ...er to clean the product These chemicals can damage the product Note Close the paper support and the output tray when you are not using the product to protect the product from dust Use a soft dry clean cloth to clean the LCD screen or touchpad Do not use liquid or chemical cleaners Useasoft dry cleanclothtocleanthesurfaceofthescannerglass Iftheglasssurfaceisstainedwithgreaseorsome other hard to rem...

Page 103: ...s or errors are indicated in the control panel B Load several sheets of A4 size plain paper in the sheet feeder C Enter Copy mode from the Home menu D Press x to make a copy without placing a document on the scanner glass Repeat step 4 until the paper is not smeared with ink For product without LCD screen A Make sure that no warnings or errors are indicated in the control panel B Load several shee...

Page 104: ... The illustrations in this section may vary depending on the product A Remove all paper from the sheet feeder and make sure the product is off B Open the scanner unit and make sure the print head is in the home position on the right Note Iftheinkcartridgeholderisnotinthehomepositionontheright turnontheproductandwaituntiltheinkcartridge holder locks in the far right position Then turn off the produ...

Page 105: ...se the paper support and the output tray F If youhave raised the control panel pull therelease lever on the rearof the control panel until it clicks andthen lower the control panel to store G Repack the product in the box using the protective materials that came with it Note Keep the product level during transport Be sure to remove the protective materials from the product before using it again Us...

Page 106: ...from the Programs category Windows XP Double click the Add or Remove Programs icon C Check the list of currently installed programs For Mac OS X A Double click Macintosh HD B Double click the Epson Software folder in the Applications folder and check the contents Note The Applications folder contains software provided by third parties To check that the printer driver is installed click System Pref...

Page 107: ...dministrator account A Turn off the product B Disconnect the product s interface cable from your computer C Do one of the following Windows 8 Select Control Panel from Settings Windows 7 and Vista Click the start button and select Control Panel Windows XP Click Start and select Control Panel D Do one of the following Windows 8 7 and Vista Select Uninstall a program from the Programs category Windo...

Page 108: ...limited account user Depending on the application the Installer may be separated from the Uninstaller A Quit all running applications B Double click the Uninstaller icon in your Mac OS X hard drive C Selectthecheckboxesforthesoftwareyouwanttouninstall suchastheprinterdriverandtheapplication from the list displayed D Click Uninstall E Follow the on screen instructions If you cannot find the softwar...

Page 109: ...vice The product display does not update information about your storage device after you copy files to it or delete files from it To update the information displayed eject and reload the storage device Do not eject your memory card or turn off the product while the memory card light is flashing or you may lose data Copying Files Between a Storage Device and Your Computer Copying files to your comp...

Page 110: ...Setup Mode on page 75 A Make sure the product is turned on and a storage device is connected B Windows 8 Select All apps and then select Computer Windows 7 and Vista Click the start button and select Computer Windows XP Click Start and select My Computer Mac OS X The removable disk icon appears on your desktop automatically C Double click the removable disk icon then select the folder in which you...

Page 111: ... the ink pad is replaced Contact Epson support to replace ink pads before the end of their service life When the ink pads are saturated the product stops and Epson support is required to continue printing A printer s ink pad is at the end of its service life Please contact Epson Support Contact Epson support to replace ink pads Operation canceled No memory card recognized Make sure the memory card...

Page 112: ...the access point or click the button on the access point s wireless settings screen displayed on your computer s screen Refer the online Network Guide I 23 Enter PIN to access point You need to enter the PIN code displayed on the printer s panel intotheaccesspointorcomputerwithintwominutes Ifnocodeis entered during the two minutes a time out error occurs and a different code is displayed and needs...

Page 113: ... 86 Wrong cartridge The currently installed ink cartridge cannot be used with the product You cannot use the cartridges that came with your product for the replacement Replace the incompatible cartridge for which an error is indicated with an appropriate ink cartridge Replacing an Ink Cartridge on page 86 Incorrectly installed ink cartridge An ink cartridge is not installed correctly Reinsert the ...

Page 114: ...rk error An error occurred while establishing the Wi Fi connection Press the Wi Fi button to clear the error and try again For more details see the online Network Guide Recovery mode The firmware update has failed and the product is in recovery mode You will need to re attempt the firmware update Ready a USB cable and visit your local Epson website for further instructions on flashing slowly flash...

Page 115: ...ems is provided by online problem solving the control panel or the status monitor Refer to the appropriate section below If you have a specific problem relating to print quality a printing problem not related to print quality or a paper feeding problem or if the product does not print at all refer to the appropriate section To solve a problem you may need to cancel printing Canceling Printing on p...

Page 116: ... the printer There are two ways to access EPSON Status Monitor 3 Double click the product shortcut icon on your Windows taskbar To add a shortcut icon to the taskbar see the following section From the shortcut icon on the taskbar on page 34 Open the printer driver click the Maintenance tab then click the EPSON Status Monitor 3 button When you access EPSON Status Monitor 3 the following window appe...

Page 117: ...ion You can view information about the installed ink cartridges by clicking Information Technical Support Click Technical Support to access the Epson technical support website Print Queue You can view Windows Spooler by clicking Print Queue For Mac OS X Note The order in which ink cartridges are listed varies depending on the printer Follow these steps to access EPSON Status Monitor A Access the E...

Page 118: ...nitor appears Youcanalsousethisutilitytochecktheinkcartridgestatusbeforeprinting EPSONStatusMonitordisplaysthe ink cartridge status at the time it was opened To update the ink cartridge status click Update User s Guide Troubleshooting for Printing Copying 118 ...

Page 119: ...roduct Note The illustrations in this section may vary depending on the product Cancel the print job if prompted by a message from the LCD screen or the printer driver Removing jammed paper from inside the product Note The illustrations in this section may vary depending on the product A Cancel the print job if prompted by a message from the printer driver Canceling Printing on page 39 User s Guid...

Page 120: ...B Open the scanner unit Note Some products may come with a scanner unit support User s Guide Troubleshooting for Printing Copying 120 ...

Page 121: ...ve all of the paper inside including any torn pieces D Close the scanner unit If the jammed paper remains near the output tray carefully remove the paper User s Guide Troubleshooting for Printing Copying 121 ...

Page 122: ...t feeder The paper stack was fanned before loading For plain paper do not load paper above the line just under the H arrow mark inside the edge guide For Epson special media make sure the number of sheets is less than the limit specified for the media Selecting Paper on page 20 The edge guides are snug against the edges of the paper The product is on a flat stable surface that extends beyond the b...

Page 123: ...ntheleftside andthenselectRemovePagefrom the Print Options menu Repeat this step for all the pages that have already been printed G Click Print on the Print Preview window Print Quality Help If you are having print quality problems then compare it with the illustrations below Click the caption under the illustration that best resembles your prints Good sample Good sample Horizontal banding on page...

Page 124: ...e is problem with copy quality clean the surface of the scanner glass Cleaning the exterior of the product on page 102 Vertical banding or misalignment Make sure the printable side the whiter or glossier side of the paper is face up in the sheet feeder Run the Head Cleaning utility to clear any clogged ink nozzles Cleaning the Print Head on page 96 Run the Print Head Alignment utility Aligning the...

Page 125: ...ink cartridges and paper recommended by Epson Makesuretheproductisonaflat stablesurfacethatextendsbeyondthebaseinalldirections Theproductwillnot operate properly if it is tilted Make sure your paper is not damaged dirty or too old Make sure your paper is dry and the printable side the whiter or glossier side is face up in the sheet feeder If the paper is curled toward the printable side flatten it...

Page 126: ...propriate for the paper size you are using For Windows check the Main window For Mac OS X check the Page Setup dialog box or Print dialog box Uninstall the printer driver then reinstall it Uninstalling Your Software on page 107 Printout has a slight slant Make sure that the paper is loaded into the sheet feeder correctly Loading Paper and Envelopes on page 23 IfFastEconomyisselectedinPaper Quality...

Page 127: ...or10 7 orPrint Fax for MacOS X 10 6or 10 5 your product in the Printers list box Options Supplies and then Driver Uninstall the printer driver then reinstall it Uninstalling Your Software on page 107 Printed side is smeared or scuffed If the paper is curled toward the printable side flatten it or curl it slightly in the opposite direction Make several copies without placing a document on the scann...

Page 128: ...er above the line just under the H arrow mark inside the edge guide For Epson special media make sure the number of sheets is less than the limit specified for the media Selecting Paper on page 20 Paper is not jammed inside the product If it is remove the jammed paper Paper Jams on page 119 The ink cartridges are not expended If a cartridge is expended replace it Replacing an Ink Cartridge on page...

Page 129: ...ckaging in a dry area The Product Does Not Print All lights are off Press the P button to make sure the product is on Make sure that the power cord is securely plugged in Make sure that your outlet works and is not controlled by a wall switch or timer Only the power light is on Turn off the product and computer Make sure the product s interface cable is securely plugged in If you are using the USB...

Page 130: ...e For products without LCD screen If the ink cartridge holder is at the far right position press the y button The ink cartridge holder moves to the ink cartridge check position The cartridge that is expended or low is indicated by the mark on this product Then press the y button again The ink cartridge holder moves to the ink cartridge replacement position C Remove and reinsert the ink cartridge a...

Page 131: ... the Print Speed For Windows Only Note The screen shots in this section may vary depending on the model Print speed may be increased by selecting certain settings in the Extended Settings window when the printing speed is slow Click the Extended Settings button on your printer driver s Maintenance window User s Guide Troubleshooting for Printing Copying 131 ...

Page 132: ...selected as for quality in the printer driver the product prints at high speed Try choosing Quiet Mode for quieter operation which will reduce the print speed For Windows select the Quiet Mode check box in the Main window of your printer driver ForMacOSX selectOnfromtheQuietMode TodisplaytheQuietMode clickthroughthefollowingmenus System Preferences Print Scan forMacOSX10 8or10 7 orPrint Fax forMac...

Page 133: ...econnectionbetweenthemtomakesureitis secure Make sure you select the correct product if a scanner list appears when starting to scan Windows When you start Epson Scan using the EPSON Scan icon and the Select Scanner list is displayed make sure you select the model of your product Mac OS X When you start Epson Scan from the Applications folder and the Select Scanner list is displayed make sure you ...

Page 134: ...ther users must first start Epson Scanner Monitor in the Applications folder and then press a button to scan How to unblock Epson Event Manager A Click Start or the start button and then point to Control Panel For Windows 8 Select Control Panel from Settings B Do one of the following Windows 8 and 7 Select System and Security Windows Vista Select Security Windows XP Select Security Center C Do one...

Page 135: ...toshop Elements uninstall the TWAIN compliant scanning program and then reinstall it Uninstalling Your Software on page 107 Problems When Feeding Paper The paper gets dirty You may need to clean the product Cleaning the Product on page 102 Multiple sheets of paper are fed If you load unsupported paper the product may feed more than one sheet of paper at a time You may need to clean the product Cle...

Page 136: ...ype setting click the Brightness button and then try adjusting the Threshold setting Office Mode Select Black White as the Image Type setting and then try adjusting the Threshold setting Professional Mode Select Black White as the Image Type setting and click the Windows or r Mac OS X button next to Image Type Make the appropriate Image Option setting and then try adjusting the Threshold setting I...

Page 137: ...il preview in Home Mode or Professional Mode move the document or photo 6 mm 0 2 inch away from the horizontal and vertical edges of the scanner glass to avoid cropping IfyouarescanningusingthebuttonorusingnormalpreviewinOfficeMode HomeMode orProfessionalMode move the document or photo about 3 mm 0 12 inch away from the horizontal and vertical edges of the scanner glass to avoid cropping Multiple ...

Page 138: ...ot scan in the direction you want Click Configuration select the Preview tab and then clear the Auto Photo Orientation check box Then place your documents correctly Problems Remain After Trying All Solutions If you have tried all the solutions and have not solved the problem initialize the Epson Scan settings Click Configuration select the Other tab and then click Reset All User s Guide Troublesho...

Page 139: ...p ink cartridge within six months of opening the package Temperature Storage 20 to 40 C 4 to 104 F 1 month at 40 C 104 F Freezing 12 C 10 4 F Ink thaws and is usable after approximately 3 hours at 25 C 77 F System Requirements For Windows System PC Interface Windows8 32 bit 64 bit Windows7 32 bit 64 bit Vista 32 bit 64 bit XPSP1 or higher 32 bit or XP Professional x64 Edition Hi Speed USB For Mac ...

Page 140: ...ed by the manufacturer at any time Epson cannot attest to the quality of any non Epson brand or type of paper Always test samples of paper stock before purchasing large quantities or printing large jobs Poor quality paper may reduce print quality and cause paper jams or other problems If you encounter problems switch to a higher grade of paper Single sheets Size A4 210 297 mm 10 15 cm 4 6 in 13 18...

Page 141: ...o 90 g m2 24 lb Envelopes Size Envelope 10 4 1 8 9 1 2 in Envelope DL 110 220 mm Envelope C6 114 162 mm Paper types Plain paper Weight 75 g m2 20 lb to 90 g m2 24 lb Printable area Highlighted portions show printable area Single sheets Normal Borderless Envelopes User s Guide Product Information 141 ...

Page 142: ... US letter size Scanning resolution 1200 dpi main scan 2400 dpi sub scan Output resolution 50 to 4800 7200 and 9600 dpi 50 to 4800 dpi in 1 dpi increments Image data 16 bits per pixel per color internal 8 bits per pixel per color external maximum Light source LED Network interface specification Wi Fi Standard IEEE 802 11b g n 1 Security WEP 64 128bit WPA PSK TKIP AES 2 Frequency Band 2 4 GHz Commu...

Page 143: ...roSD Media format DCF DCF Design rule for Camera File system version 1 0 or 2 0 compliant All card types standard version compliant Voltage Requirements 3 3 v Adapter required Photo data specifications File format JPEG with the Exif Version 2 3 standard Image size 80 80 pixels to 9200 9200 pixels Number of files XP 410 Series up to 9990 XP 310 Series up to 2000 Mechanical XP 210 Series XP 310 Seri...

Page 144: ...ctrical XP 210 Series 100 240 V Model Input voltage range 90 to 264 V Rated frequency range 50 to 60 Hz Input frequency range 49 5 to 60 5 Hz Rated current 0 5 to 0 3 A Power consumption Standalone copying Approx 12 W ISO IEC24712 Ready mode Approx 5 0 W Sleep mode Approx 2 7 W Power off Approx 0 3 W XP 310 Series 100 240 V Model Input voltage range 90 to 264 V Rated frequency range 50 to 60 Hz In...

Page 145: ...gium power consumption when copying may vary Check http www epson be for the latest specifications Environmental Temperature Operation 10 to 35 C 50 to 95 F Storage 20 to 40 C 4 to 104 F 1 month at 40 C 104 F Humidity Operation 20 to 80 RH Storage 5 to 85 RH Without condensation Standards and approvals U S model Safety UL60950 1 CAN CSA C22 2 No 60950 1 EMC FCC Part 15 Subpart B Class B CAN CSA CE...

Page 146: ...t the equipment Models C462K C462L and C462M are in compliance with the essential requirements and other relevant provisions of Directive 1999 5 EC For use only in Ireland UK Austria Germany Liechtenstein Switzerland France Belgium Luxemburg Netherlands Italy Portugal Spain Denmark Finland Norway Sweden Iceland Cyprus Greece Slovenia Malta Bulgaria Czech Estonia Hungary Latvia Lithuania Poland Rom...

Page 147: ...our area is not listed below contact the dealer where you purchased your product Epson support will be able to help you much more quickly if you give them the following information Product serial number The serial number label is usually on the back of the product Product model Product software version Click About Version Info or similar button in the product software Brand and model of your compu...

Page 148: ...iwan 02 27491234 02 27495955 1F No 16 Sec 5 Nanjing E Rd Songshan Dist Taipei City 105 Taiwan 02 32340688 02 32345299 No 1 Ln 359 Sec 2 Zhongshan Rd Zhonghe City Taipei County 235 Taiwan 039 605007 039 600969 No 342 1 Guangrong Rd Luodong Township Yilan County 265 Taiwan 038 312966 038 312977 No 87 Guolian 2nd Rd Hualien City Hualien County 970 Taiwan 03 2810606 03 2810707 No 413 Huannan Rd Pingzh...

Page 149: ...Epson contact points new product information and technical support e mail Epson Helpdesk EpsonHelpdeskisprovidedasafinalbackuptomakesureourclientshaveaccesstoadvice OperatorsontheHelpdesk can aid you in installing configuring and operating your Epson product Our Pre sales Helpdesk staff can provide literatureonnewEpsonproductsandadvisewherethenearestdealerorserviceagentislocated Manytypesofqueries...

Page 150: ... contact Epson Hong Kong Limited Internet Home Page EpsonHongKonghasestablishedalocalhomepageinbothChineseandEnglish ontheInternettoprovideuserswith the following information Product information Answers to Frequently Asked Questions FAQs Latest versions of Epson product drivers Users can access our World Wide Web home page at http www epson com hk Technical Support Hotline You can also contact our...

Page 151: ...g for Mac OS X 34 accessing for Windows 33 uninstalling 107 E Easy Photo Print 41 Enlarging pages 43 Envelopes loading 23 printable area 141 Epson Easy Photo Print 41 paper 20 Epson Connect 8 72 Epson Event Manager 69 Error messages 111 Errors copy 126 print 115 scan 133 F File Sharing Setup 76 Fit to page printing 43 Fix Red Eye 71 Full Auto Mode 54 H Head cleaning control panel 97 Mac OS X 97 pr...

Page 152: ...ecial paper 20 feeding problems 128 jams 119 loading 23 loading capacity 20 printable area 141 specifications 140 wrinkling 129 Paper jam 119 135 Paper Size more functions 73 print photos 71 Paper Type more functions 73 print photos 71 PDF 65 Personal Stationery 73 Photo software 41 Photo ID 73 Photo Layout Sheet 73 Power Off Timer 75 Previewing 61 Print head aligning 98 checking 94 cleaning 96 Pr...

Page 153: ...Photos more functions 73 Service 147 Settings 71 Sharing printer Mac OS X 47 Windows 45 Sleep Timer 75 Slide Show 73 Smeared prints 125 127 Software uninstalling 107 Sound 75 Specifications ink cartridges 139 mechanical 143 memory card 143 paper 140 printer 140 scanner 142 standards and approvals 145 Speed increasing 127 131 Status lights 133 Status Monitor Mac OS X 117 System requirements 139 T T...

Reviews: