background image

3 | 

P a g e


Hardware Installation 


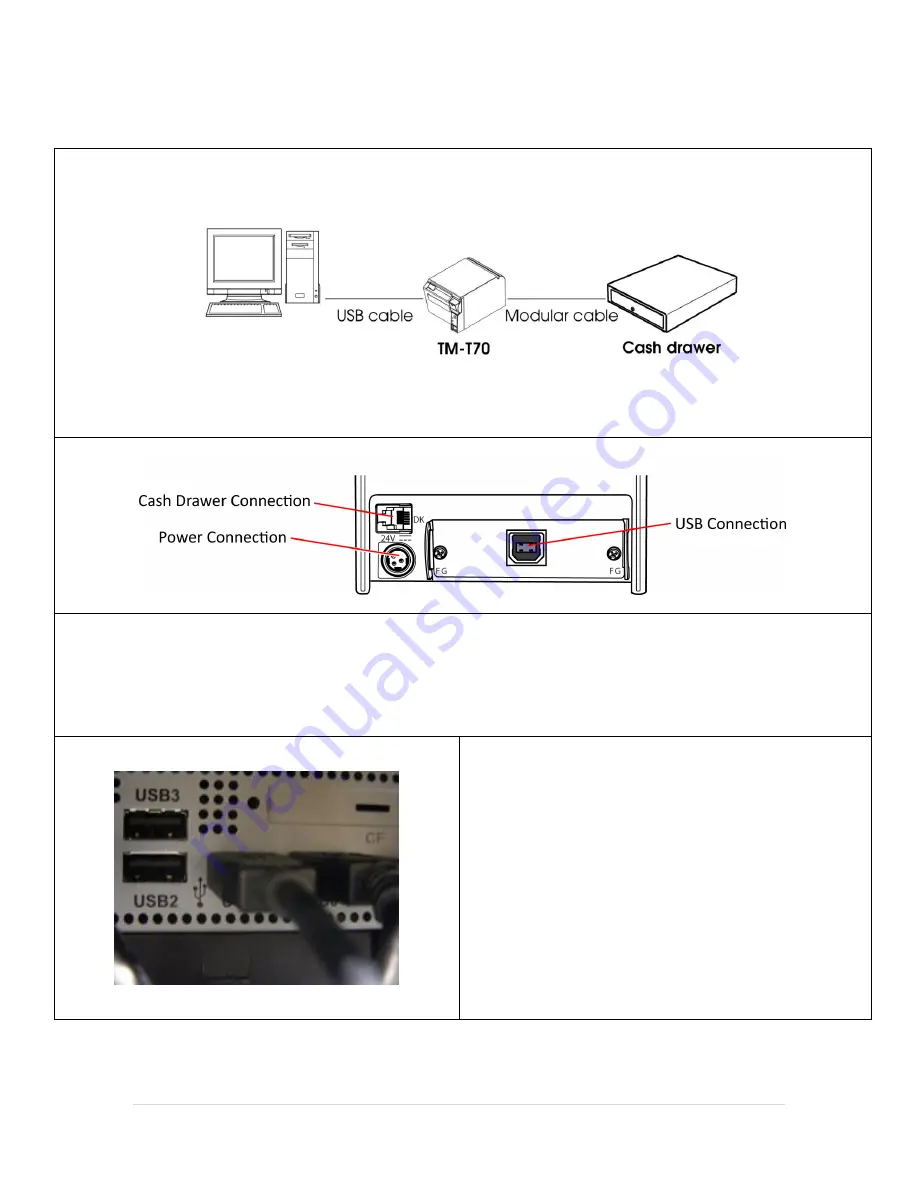
Diagram of how the printer will be interfaced with the computer 


1.


Using the above image to correctly plug in all of the cables that came with the TM-T70 series receipt printer.  

Note

: The printer may have a different interface than the one pictured above (e.g. parallel, serial, etc…). 


2.


Plug the other end of the interface cable into the back 
of the computer. 

3.


Plug the other end of the cash drawer cable into the 
back of the cash drawer. 

4.


Plug the power cable into an outlet. 


Summary of Contents for TM-T70

Page 1: ...Blue Hill Plaza 16 th Floor PO Box 1546 Pearl River NY 10965 1 800 PC AMERICA 1 800 722 6374 Voice 845 920 0800 Fax 845 920 0880 1 P a g e EPSON TM T70 Series Receipt Printers Installation for Windows Vista ...

Page 2: ... open lever down to open the roll paper cover 2 Remove the used roll paper core if applicable 3 In the correct direction pictured left install the roll paper 4 Pull the paper out through the Paper guides 5 Close the roll paper cover 6 Tear off any excess roll paper ...

Page 3: ...the cables that came with the TM T70 series receipt printer Note The printer may have a different interface than the one pictured above e g parallel serial etc 2 Plug the other end of the interface cable into the back of the computer 3 Plug the other end of the cash drawer cable into the back of the cash drawer 4 Plug the power cable into an outlet ...

Page 4: ... extract the installation files from http download2 pcamerica com drivers APD_402E zip 1 Run the install file APD_402E exe 2 Select Next to begin the installer 3 Select I accept the terms in the license agreement and select Next 4 Select Standard and then select Next ...

Page 5: ... 8 Select the correct type of port under Port Type e g if the printer connects via a USB port select Create a USB port 9 Optionally you can set the receipt printer as the default printer in windows 10 Select Next 11 At the next screen if you selected to create a Parallel or serial port you will be prompted to select a port number to install this with e g if your device is installed via a parallel ...

Page 6: ...now show under Printer Configuration 14 Select Next 15 Review the files to be installed and select Next The files will automatically install on your computer 16 Select Yes I want to restart my computer now 17 Select Finish You can now turn the printer back on ...

Page 7: ... select Properties 3 Select the Ports tab 4 Select the port your EPSON Receipt printer is connected to e g ESDPRT001 LPT1 COM1 USB T70 and select Apply Note If the printer is already selected and the Apply button is disabled just continue to the next step Now you can print a test page to ensure that your printer is set up correctly 1 Select the General tab 2 Select Print Test Page Note If your tes...

Page 8: ... same Printer Properties window General tab 1 Select Printing Preferences 2 Select the Document Settings tab 3 At the bottom of the window select Paper Conservation Then select Top Bottom 4 Select Paper Source 5 At the bottom of the window select Document NoFeed NoCut ...

Page 9: ...rcode font 1 Select the Barcode tab 2 Select Barcode4 from the Font Name drop down list the Type should be Code39 3 Select the Advanced settings button 4 Element Width to 2 5 Set the Element Height to 80 6 Select OK three times to finish configuring the printer ...

Page 10: ...t 5 Select the EPSON TM T70 Receipt printer in the Select local Windows printer list on the right 6 Select Epson Thermal Receipt Printer as the Printer Type 7 Select Cut Receipt at this Station 8 Select Print logo on receipts at this station then select the logo file you would like to print on receipts if applicable Note The Pixel aspect ratio for the logo must be 1 3 i e if the image has a 100px ...

Page 11: ...e Hardware tab 5 Select Page1 6 Under Cash Drawer select the radio button that says Open Default Drawer 7 Under Default Cash Drawer Port select the appropriate port that your receipt printer is connected to USB Receipt Printer Note If the port that your printer is connected to is selected and the cash drawer is not opening try setting the port as the USB Receipt Printer 8 Select Update ...

Page 12: ...r Options button 2 Enter the administrator password default admin where applicable 3 Select Setup then Setup Screen 4 Select the Receipt tab 5 Check Print Bar Code On On Hold Receipts 6 Check Print Bar Code On Complete Receipts 7 Select Update to save your changes ...

Page 13: ...TM T70 Receipt and EPSON TM T70 Receipt 1 delete all except the unnumbered listing Right click on the duplicate printer name s and select Delete 3 Select the Ports tab 4 Check the first corresponding port for the printer that you have e g LPT1 COM1 ESDPRT001 5 Select the General tab Select Print Test Page if the test page prints correctly you can return to the CRE RPE software and configure the pr...

Reviews: