Maintaining and Transporting
39
En
g
lis
h
2.
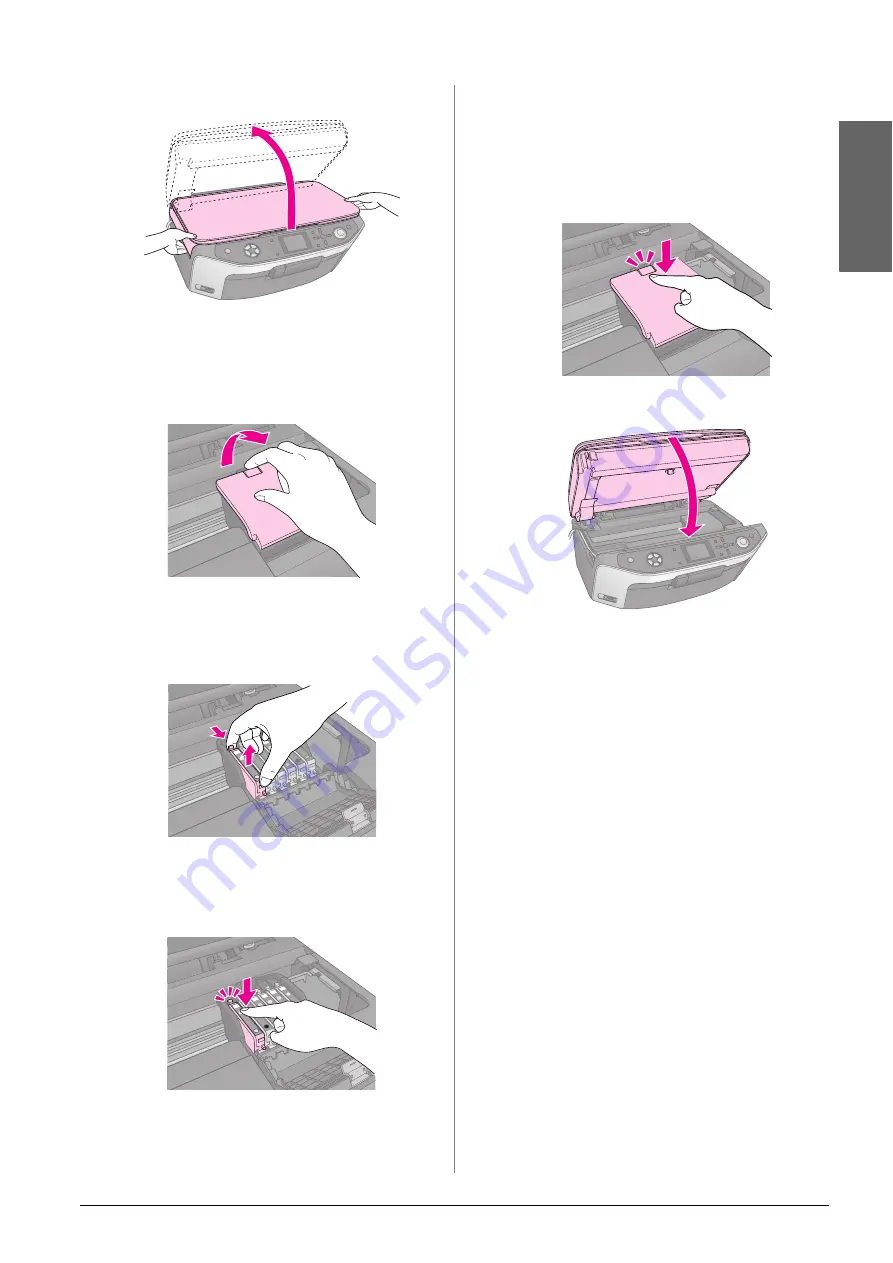
Lift up the scanner unit to access the printer area.
3.
Open the cartridge cover.
c
Caution:
Never attempt to open the cartridge cover while the print head
is moving. Wait until the cartridges have moved to the
replacement position.
4.
Remove the cartridge you need to replace.
Squeeze the tab at the back of the cartridge and lift
it straight out. Dispose of it carefully. Do not take
the used cartridge apart or try to refill it.
5.
Unwrap the new cartridge.
6.
Place the new cartridge into the holder and push
it down until it clicks into place.
If you need to replace other ink cartridges, repeat
steps 4 through 6 before continuing with the next
step.
7.
Close the ink cartridge cover and press it until it
clicks into place.
c
Caution:
If you find it difficult to close the cover, make sure all the
cartridges are firmly seated. Press down on each cartridge until
you hear it click into place. Do not attempt to force the cover
closed.
8.
Close the scanner unit.
9.
Press
OK
.
The EPSON STYLUS PHOTO RX begins charging
ink and the
Charging ink.
Please wait.
message
appears on the LCD screen.
Wait until the message
Ink cartridge
replacement is complete.
appears on the LCD
screen before you continue printing.
c
Caution:
Never turn off the EPSON STYLUS PHOTO RX during ink
charging or you will waste ink.
Checking and Cleaning the
Print Head
If your printouts are unexpectedly light, colors are
missing, or you see light or dark lines across the page,
you may need to clean the print head. This clears the
print head nozzles, which can become clogged if you
do not use the EPSON STYLUS PHOTO RX for a long
time.
Note:
Make sure the front tray is in the paper position (lower position) and
the CD/DVD tray is not inserted in the EPSON STYLUS PHOTO
RX. For detailed information, see “Loading Paper” on page 4.
Summary of Contents for Stylus Photo RX640 series
Page 51: ...51 English Memo ...


