background image

EPSON Stylus C80

1/02

EPSON Stylus C80

 - 

9

Testing the Printer

You can run a printer check to determine whether a problem 
comes from the printer itself or some other source. 

1. Make sure both the printer and computer are turned off. 

Then disconnect the interface cable from the printer.

2. Make sure letter-size or larger plain paper is loaded in the 

printer.

3. Hold down the 


m

 paper button, then press and release the 


P

power button. Continue holding down the 


m

 paper 

button until the 


P

 power light starts to flash, then release 

it.

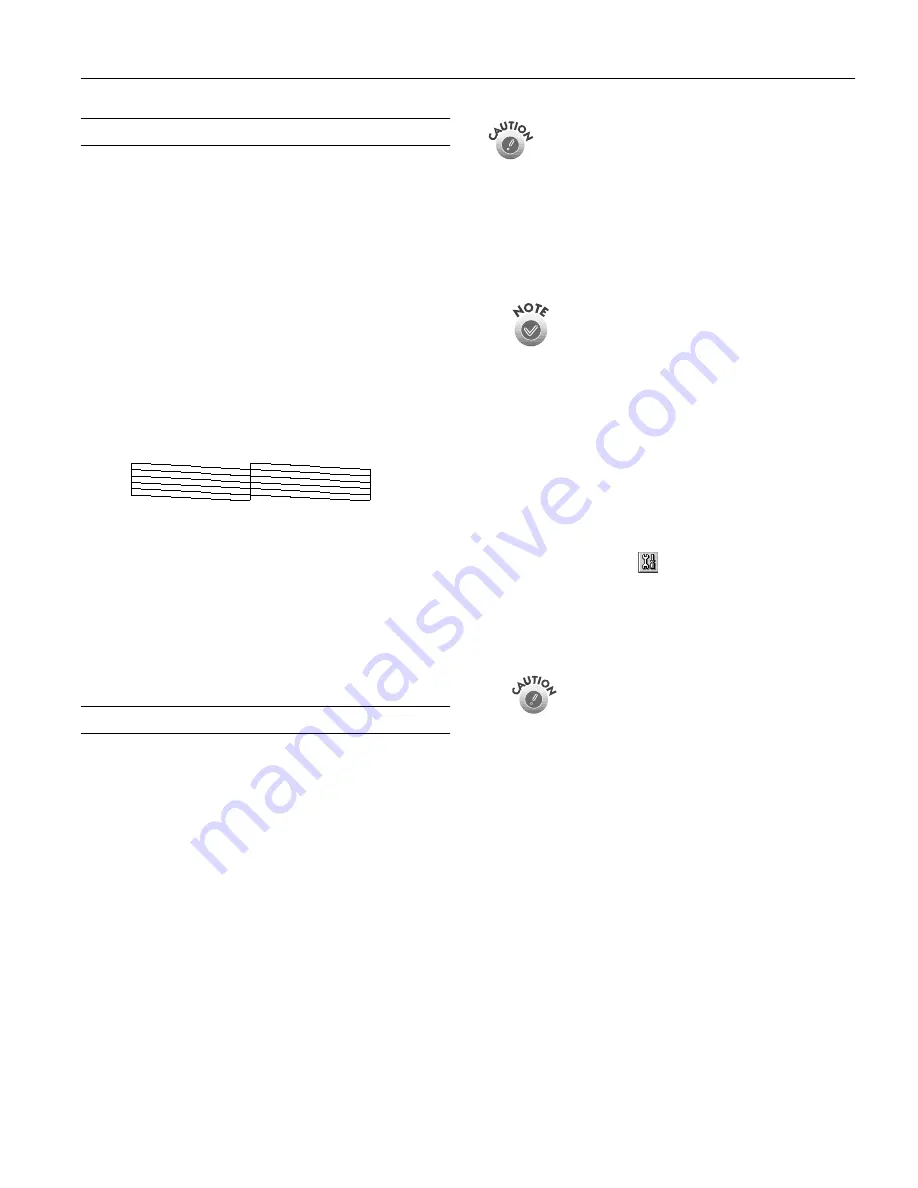
The printer prints one page showing its ROM version 
number, ink counter, and a nozzle check pattern. (If the 
pattern has white lines, you need to clean the print head; see 
below.)

4. Turn off the printer after it prints the check page. Then 

reconnect the cable and turn on your printer and computer.

If the check page prints, the problem probably lies in your 
software settings, interface cable, or computer. Your software 
may not be installed correctly.

If the check page doesn’t print, you may have a problem with 
your printer. Try the suggestions in the 

Printer Basics

 book. If 

nothing works, contact your dealer or EPSON.

Cleaning the Print Head

If your printouts are unexpectedly light or faint, or dots or 
lines are missing from the image, you may need to clean the 
print head. This unclogs the nozzles so they can deliver ink 
properly. Print head cleaning uses ink, so clean it only if 
quality declines. 

This section explains how to clean the print head using the 
Head Cleaning utility. This is the recommended method 
when the printer is connected directly to your computer (not 
over a network). 

You can also clean the print head using the printer’s control 
panel. See the electronic 

Reference Guide

 for detailed 

instructions. 

When you don’t turn on your printer for a long time, the 
print quality can decline. It’s a good idea to turn on your 
printer at least once a month to maintain good print 
quality.

If your paper comes with a cleaning sheet, don’t use it 
with your printer; it may jam inside the printer.

1. Make sure the printer is turned on but not printing. 

The 


P

 power light should be on, but not flashing. Neither 

of the other lights should be flashing or on.

You can’t clean the print head if the 


H

 ink out light 

is flashing or on. Replace the appropriate ink 
cartridge instead.

2. Load letter-size paper.

3. If you have an application running, access the printer 

settings dialog box.

Or, with Windows, click 

Start

, point to 

Settings

, then 

select 

Printers

. Right-click your 

EPSON Stylus C80 

Series

 printer icon in the Printers window. Then select 

Properties

 (

Document Defaults

 in Windows NT, 

Printing Preferences

 in Windows 2000).

4.

Windows

: Click the 

Utility

 tab. 

Macintosh:

 Click the 

Utility button.

5. On the Utility menu, click the 

Head Cleaning

 button.

6. Follow the instructions on the screen to clean the print 

head. Cleaning takes about 30 seconds, during which the 
printer makes some noise and the 


P

power light flashes. 

Never turn off the printer while the 


P

power light is 

flashing, unless the printer hasn’t moved or made 
noise for more than 5 minutes.

7. When the 


P

power light stops flashing, run a nozzle check 

to confirm that the print head nozzles are clean.

Make sure paper is loaded in the printer and click 

Print 

nozzle check pattern

 (Windows) or 

Confirmation


(Macintosh). Then click 

Next

. The nozzle check pattern 

prints (see below for details).

8. If the nozzle check pattern has no gaps in its lines, click 

Finish

.

If the pattern has any gaps, click 

Clean

 to clean the print 

head again. If you don’t see any improvement after cleaning 
three or four times, see the troubleshooting section in the 
online 

Reference Guide

.

Summary of Contents for Stylus Color C80

Page 1: ... Reference number Part number Paper support 114 1070427 EPSON paper name Size Part number Premium Bright White Paper Letter S041586 Photo Quality Ink Jet Paper Letter A4 Legal S041062 S041061 S041067 Photo Quality Ink Jet Cards A6 S041054 Ink Jet Transparencies Letter A4 S041064 S041063 Matte Paper Heavyweight Letter A4 S041257 S041258 Archival Matte Paper Letter A4 S041341 S041342 Double Sided Ma...

Page 2: ... replacement The actual print capacity may vary The ink charging process reduces the print capacity of the initial cartridge even though it contains the standard amount of ink Ink thaws and is usable after approximately 3 hours at 77 F 25 C To ensure good results use genuine EPSON cartridges and do not refill them Other products may cause damage to the printer not covered by EPSON s warranties Don...

Page 3: ...ing However print quality may decline in the expanded area Paper type Size Paper types Thickness Weight Single sheets Letter 8 5 11 inches Legal 8 5 14 inches Half letter statement 5 5 8 5 inches Executive 7 5 10 inches A4 210 297 mm A5 148 210 mm A6 105 148 mm Plain bond paper and special ink jet papers distributed by EPSON 0 003 to 0 004 inch 0 08 to 0 11 mm for plain bond paper 17 to 24 lb 64 t...

Page 4: ...er and remove any paper inside including torn pieces Then load a new stack of paper and press the m paper button to resume printing H is flashing One of the ink cartridges is low on ink Follow the instructions beginning on page 5 to replace the empty cartridge If the H ink out light goes on after you ve replaced a cartridge you may have installed a cartridge your printer can t use Check the number...

Page 5: ...flashing unless the printer hasn t moved or made any noise for more than 5 minutes Replacing an Ink Cartridge When the H ink out light is flashing one of your ink cartridges is low on ink When the H ink out light stays on an ink cartridge is empty and you need to replace it You cannot print if any of the ink cartridges are empty Leave the empty cartridge installed in the printer until you have obt...

Page 6: ...oves to the left and the cartridge that needs to be replaced stops under the _ mark The P power light also begins to flash Don t press the H ink cartridge replacement button for more than three seconds or the printer will start to clean the print head To avoid damaging the printer never move the print head by hand 4 Press the H ink cartridge replacement button again If more than one ink cartridge ...

Page 7: ...ave the new ink cartridge s before you continue Once you start the ink cartridge replacement procedure you must complete all the steps in one session Follow these steps to replace ink cartridges before the H ink out light goes on or begins to flash 1 Use the Nozzle Check utility described in the Reference Guide to determine which cartridge s needs to be replaced 2 Make sure the printer is turned o...

Page 8: ...sheets between the sheets of paper or film be sure to remove the protective sheets before printing Some special media have a cut corner that you need to position on the upper right You can load the following number of sheets of EPSON special media If you have any problem loading multiple sheets of paper try loading just one sheet at a time For this paper name Select this Media Type setting Plain p...

Page 9: ...ide for detailed instructions When you don t turn on your printer for a long time the print quality can decline It s a good idea to turn on your printer at least once a month to maintain good print quality If your paper comes with a cleaning sheet don t use it with your printer it may jam inside the printer 1 Make sure the printer is turned on but not printing The P power light should be on but no...

Page 10: ...best line from the first group of lines on the printout then enter its number in box 1 on the screen Select the line with the cleanest straightest edges 7 Select the best line for each of the other groups of lines and enter its number in the appropriate box 8 Do one of the following If the middle line number 8 in each group is the best your print head s vertical alignment is correct Click Next to ...

Page 11: ...amage always leave the ink cartridges installed when transporting the printer Be sure to remove the tape used in step 4 after installing the printer in its new location 1 Turn on the printer wait until the print head locks in the far right position then turn off the printer 2 Unplug the power cord from the electrical outlet and disconnect it from the printer 3 Disconnect the printer cable from the...

Reviews: