background image

SC-F7200 Series

Rev.A

15

<<Media Feeding Unit>>

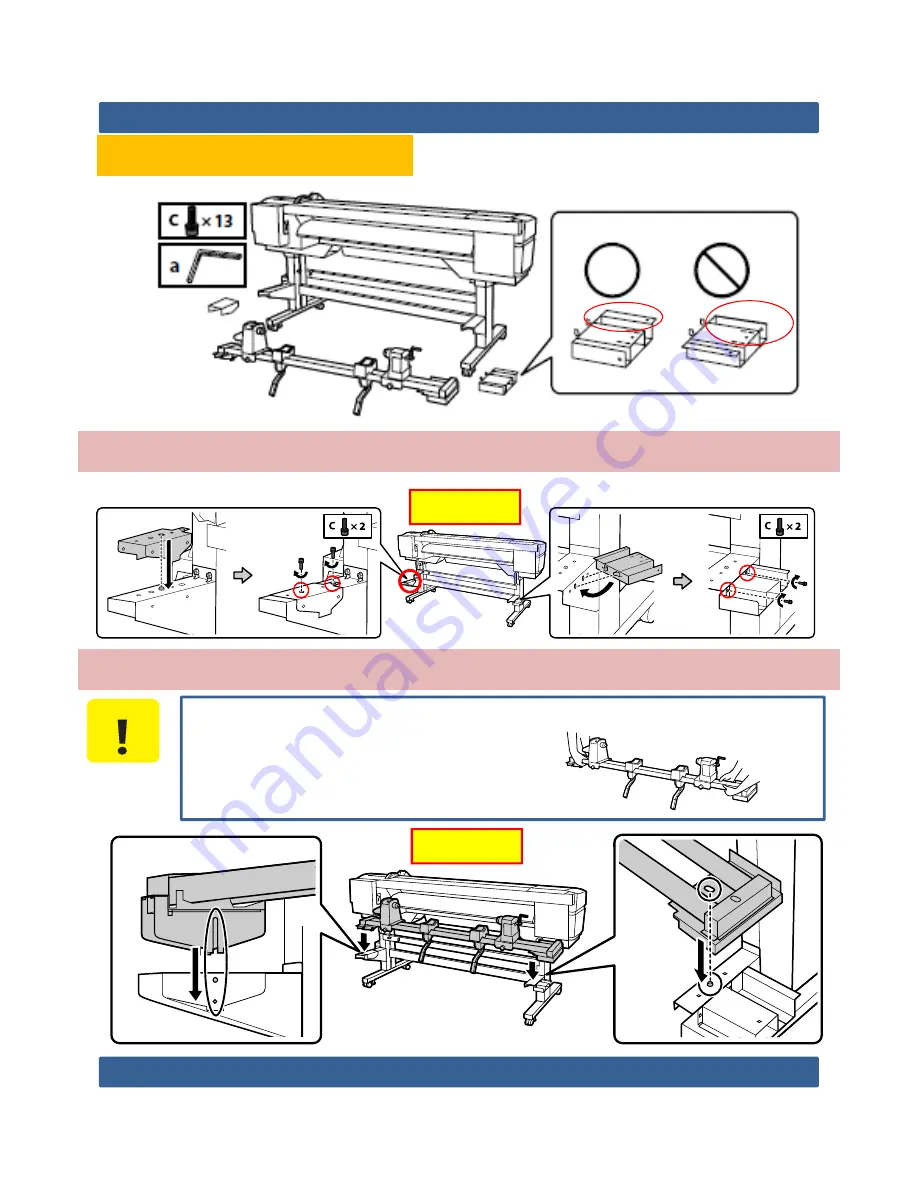
Fix the parts at both sides by tightening screws (total: 4pcs).

Rear side

Set the Media Feeding Unit firstly from the left side as below.

Carry the Media Feeding Unit (approx. 34.3 kg) using 2persons, 
each holding the 2bars as shown

C A U T I O N

Rear side

Summary of Contents for SC-F7200 Series

Page 1: ...SC F7200 Series Rev A 1 SETUP MANUAL SE Group Confidential Related Staff Only SC F7200 Series ...

Page 2: ...SC F7200 Series Rev A 2 Please inform the user of the next page certainly Please print and pass the next page to user and encourage the points of caution IMPORTANCE ...

Page 3: ...vel is about or less than 70mm Go to step 2 1 3 4 Replace chip unit with new one attached new ink pack Refill ink Use up all ink in the pack at a time No remaining When this message appears check ink level of the tank which is indicated by Shake the new ink pack as shown in the illustration horizontally for approximately 5cm left and right for 5seconds approximately 15times 2 Important ...

Page 4: ...on of equipment May indicate an operating or maintenance procedure practice or condition that is necessary to accomplish a task efficiently It may also provide additional information that is related to a specific subject or comment on the results achieved through a previous action Indicates should be confirmed by tentative When assembling it until the present stage Write the check when it is possi...

Page 5: ...SC F7200 Series Rev A 5 Revision Date of Issue Description 0 June 26 2015 Temporary release for AMP unit A July 22 2015 First release for MP unit Revision Status ...

Page 6: ...p Not User 1 2 Choosing a Place for the Printer Instructions for Placing the Printer keep adequate room as shown Choose a level and stable location that can support the weight of the printer about 288 kg 1 3 Used Tools Phillips screwdriver No 2 Long driver more than 250mm Rule Scale Scissors ...

Page 7: ...SC F7200 Series Rev A 7 1 4 Inside of carton box Printer Media Feeding Unit Auto Take up Reel Unit Epson Genuine Ink Supply System Cover ...

Page 8: ... System Cover Service engineer Before assembling the printer clear the work area by putting away the removed packing materials and bundled items C A U T I O N Ink Supply System Stand Printer Installation Media Feeding Unit Auto Take up Reel Unit Connecting the Power Cable Customer Media Guide Bar ...

Page 9: ...SC F7200 Series Rev A 9 Stand It is recommended to assemble the stand by 3persons C H E C K P O I N T Remove the tapes Insert the strut into the stands with supporting the stands Tighten 4screws ...

Page 10: ...SC F7200 Series Rev A 10 Check the markings of L R on both stands and strut Tighten 4screws with supporting the stands Tighten 1screw Tighten 2screws ...

Page 11: ...SC F7200 Series Rev A 11 Printer Take out the Carrying Bar Insert the Carrying Bar Set the carrying bar for printer to be between two screws of the carrying bar locate the screws upside ...

Page 12: ...ing the printer use at least 6persons Be careful for Waste Ink Tube not to be sandwiched when you set Printer on Stand C A U T I O N Before moving the printer be sure the stand is fixed in place Be sure the casters are not floating on floor C A U T I O N Pull out the carrying bar from the printer ...

Page 13: ... when opening or closing the front cover C A U T I O N Pressing the tabs on both sides of the media holding plates to center as shown Temporarily in the center of the platen before adjustment of parallelism Reel Roll Media Guide bar The media holding plate is used when printing on media with a thickness of less than 0 4 mm C H E C K P O I N T ...

Page 14: ...SC F7200 Series Rev A 14 Remove 2screws and remove the plate below plate Dispose 2screws and this plate C H E C K P O I N T ...

Page 15: ...ix the parts at both sides by tightening screws total 4pcs Rear side Set the Media Feeding Unit firstly from the left side as below Carry the Media Feeding Unit approx 34 3 kg using 2persons each holding the 2bars as shown C A U T I O N Rear side ...

Page 16: ...SC F7200 Series Rev A 16 Slide core holder and tighten 5screws Tighten 4screws temporarily until parallel adjustment is completed C A U T I O N Temporarily tighten Only home side Set cable by clamps ...

Page 17: ...SC F7200 Series Rev A 17 Open the cover Plug the connector Set the cable by clamps Close the cover ...

Page 18: ...SC F7200 Series Rev A 18 Auto Take up Reel Unit Tighten each 2screws total 4pcs Set Reel Unit ...

Page 19: ...ighten 5screws Tighten 4screws temporarily until parallel adjustment is completed Temporarily tighten Only home side Set the cable through the bottom clamp behind the printer Plug the connector fix it by 2screws Set the cable by 3clamps C A U T I O N ...

Page 20: ...20 2 7 Stand Ink Tank Waste Ink Tube Waste Tank 20 Silver ones 2pcs Blue ones 2pcs You can use both Blue ones below After 100units This screws will be changed Running change First around100units for MP applied by Blue marker ...

Page 21: ...6pcs plates for strengthen stand 1 Full and Front side 1pcs 1 Make sure 2 holes are bigger 2 Tighten 2 screws temporarily Temporarily tighten 3 Slide the plate tighten 2 screws 4 Tighten 2 more screws on front side Tighten I x 2 I x 2 ...

Page 22: ... A Attach 6pcs plates for strengthen stand 2 Full and Rear side 2pcs 1 Make sure left parts and right parts 2 Tighten 2 screws temporarily to keep 1 2 mm distance 1 2mm Temporarily tighten Right Parts Left parts 22 I x 2 ...

Page 23: ...C F7200 Series Rev A Attach 6pcs plates for strengthen stand 2 Full and Rear side 2pcs 3 Slide the plate and tighten 2 screws temporarily 4 Tighten 4 screws Temporarily tighten Tighten 4 screws 23 I x 2 ...

Page 24: ... A Attach 6pcs plates for strengthen stand 2 Full and Rear side 2pcs 1 Make sure left parts and right parts 2 Tighten 2 screws temporarily to keep 1 2 mm distance 1 2mm Temporarily tighten Right Parts Left parts 24 I x 2 ...

Page 25: ...C F7200 Series Rev A Attach 6pcs plates for strengthen stand 2 Full and Rear side 2pcs 3 Slide the plate and tighten 2 screws temporarily 4 Tighten 4 screws Temporarily tighten Tighten 4 screws 25 I x 2 ...

Page 26: ...SC F7200 Series Rev A 26 Attach 6pcs plates for strengthen stand 3 Home and Rear side 2pcs Right Parts Left parts 1 As the same as 3 Full and Rear side 2pcs 2 Tighten total 8 screws I x 8 ...

Page 27: ... Series Rev A 27 Tighten 2 screws temporarily Position the part on the stand and slide it to left Tighten 2screws Temporarily tighten Tighten Slide it to left D Media Guide Bar Only 2 flames for left and right ...

Page 28: ...200 Series Rev A 28 1 Hook the plate and Tighten 1 screw temporarily 2 Align the plate on the L shape spacer 3 Tighten 2 screws temporarily G x 1 Temporarily tighten E x 2 L shape spacer Temporarily tighten ...

Page 29: ...Series Rev A 4 Tighten 1 more screw temporarily 5 Set 1 more plate and slide to left 6 Tighten 1 more screw temporarily It was already assembled at factory I x 1 Temporarily tighten 29 Temporarily tighten I x 1 ...

Page 30: ... strengthen stand 4 Home and Front side 1pcs 1 Make sure 2 holes are smaller 30 2 Tighten 2 screws temporarily and slide the plate to fix onto the stand 3 Tighten 2 more screws on front side temporarily I x 4 Temporarily tighten Temporarily tighten ...

Page 31: ...ngthen stand 4 Home and Front side 1pcs 4 Tighten 1 more screws temporarily Temporarily tighten D x 1 5 Tighten all temporarily tightened screws Total 10 pcs From page28 to page30 Media guide bar 5pcs E X 2 G X 1 I X 2 Strengthen parts 5 pcs D X 1 I X 4 ...

Page 32: ...SC F7200 Series Rev A 32 1 Pass the tube and Hook the plate to fix as below 2 hooks G x 5 2 Tighten 5 screws Left Side of The plate Bottom Side of The plate ...

Page 33: ... F7200 Series Rev A 33 1 Loosen 2 screws and make sure Front Plate is low 2 Loosen 4 screws and Make sure the plates to be able to move up low and left right Loosen Front Plate Loosen Loosen Loosen Loosen ...

Page 34: ...SC F7200 Series Rev A 34 1 Tighten 2 long screws temporarily Not to touch Temporarily tighten Temporarily tighten ...

Page 35: ...e the color index on the plate 2 Put each CSIC on each slider 3 Set only Cyan and Black Ink Tanks into Ink Holder as the same order as the color index Set the tank with Chip Slider during pushing slider Slider CSIC IMPORTANCE Cyan Black ...

Page 36: ...n of Ink Tank and hook of Ink Holder Please do NOT be down all levers before adjustment tank height OK NG Set Ink Tank again IMPORTANCE 36 Tighten 2 Blue screws temporarily Temporarily Tighten Temporarily Tighten No need to fix the tank H x 2 Blue screws ...

Page 37: ...nd Tighten 2 screws 2 Insert 2 pcs thickness gauges 2 0mm with raising the tanks at 2 locations Black and Cyan 3 Tighten 2 Blue screws to fix the tanks only Black Cyan Tighten Tighten To fix the tank Tighten To fix the tank t 2 5mm x1pcs t 2 0mm x 2pcs ...

Page 38: ...s 2 0mm gauges can be moved smoothly at 2 locations Black and Cyan 2 Tighten Left Long Screw as the same as the right one 3 Loosen 2 Blue screws The reason why to loosen 2 Blue screws Tighten to adjust Right Long Screw Left Long Screw Tighten to adjust Loosen blue screws Loosen blue screws Cyan Black ...

Page 39: ...othly AGAIN at 2 locations Black and Cyan 2 Tighten Left Long Screw as the same as the right one 3 Make sure the thickness gauge 2 5mm can t be passed at 2 locations Black and Cyan Tighten to adjust Right Long Screw Left Long Screw Tighten to adjust Can t be Passed Can t be Passed Thickness gauge 2 5mm t 2 5mm x1pcs t 2 0mm x 2pcs ...

Page 40: ...es Rev A Tighten to fix 1 Yellow Tighten to fix 2 Magenta Tighten to fix 3 Cyan Tighten to fix 4 Black 40 1 Set the other tanks Yellow and Magenta 2 Tighten 4 screws to fix the tanks Yellow Magenta Cyan Black H x 2 ...

Page 41: ...ries Rev A 41 1 Make sure thickness gauge 2 0mm can be passed and thickness gauge 2 5mm can t be passed Again at 2 locations Black and Cyan 2 0mm Can be Passed 2 5mm Can t be Passed 41 t 2 5mm x1pcs t 2 0mm x 2pcs ...

Page 42: ...OK Check the vertical position of Ink Tank Check the front and rear position of Ink Tank If it is not enough to hold insert the Ink Tank please set this Ink Tank again C A U T I O N If it is not enough to hold insert the Ink Tank please set this Ink Tank again C A U T I O N ...

Page 43: ...SC F7200 Series Rev A 43 1 Tighten 2 screws 2 Push 4 tanks softly by hand 3 Tighten 2 more screws without pushing by hand Tighten Tighten Tighten Tighten ...

Page 44: ...SC F7200 Series Rev A 44 1 Loosen 2 screws again 2 Tighten 2 screws with rising the plate softly 3 Lock down all levers Loosen Loosen Tighten Tighten ...

Page 45: ...eries Rev A 45 1 Turn back the tank guard plate and hook the plate into the holes of tank guard plate 2 hooks 2 Tighten 4 screws Tank guard plate Top side Tank guard plate Bask side J x 4 Tighten 2 hooks 2 holes ...

Page 46: ...SC F7200 Series Rev A 46 1 Hook the plate into the holes of fix 2 Tighten 9 screws J x 9 Tighten 2 hooks ...

Page 47: ...SC F7200 Series Rev A 47 Peel off the tapes on the tube and pass through the tube into the hole Unlock the 2clamps ...

Page 48: ...Rev A 48 1 Cover the plate over Waste Ink Tube 2 Make sure the hook is under Upper Clamp and lock it 3 Make sure the hook is above Lower Clamp and lock it Upper Clamp Lower Clamp Upper Clamp hook hook Lower Clamp Plate ...

Page 49: ...SC F7200 Series Rev A 49 Fix Waste ink Joint of the tube onto the plate as below Waste ink joint ...

Page 50: ...SC F7200 Series Rev A 50 Set Stopper as below The lid of the Waste Ink Bottle is required when disposing of the waste ink Keep the lid Do not throw it away C H E C K P O I N T Stopper 2 hooks ...

Page 51: ...SC F7200 Series Rev A 51 Stick the label for your territory on the English label if necessary ...

Page 52: ... guide bar in both hand tighten 2screws Tighten 2screws temporarily until the parallel adjustment is completed The media guide bar is heavy A minimum of 2persons is required for assembly C A U T I O N Temporarily tighten Tighten E x 2 E x 2 ...

Page 53: ...Adjustment of the Media Feeding Unit When the film will be reused the adhesive side may be soiled Soak a lint free cloth in water wring it out and then use it to wipe away the dust and lint stuck to the reverse side C H E C K P O I N T ...

Page 54: ...SC F7200 Series Rev A 54 Open Release Loosen 4screws Pass 2films from Rear side after checking L R Remove protective sheet and put it after aligned screws Media Feeding Unit ...

Page 55: ...SC F7200 Series Rev A 55 Remove protective sheet and put it after aligned 2 and 4 screws Loosen knobs and fix knobs after aligned Frame of Board box Frame of Board box Loosen knobs and slide it ...

Page 56: ...SC F7200 Series Rev A 56 Pass film into Core Turn counter clockwise Set Core Turn clockwise until No visible A Pass film from Rear Align a film to b film Rear and Front side ...

Page 57: ...SC F7200 Series Rev A 57 Attach Counterweight and Measure and note value Move film to Home side and Check value Same No need to adjust different Need to adjust ...

Page 58: ...SC F7200 Series Rev A 58 Adjustment to turn screw Tighten 4screws after adjust same value Remove counterweight Loosen knob and slide it Pull film Remove core with film ...

Page 59: ...SC F7200 Series Rev A 59 Loosen 4screws Turn counter clockwise Loosen knobs and fix knobs after aligned Frame of after heater Frame of After heater Auto take up Reel Unit ...

Page 60: ...SC F7200 Series Rev A 60 Set Core Turn clockwise until No visible A Pass film from Front To through Media Guide Bar After Heater Roll Core Media Guide Bar Paper IMPORTANCE ...

Page 61: ...SC F7200 Series Rev A 61 Align a film to b film Rear and Front side Attach Counterweight and Measure and note value Move film to Home side and Check value Same No need to adjust different Need to adjust ...

Page 62: ...SC F7200 Series Rev A 62 Adjustment to turn screw Tighten 4screws after adjust same value Remove counterweight Remove core with film ...

Page 63: ...es Rev A cofidencial 63 After Heater Roll Core Media Guide Bar Paper IMPORTANCE Pass film from Front To use Media Guide Bar Align a film to b film Rear and Front side Attach Counterweight and Measure and note value ...

Page 64: ...SC F7200 Series Rev A 64 Move film to Home side and Check value Same No need to adjust different Need to adjust Loosen 2screws to use small hexagon wrench ...

Page 65: ...SC F7200 Series Rev A 65 Adjustment to turn screw Tighten 2screws after adjust same value Remove counterweight Remove core with film ...

Page 66: ...onnecting the Power Cable このイメージは 現在表示できません Install the clamp Connecting 2 power cables at Printer Fasten the cables by 2clamps Connect 2 AC cables Use only the type of power source indicated on the printer s label C A U T I O N ...

Page 67: ...roximately 15 times Open the slider ink inlet cover Shake the ink packs of all colors well to prevent the ink settlement C A U T I O N Wear security goggle and globes wash your skin immediately when the ink adheres to your skin C A U T I O N Remove the ink inlet cap from the ink tank Cut ink pack by scissors Do not cut off this white area IMPORTANCE Set ink chip ...

Page 68: ...iple different ink tanks This can cause messages from the remaining ink warning system to not be displayed properly Do not turn on printer before filling all inks Confirm whether Ink Tank color is suitable for Ink Pack color before filling ink C A U T I O N IMPORTANCE Push and Make sure the ink inlet cap back on ink tank Close the slider ink inlet cover ...

Page 69: ... update mode Push ON while pressing Media setup Media feed Maintenance Check the current Firmware version Update the latest FW Printer will be turned off automatically Please turn on the printer by FW update mode again Check the FW version if you updated Turn off printer IMPORTANCE ...

Page 70: ...200 Series Rev A 70 Turn ON the printer in the Normal mode Set the printer setting Language date time etc Starting Ink Charge Approximately 50 min Check the nozzle check pattern If nozzle missing do cleaning ...

Page 71: ...rn ON the printer in the Serviceman Mode Push ON while pressing Menu Back OK 2 SELF TESTING Mech Adjustment Sensor Check ILS 3 Check all Ink are OFF If it is ON check and adjust Ink Tank position again Check the Ink Tank position IMPORTANCE If necessary ...

Page 72: ...eight of Ink Tank is not correct When Ink charge There is air inside the ink tube Hook of Ink Tank comes off The height of Ink Tank is not correct False detection of Ink Level Hook of Ink Tank comes off The height of Ink Tank is not correct Always light the Lock Lever Sensor Hook of Ink Tank comes off The height of Ink Tank is not correct Make sure Lever down all ink tanks Gap of Ink Tank position...

Reviews: