background image

Setting Up Your Fax

5

English

Setting Up Your Fax 
Features

Before sending or receiving faxes, you 
may want to create a fax header, select 
your fax preferences, and set up a speed 
dial/group dial list of frequently used fax 
numbers. 

Checking your selected 
region

Before using the product, you need to 
select the region where you are using the 
product.
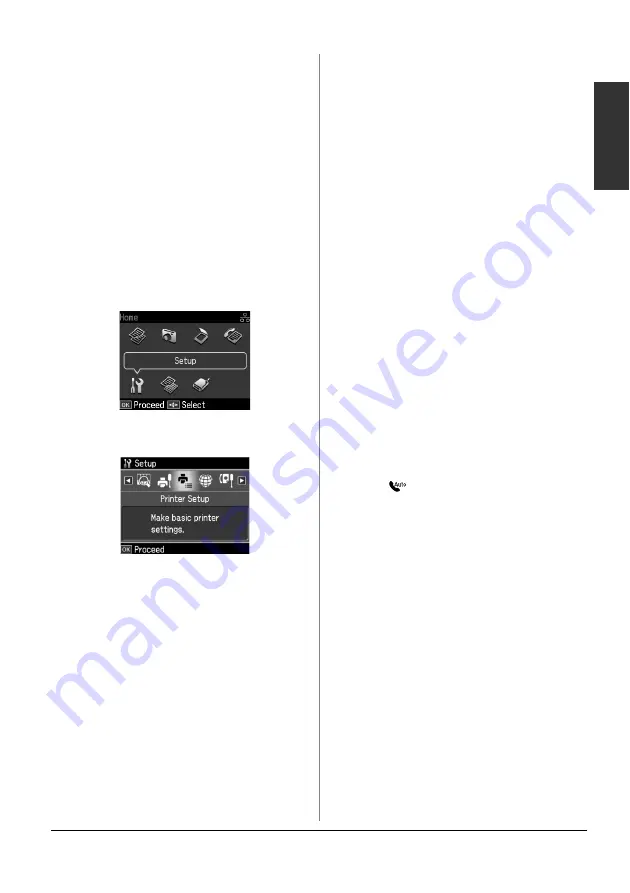
1. Press 

l

r

u

, or 

to select 

F

Setup

and then press 

OK

.

2. Press 

l

or

r

 to select 

Printer Setup

 and 

then press 

OK

.

3. Press 

u

or

d

 to select 

Country/Region

and then press 

OK

.

4. If you need to change the region, use 

u

or

d

 to select your region.

5. Press 

OK

. An information screen is 

displayed.

6. Select 

Yes

 to change the region, and 

then press 

OK

.

Note:

To cancel changing the region, select 

No


and then press 

OK

.

When you change the region, the fax 
settings are restored to their defaults.

7. Press 

Home

 to return to the first screen.

Setting up Automatic Fax 
Reception

When an answering machine is connected, 
make sure the answer time for the 
answering machine and the product are 
set correctly. If your answering machine is 
set to pick up on the fourth ring, you 
should set the product to pick up on the 
fifth ring or later.

Note:

Rings to Answer

 may be unavailable or the 

range of values may differ depending on the 
region.

1. Press 

l

r

u

, or 

d

 to select 

F

Setup

 and 

then press 

OK

.

2. Press 

l

or

r

 to select 

Fax Setting

, and 

then press 

OK

.

3. Press 

u

or

d

 to select 

Communication

then press 

OK

.

4. Press 

u

or

d

 to select 

Rings to Answer

then press

r

.

5. Press 

u

 or 

d

 to select the number of 

rings, then press 

OK

. Select more than 

the number of rings needed for the 
answering machine to pick up.

6. See your telephone's documentation 

for the setup method.

7. Press [

Auto Answer/Space

], and 

turn on Auto Answer mode.

8. Press 

OK

.

9. Press 

Home

 to return to the first screen.

When you receive a call, if the other party 
is a fax and you pick up the phone or the 
answering machine answers, the product 
automatically begins receiving the 
transmission. If the other party is a caller, 
the phone can be used as normal or a 
message can be left on the answering 
machine.

Note:

When Auto Answer mode is set to Off, you can 
receive the fax manually by lifting the handset. 
(

&

"Receiving faxes manually" on page 13)

Summary of Contents for OfficeSX610FW Series

Page 1: ...onnection 4 Setting Up Your Fax Features 5 Faxing Photos or Documents Handling Originals 10 Handling Paper 10 Sending Faxes 10 Receiving Faxes 13 Selecting Send Receive Settings 13 Printing Reports 15 Solving Problems Error Messages 16 Problems and Solutions 16 Appendix Important Safety Instructions 17 Personal Information Stored in Memory 18 Fax mode Menu List 19 ...

Page 2: ... Epson Corporation s operating and maintenance instructions Seiko Epson Corporation shall not be liable for any damages or problems arising from the use of any options or any consumable products other than those designated as Original Epson Products or Epson Approved Products by Seiko Epson Corporation Seiko Epson Corporation shall not be held liable for any damage resulting from electromagnetic i...

Page 3: ...on Turning off the Power When the power is turned off the following data stored in the product s temporary memory is erased Fax reception data Data stored in Delayed Fax Data being redialed Also when the power is left off for extended periods of time the clock may be reset causing irregularities Check the clock when you turn the power on Power saving function After 13 minutes of inactivity the scr...

Page 4: ...king Your Fax Connection The Check Fax Connection menu allows you to check the status of your fax connection 1 Load A4 size plain paper into the sheet feeder 2 Press l r u or d to select K Setup and then press OK 3 Press l or r to select Fax Setting and then press OK 4 Press u or d to select Check Fax Connection and then press OK 5 Press x Start to print the report 6 Press Home to return to the fi...

Page 5: ...he product are set correctly If your answering machine is set to pick up on the fourth ring you should set the product to pick up on the fifth ring or later Note Rings to Answer may be unavailable or the range of values may differ depending on the region 1 Press l r u or d to select F Setup and then press OK 2 Press l or r to select Fax Setting and then press OK 3 Press u or d to select Communicat...

Page 6: ...d then press OK 3 Press u or d to select Header and then press OK 4 Select Fax Header then press OK You see the header information input screen 5 Use the numeric keypad with other buttons on the control panel to enter the header information Using control panel buttons in fax mode on page 6 You can enter up to 40 characters 6 Press OK You return to Fax Header 7 Press d once to select Your Phone Num...

Page 7: ...n to the first screen Setting up your speed dial list You can create a speed dial list of up to 60 fax numbers so you can quickly select them for faxing You can also add names to identify the recipients and print the speed dial list Creating a new speed dial list 1 Press l r u or d to select F Setup and then press OK 2 Press l or r to select Fax Setting and then press OK 3 Press OK to select Speed...

Page 8: ... you want to delete then press OK 3 You see a confirmation message Select Yes to delete the entry and then press OK Note To cancel deleting the entry select No and then press OK 4 Press Home to return to the first screen Setting up your group dial list The group dial list allows you to easily send the same fax message to many fax numbers Before creating a group dial entry you need to register a fa...

Page 9: ...ing a group dial entry 1 Select Edit from the Group Dial Setup menu and then press OK You see the available group dial entry numbers 2 Select or type the group dial entry number that you want to edit 3 Repeat steps 6 through 13 in the previous section to edit the group dial list Deleting a group dial entry 1 Select Delete from the Group Dial Setup menu and then press OK You see the available group...

Page 10: ...hen press OK Note If you place your original in the automatic document feeder the icon is displayed 2 Use the keys on the numeric keypad to enter the fax number You can enter up to a maximum of 64 digits If you want to redial the last fax number you used press Redial Pause instead of entering a fax number The last fax number is displayed on the LCD screen Note If you want to change Color Mode pres...

Page 11: ...the sending information screen 4 Repeat steps 4 to 5 in the previous section to fax Note If you use group dial list only B W is available Broadcast sending Broadcast allows you to easily send the same fax message to many fax numbers using speed dial group dial or by entering a phone number You can send up to 30 phone numbers 1 Press Home to select K Fax and then press OK 2 Press x Menu 3 Press r t...

Page 12: ...d then press OK 3 Press u or d to select Delayed Fax and then press r 4 Press u or d to select On 5 Set the time that you want to send the fax and then press OK 6 You return to Delayed Fax and then press OK 7 Press x Start to reserve Fax Once it has been scanned the fax is transmitted at the time you specified Note If you need to cancel faxing at the time you specified press y Stop Clear Sending f...

Page 13: ... from fax information service Poll to Receive This function is used to gather information stored on another party s fax machine to your product 1 Load A4 size plain paper into the sheet feeder 2 Press Home to select K Fax and then press OK 3 Press x Menu You see Fax Send Settings 4 Press r twice to select Poll to Receive and then press OK 5 Enter the other party s fax number You can also use Speed...

Page 14: ...rent ring patterns to select an option other than All or Off ECM On Off Indicates whether you use Error Correction Mode to automatically request retransmission of fax data that is received with detected errors Setting and Options Description V 34 On Off Indicates the speed at which you transmit and receive faxes On is 33 6 Kbps and Off 14 4 Kbps Rings to Answer 1 2 3 4 5 6 7 8 9 The default value ...

Page 15: ...lect one of these options Fax Log Last Transmission Speed Dial List Group Dial List Reprint Faxes Protocol Trace 6 Press OK 7 If you select anything other than Fax Log go to Step 8 Press OK to print the Fax Log Note You can also check the Fax Log on the LCD Panel Press d to select View and then press OK Press l or r to flip between records 8 Press x Start to print the report you selected 9 Press H...

Page 16: ... Contact your DSL provider for the necessary filter If your phone line has static or other noise problems turn off the V 34 setting and try faxing again Selecting Send Receive Settings on page 13 If problems still exist turn off the ECM Error Correction Mode setting and try faxing again Restore default settings 1 Press l r u or d to select F Setup and then press OK 2 Press l to select Restore Defa...

Page 17: ...inside the printer Do not spill liquid on the printer Do not use aerosol products that contain flammable gases inside or around the printer Doing so may cause fire Except as specifically explained in your documentation do not attempt to service the printer yourself Unplug the printer and refer servicing to qualified service personnel under the following conditions if the power cord or plug is dama...

Page 18: ...ompatible with all of Telecom s network services Personal Information Stored in Memory This product allows you to store names and telephone numbers in its memory which are saved even when the power is turned off We recommend that you use the following procedure to erase the memory if you give the product to someone else or when you dispose of the product Erasing the memory 1 Press l r u or d to se...

Page 19: ... 7 8 9 0 Enter fax numbers Color Mode Color B W Select color or black and white faxing Menu Setting item Description Resolution Standard Fine Photo Select this option to change the resolution for fax data you are sending Contrast 4 to 4 Select this option to change the contrast for fax data you are sending Delayed Fax Off On Time Select this option to set transmission reservations ...

Page 20: ... number r 1 2 3 4 5 6 7 8 9 0 Enter a fax number manually Speed Dial List l r u d Select this option to add a Speed Dial entry number Group Dial List l r u d Select this option to add a Group Dial entry number Menu Setting item Description Receive From 1 2 3 4 5 6 7 8 9 0 Enter the other party s Fax number ...

Page 21: ...st Transaction Prints the latest communication in the log transmission and polling reception Speed Dial List Prints the speed dial list Group Dial List Prints the group dial list Reprint Faxes Reprints the faxes received so far Protocol Trace Prints the latest protocol trace for one communication Setting Item Description Printer Setup Please refer to the Basic Operation Guide ...

Page 22: ...e Edit Delete Group Dial Setup Create Edit Delete Scan Print Setup Resolution Standard Fine Photo Contrast 4 to 4 Auto Reduction On Off Last Transmission Report Off On Error On Send Communication Dial Mode 1 Tone Pulse DRD All Single Double Triple Double Triple 2 ECM On Off V 34 On Off Rings to Answer 1 1 to 9 Dial Tone Detection On Off Check Fax Connection Check fax connection status Header Fax H...

Page 23: ...de DRD ECM V 34 Rings to Answer Dial Tone Detection Reset Fax Data Settings Initializes the following items to the factory settings Speed Dial Setup Group Dial Setup Header Fax Header Your Phone Number Fax Log Reset Network Settings Initializes Network settings to the factory settings Reset All except Network Fax Settings Initializes All except Network Fax settings to the factory settings Reset Al...

Page 24: ...Copyright 2009 Seiko Epson Corporation All rights reserved Printed in XXXXXX ...

Reviews: