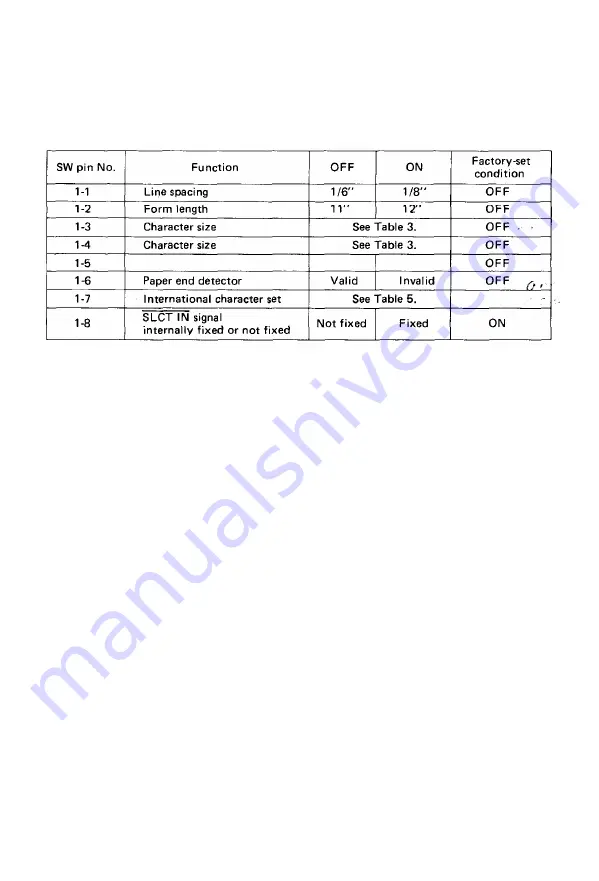
5.1. Setting of DIP Switch No. 1
The DIP switch No. 1 consists of the following 8 pins.
A summary of the functions of the respective DIP switch pins and their preset
conditions at the time of shipment are shown in Table 2.
Table 2 Functions and Conditions of DIP Switch No. 1
(1) SW1-1: Setting this pin to the ON position will cause the line spacing to be
automatically set at 1/8 inch per line upon power application.
(2) SW1-2: Setting this pin to the ON position will cause the form length per page
to be set at 12 inches. The form length per page becomes 11 inches when this
pin is set to the OFF position.
(3) SW1-3 & 1-4: Combined use of these two pins permits selection of the number
of columns per line as shown in Table 3.
(4) SW1-5: Never set this pin to the ON position. Always leave it in the OFF
position.
(5) SW1-6: This pin is used to activate or inactivate the paper end detector. When
this pin is turned on, the paper end detecting function becomes invalid upon
power application and the Printer is allowed to operate even if it is out of
paper. With the Printer in this state, input of control code “ESC 9” will permit
the paper end detector to be activated again.
(6) SW1-7: This pin is used to select an international character set in conjunction
with DIP switch No. 2 upon power application.
(7) SW1-8: When this switch is set to the OFF position, SLCT IN signal is not
fixed internally, thus permitting the Printer to be controlled from a host
computer.
NOTE: This signal line is wired O Red with the pin No. 36 of the interface connector.
Therefore, to control the signal level with the pin No. 36 of the interface
connector from the external CPU through TTL, etc., leave this DIP switch pin
to the OFF position.
- 4 5 -
Summary of Contents for MX-80 F/T Type II
Page 1: ...M X 8 0 EPSON DOT MATRIX PRINTER TYPE II Operation Manual EPSON P8190014 2 ...
Page 22: ... 1 6 ...
Page 41: ... 3 5 ...
Page 44: ...1 3 Printer initial check Take the following steps and become familiar with the Printer 3 8 ...
Page 55: ...Fig 57 Setting Form Length per Page 4 9 ...
Page 56: ...Fig 58 Setting Number of Columns per Line 5 0 ...
Page 57: ...Fig 59 Setting Skip over Perforation Function 5 1 ...
Page 80: ... 2 Normal density bit image printing 74 ...
Page 89: ......
Page 90: ...Fig Al 2 Driver Circuit Diagram 8 5 ...
Page 96: ......
Page 97: ...APPENDIX 4 Character Fonts 92 ...
Page 98: ...NOTE Numbers represent Hex code 93 ...
Page 99: ... 94 ...
Page 100: ... 95 ...
Page 101: ...APPENDIX 5 Control Codes ...


