background image

7. When the control panel lights match your desired setting,

press 

PAUSE

.

'HIDXOWðVHWWLQJVý

PHQX

6HWWLQJV

ìýýýýëýýýý3$86(ý

&KDUDFWHU

VSDFLQJ

ìíýFSL

2

# #

2

# #

2

ìëýFSL

1

# #

1

# #

1

6KDSHýRIý]HUR

í

2

# #

2

# #

2

íîýýõZLWKýVODVKô

1

# #

1

# #

1

6NLSðRYHUð

SHUIRUDWLRQ

2II

2

# #

2

# #

2

2Q

1

# #

1

# #

1

&KDUDFWHUýWDEOH

,WDOLFý8ï6ï$

2

# #

2

# #

2

,WDOLFý)UDQFH

1

# #

2

# #

2

,WDOLFý*HUPDQ\

)

# #

2

# #

2

,WDOLFý8ï.ï

2

# #

1

# #

2

,WDOLFý'HQPDUNýì

1

# #

1

# #

2

,WDOLFý6ZHGHQ

)

# #

1

# #

2

,WDOLFý,WDO\

2

# #

)

# #

2

,WDOLFý6SDLQýì

)

# #

)

# #

2

3&éêæýõ86$ñý6WDQGDUGý(XURSHô

2

# #

2

# #

1

3&åèíýõ0XOWLOLQJXDOô

1

# #

2

# #

1

3&åçíýõ3RUWXJXHVHô

)

# #

2

# #

1

3&åçì

2

# #

1

# #

1

3&åçêýõ&DQDGLDQð)UHQFKô

1

# #

1

# #

1

3&åçèýõ1RUZHJLDQô

)

# #

1

# #

1

%5$6&,,ýõ%UD]LOLDQý3RUWXJXHVHôóó

2

# #

)

# #

1

$ELFRPSýõ%UD]LOLDQý3RUWXJXHVHôóó

1

# #

)

# #

1

$XWRýOLQHýIHHG

2II

2

# #

2

# #

2

2Q

1

# #

1

# #

1

&RQWLQXRXVðSDSHU

SDJHýOHQJWK

ììýLQFKHV

1

# #

2

# #

2

ìëýLQFKHV

2

# #

1

# #

2

åïèýLQFKHV

1

# #

1

# #

2

æíîçýLQFKHV

2

# #

2

# #

1

7HDUýRII

2II

2

# #

2

# #

2

2Q

1

# #

1

# #

1

7UDFWRU

6LQJOH

2

# #

2

# #

2

'RXEOH

1

# #

1

# #

1

,QWHUIDFH

$XWRýVHOHFWLRQýõìíýPVýZDLWô

1

# #

2

# #

2

$XWRýVHOHFWLRQýõêíýPVýZDLWô

2

# #

1

# #

2

3DUDOOHO

1

# #

1

# #

2

6HULDO

2

# #

2

# #

1

'HIDXOWðVHWWLQJVý

PHQX

6HWWLQJV

ìýýýýëýýýý3$86(ý

%LWýUDWH

êííýESV

1

# #

2

# #

2

çííýESV

2

# #

1

# #

2

ìëííýESV

1

# #

1

# #

2

ëéííýESV

2

# #

2

# #

1

éåííýESV

1

# #

2

# #

1

äçííýESV

2

# #

1

# #

1

ìäëííýESV

1

# #

1

# #

1

3DULW\ýELW

1RQH

1

# #

2

# #

2

2GG

2

# #

1

# #

2

(YHQ

1

# #

1

# #

2

'DWDýOHQJWK

æýELW

2

# #

2

# #

2

åýELW

1

# #

1

# #

1

(7;î$&.

2II

2

# #

2

# #

2

2Q

1

# #

1

# #

1

7. When the control panel lights match your desired setting,

press 

PAUSE

.

8. Repeat steps 5 and 7 to make all of your changes.

9. To exit the default-settings mode, turn the printer off.

Note:

You may exit the default-settings mode any time by turning off
the printer. Any changes you have made remain in effect until
you change them again.

If you want to check the new default settings, enter the
default-settings mode again and print the current settings.
After you check them, turn the printer off to exit without
making changes.

,QVWDOOLQJýWKHý5LEERQý&DUWULGJHý

Before installing the ribbon cartridge, make sure the printer
is not plugged into an electrical outlet.

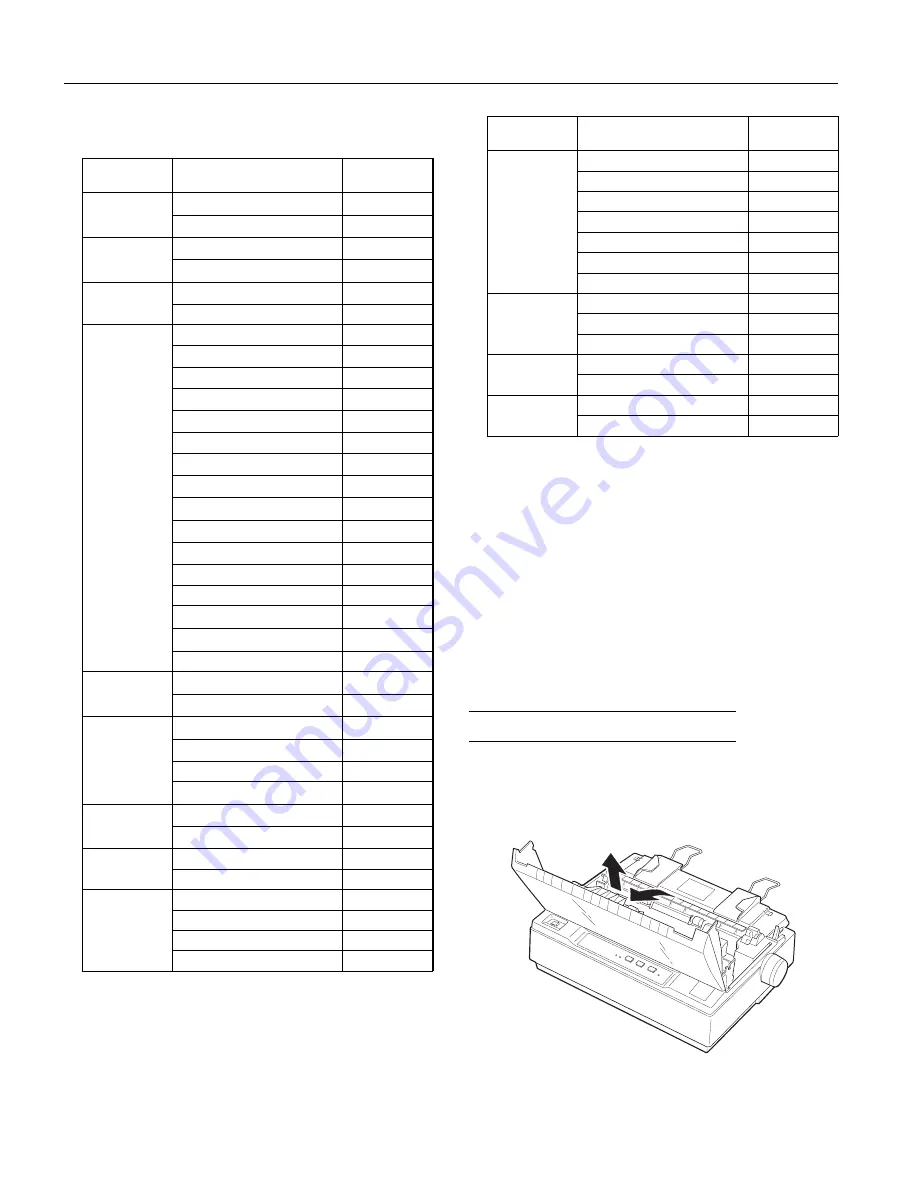
1. Open the printer cover to the upright position, then pull it

up to remove it.

(3621ý/;ðêíí

(3621ý/;ðêííðç

éîëëîäé

,QNý-HWý3ULQWHUV

Summary of Contents for LX-300

Page 1: ...oman EPSON NLQ Sans Serif EPSON Draft Draft condensed Character tables 1 italic and 8 graphics character tables Character sets 13 international character sets Paper Single sheets CSF Width 210 mm 8 5 inches Length 297 mm 11 0 inches Thickness 0 065 to 0 14 mm 0 0025 to 0 0055 inches Weight 64 to 90 g m2 18 to 24 lb Quality Bond paper plain paper recycled paper Single sheets manual insertion Width ...

Page 2: ...ush tractor Push pull tractor with optional pull tractor unit Pull tractor C800301 Cut sheet feeder option C806371 Ribbon Black ribbon cartridge 8750 Life expectancy at 14 dots character 3 million characters Color ribbon cartridge S015073 Life expectancy at 14 dots character Black 1 million characters Magenta Cyan 0 7 million characters Yellow 0 5 million characters MTBF 4 000 power on hours Lifet...

Page 3: ...pin assignments The following table lists the serial connector pin assignments and describes their respective interface signals 3LQý1Rï 6LJQDO LUHFWLRQ HVFULSWLRQ ì 3URWHFWLYHý URXQGýõ ô 3ULQWHU VýFKDVVLVýJURXQG ë 7UDQVPLWWHGýGDWD õ7 î6 ô 2XW 3ULQWHUýKDVýWUDQVPLWWHG VHULDOýGDWD ê 5HFHLYHGýGDWDýõ5 î5 ô Q 3ULQWHUýKDVýUHFHLYHG VHULDOýGDWD é 5HTXHVWýWRý6HQG õ576î56ô 2XW OZD VýSRVLWLYHý è OHDUýWRý6HQGý...

Page 4: ...low lists all the features you can select in the default settings mode XQFWLRQ 2SWLRQV KDUDFWHUýVSDFLQJ ìíýFSLñýìëýFSL 6KDSHýRIý HUR íñýí îýýõZLWKýVODVKô ìýLQFKýVNLSðRYHUðSHUIRUDWLRQ 2Qñý2II KDUDFWHUýWDEOH 86 ý WDOLFñý UDQFHý WDOLFñý HUPDQ ý WDOLFñý8 WDOLFñý HQPDUNý WDOLFñý6ZHGHQý WDOLFñý WDO WDOLFñý6SDLQýìý WDOLFñý3 éêæñýåèíñýåçíñýåçìñ åçêñýåçèñý 5 6 ñý ELFRPS XWRýOLQHýIHHG 2Qñý2II 3DJHýOHQJWK ìì...

Page 5: ...teps below 1 Make sure the printer is turned off and paper is loaded in the paper feeder 2 Hold down the FONT button and turn on the printer to enter the default settings mode The printer loads a sheet of paper and prints a brief summary and instructions It instructs you to select the language that you want messages printed in English French German Italian or Spanish 3 Press the FONT button until ...

Page 6: ...ZDLWô 2 1 2 3DUDOOHO 1 1 2 6HULDO 2 2 1 HIDXOWðVHWWLQJVý PHQX 6HWWLQJV ìýýýýëýýýý3 86 ý LWýUDWH êííýESV 1 2 2 çííýESV 2 1 2 ìëííýESV 1 1 2 ëéííýESV 2 2 1 éåííýESV 1 2 1 äçííýESV 2 1 1 ìäëííýESV 1 1 1 3DULW ýELW 1RQH 1 2 2 2GG 2 1 2 YHQ 1 1 2 DWDýOHQJWK æýELW 2 2 2 åýELW 1 1 1 7 î 2II 2 2 2 2Q 1 1 1 7 When the control panel lights match your desired setting press PAUSE 8 Repeat steps 5 and 7 to mak...

Page 7: ...ed 6 Slide the print head from side to side to make sure it moves smoothly 7 Re install and close the printer cover When the printing becomes faint you need to replace the ribbon cartridge To remove the old ribbon cartridge first move the print head to the center of the printer Then remove the cartridge by lifting the posts on either side and taking it out of the printer 5XQQLQJýWKHý6HOIý7HVWý The...

Page 8: ... that presents a list of printers To take full advantage of your printer s features choose LX 300 If LX 300 is not listed contact your software manufacturer for an update that includes the LX 300 Until you receive an update choose another printer as close to the top of the list as possible LX 300 LX 810 JX 80 Color LX 850 Not color EX 800 LX 800 LX 80 86 FX 850 FX 86e 800 If none of these printers...

Page 9: ... release lever forward to the continuous paper position 2 Release the sprocket units by pulling the sprocket locks forward 3 Slide the left sprocket unit using the scale on the printer as a guide The printer prints to the right of the position marked 0 Push the sprocket lock lever back to lock it in place Then slide the right sprocket unit to match the width of your paper but do not lock it Move t...

Page 10: ...ter cover do not match adjust the paper position by following the steps in Adjusting the loading position while the PAUSE light is flashing When you send more data the paper automatically feeds back to the loading position If you want to change the position where printing begins on the page adjust the loading position Printing with the pull tractor F Caution When using the pull tractor set the Aut...

Page 11: ... guide mark 10 Attach the printer cover and adjust the paper position with the paper feed knob Turn the knob until the perforation between pages is just above the print head Then turn on the printer The PAUSE light flashes briefly then stays off 11 Make sure the printer cover is closed When the printer receives data it begins printing automatically If you want to change the position where printing...

Page 12: ...is a different color from the rest adjust the ribbon angle Check the characters printed in red If the top edge is blue move the color ribbon adjustment lever forward If the bottom edge is yellow move the lever backward Then print another self test to check your adjustment Repeat this process until the ribbon is properly adjusted Note When you print using the color ribbon the print speed is reduced...

Reviews: