background image

3

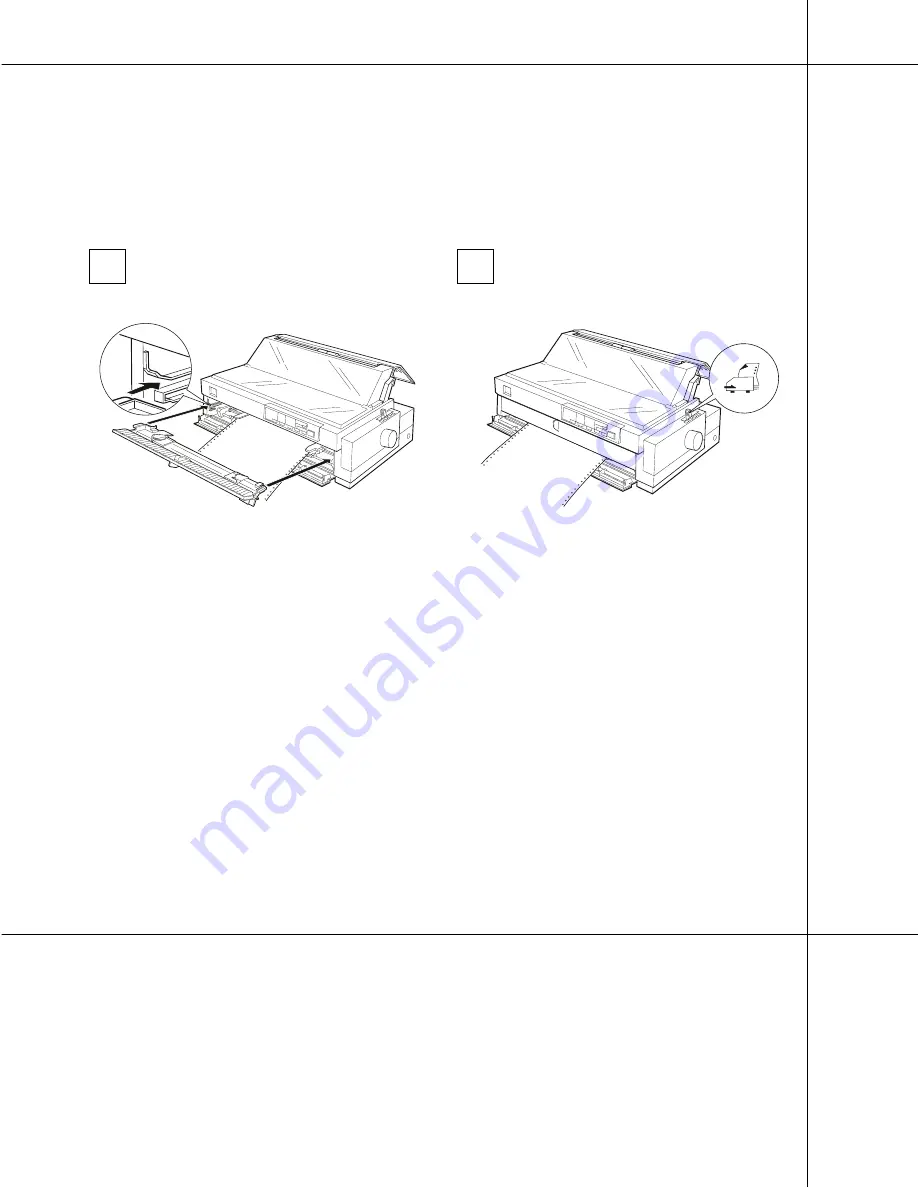
Attach the front paper guide by 
inserting it into the slots in the printer 
as shown.

Close the front paper guide, and make 
sure the paper release lever is set to the 
front push tractor position.

Note:

Always close the printer cover before printing. 
The printer does not print when the cover is open.

3

4


When you load continuous paper with 
labels, make sure that the auto tear-off 
mode is off before you start to print. If 
you feed continuous labels backward, 
the labels may come off the backing sheet 
and jam the printer.

To turn off the auto tear-off mode, enter 
the printer’s default-setting mode. See 
Chapter 5 of the 

User’s Guide

 for 

instructions.

Loading Continuous Paper Onto 

the Front Push Tr

actor

Summary of Contents for LQ-2180

Page 1: ......

Page 2: ...he Ribbon Cartridge 8 Clearing Paper Jams 14 If Your Printer Stops Printing Unexpectedly 16 EPSON is a registered trademark of SEIKO EPSON CORPORATION Other product names used herein are for identification purposes only and may be trademarks of their respective owners EPSON disclaims any and all rights in those marks Read your User s Guide first for complete instructions and then use this guide an...

Page 3: ...et covers Note Load continuous paper that has a clean straight edge to avoid paper jams 1 tab 2 To remove any paper from the paper path press the Load Eject button The printer feeds the paper into the standby position where you can remove the paper from the printer If you load continuous paper of a different size or thickness you need to adjust the position of the sprockets or change the paper thi...

Page 4: ...ng The printer does not print when the cover is open 3 4 When you load continuous paper with labels make sure that the auto tear off mode is off before you start to print If you feed continuous labels backward thelabelsmaycomeoffthebackingsheet and jam the printer To turn off the auto tear off mode enter the printer s default setting mode See Chapter 5 of the User s Guide for instructions Loading ...

Page 5: ...from the paper path press the Load Eject button The printer feeds the paper to the standby position where you can remove the paper from the printer If you load continuous paper which is a different size or thickness you need to adjust the position of the sprocket units or change the paper thickness lever setting See Chapter 2 of the User s Guide for instructions To load continuous paper onto the r...

Page 6: ...de cover and make sure the paper release lever is set to the rear push tractor position Note Always close the printer cover before printing The printer does not print when the cover is open 3 4 Loading Continuous Paper Onto the Rear Push Tractor ...

Page 7: ...esume printing the printer automatically feeds the paper backward to the top of form position and starts printing To feed the continuous paper backward from the tear off position to the standby position press the Load Eject button Open the paper guide cover and tear off the printed document using the printer s tear off edge To remove the printed document from the front or rear push tractor follow ...

Page 8: ...ining labels from the printer c Caution When printing on labels never press the Load Eject or Tear Off Bin button Whenfedbackward labelscaneasilycome off the backing sheet and cause a paper jam 1 2 3 Removing Continuous Paper With Labels Removing the Printed Document From the Push Tractor Removing Continuous Paper With Labels To avoid peeling labels off the backing sheet and jamming the printer fo...

Page 9: ...may damage the printer Unplug the printer from the electrical outlet Open the paper guide cover Then lift the printer cover by its back edge and pull it straight up and off the printer 1 2 3 To replace the ribbon cartridge follow the steps below w Warning You will need to move the print head by hand to replace the ribbon cartridge If you have just used the printer the print head may be hot let it ...

Page 10: ...the ribbon installation position the indented portion of the paper tension unit by hand Grasp the used ribbon cartridge and pull it up and out of the printer 4 5 When you use the pull tractor you can replacethe ribboncartridgeeven though the print head is not in the ribbon installation position Replacing the Ribbon Cartridge ...

Page 11: ...knob in the direction of the arrow to remove any slack in the ribbon Hold the cartridge with the ribbon tightening knob up Fit the two notches nearest you over the small pegs on each side of the printer as shown Then lay the cartridge flat so that the other notches fit over the corresponding pegs 6 ribbon tightening knob separator 7 ...

Page 12: ... over the metal pins behind the print head Make sure the ribbon is not twisted or creased and that it is in place behind the print head Thenpressdowntheribbonguideuntil it clicks into place Turn the ribbon tightening knob in the direction of the arrow to remove any slack in the ribbon 8 9 10 Replacing the Ribbon Cartridge ...

Page 13: ...12 Replacing the Ribbon Cartridge Slide the print head from side to side to make sure it moves smoothly Replace the printer cover and close the paper guide cover 11 12 ...

Page 14: ...EPSON ribbon cartridges are designed and manufactured to work properly with your EPSON printer They ensure proper operation and long life of the print head and other printer parts Replacing the Ribbon Cartridge Ribbon Cartridge Your printer uses EPSON black ribbon cartridge S015086 ...

Page 15: ...r is stuck on the paper guide remove it Remove the printer cover If continuous paper from the rear slot is jammed also remove the paper guide If continuous paper is jammed in the printer tear off the fresh supply at the perforation nearest the paper entry slot 1 2 3 4 To clear a paper jam follow these steps ...

Page 16: ... Turntheknobonly whentheprinterisoff Otherwise you may damage the printer or lose the top of form position or tear off position Attach the paper guide if necessary Replace the printer cover and close the paper guide cover Press the Operate button to turn on the printer Make sure the Paper Out and Pause lights are off 5 6 7 8 Clearing Paper Jams ...

Page 17: ...off the Pause light if necessary If you are using the pull tractor see your User s Guide for instructions The Paper Out and Pause lights are on Cause Solution No paper is loaded in the selected paper source or paper is not loaded correctly Load paper in the printer then press the Pause button to turn off the Pause light if necessary Paper is jammed in the printer See Clearing Paper Jams or page 14...

Reviews: