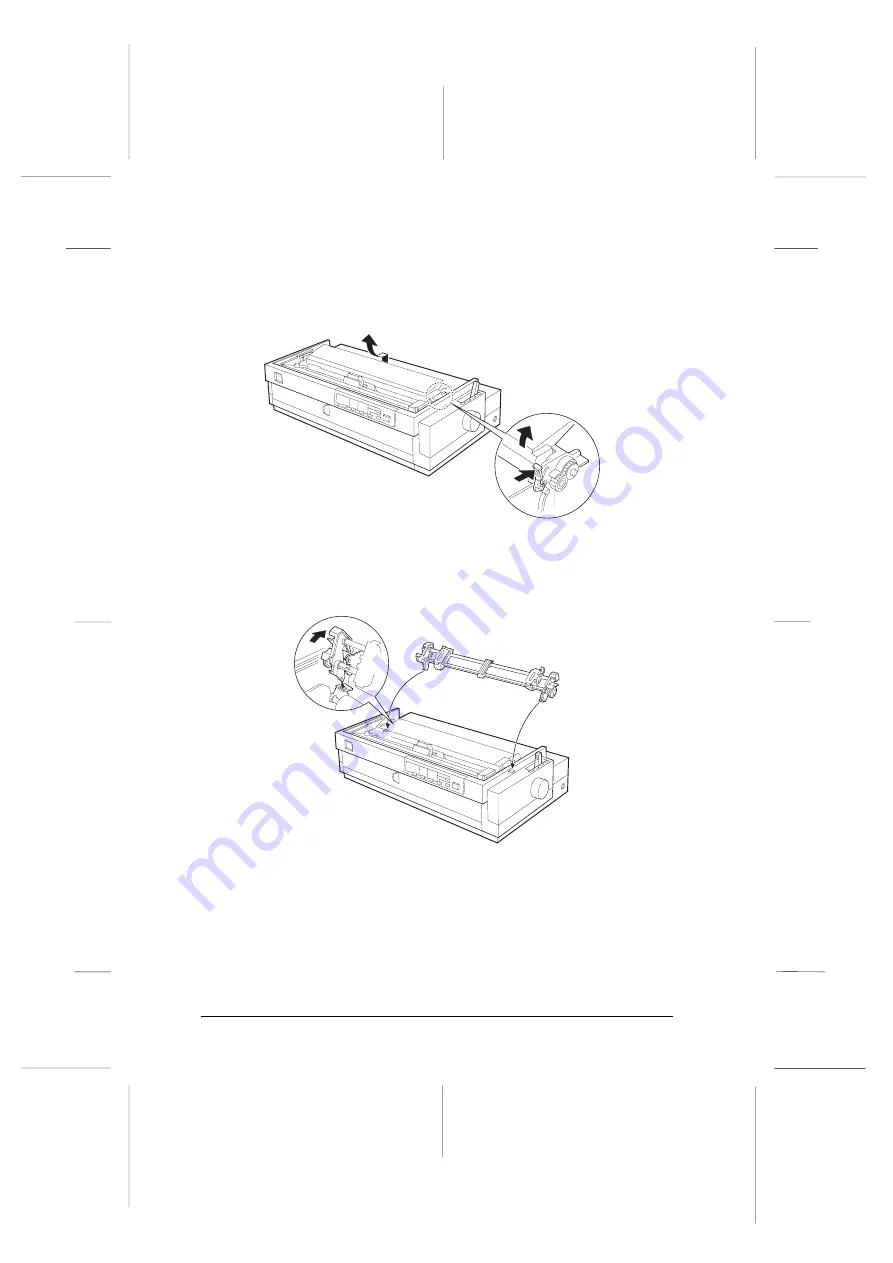
background image

3.

Press the tabs on both ends of the clear plastic paper-tension
unit, raise the front of the unit, and lift it off the printer.

 4. Place the tractor’s tabs into the printer’s mounting slots, then

press the tractor back until it locks into place.

Note:
Check the paper thickness lever position to ensure that it wasn’t
moved during pull tractor installation. See “Adjusting the paper
thickness lever” on page 2-33 for the correct lever position.

2-18nn

2-19nn

L

Sunflower-P 

Rev.c

A5 size   Chapter 2

01/19/96

pass 2

2-18      

Paper Handling

Summary of Contents for LQ-2070

Page 1: ......

Page 2: ...cover paper guide front paper guide control panel knob paper separator cover 1 parallel interface shield plate ribbon cartridge paper thickness lever rear push tractor paper tension unit cover 2 front paper guide front edge guide cover 3 R Sunflower P Ref Rev c A5 size Inside front cover 01 09 96 DR pass 0 ...

Page 3: ... or third parties as a result of accident misuse or abuse of this product or unauthorized modifications repairs or alterations to this product Seiko Epson Corporation and its affiliates shall not be liable against any damages or problems arising from the use of any options or any consumable products other than those designated as Original EPSON Products or EPSON Approved Products by Seiko Epson Co...

Page 4: ...ion between the equipment and receiver Connect the equipment into an outlet on a circuit different from that to which the receiver is connected Consult the dealer or an experienced radio TV technician for help WARNING The connection of a non shielded equipment interface cable to this equipment will invalidate the FCC Certification of this device and may cause interference levels which exceed the l...

Page 5: ...an 5 1183 AT Amstelveen The Netherlands Declares that the Product Product Name Dot Matrix Printer Type Name LQ 2070 Model P911A Conforms to the following Directive s and Norm s Directive 89 336 EEC EN 55022 Class B EN 50082 1 IEC 801 2 IEC 801 3 IEC 801 4 Directive 73 23 EEC EN 60950 Directive 90 384 EEC EN 45501 April 1996 M Hamamoto President of EPSON EUROPE B V R Sunflower P Rev c A5 size Front...

Page 6: ...ndards Note The Energy Star emblem does not represent EPA endorsement of any product or service Energy saving Tips Here are a few tips you can use to be even more energy wise If your monitor isn t Energy Star compliant turn it off when you re not using it Turn off your computer printer and monitor each day when you are done using them Use the print preview option in your software to catch errors b...

Page 7: ...cts You can purchase ribbons supplies parts printed manuals and accessories for your EPSON products from EPSON Accessories at 800 873 7766 U S sales only In Canada call 800 BUY EPSON for sales locations If you purchased your printer outside the United States or Canada contact your EPSON dealer or the marketing location nearest you for customer support and service If you need help with any software...

Page 8: ...o parity bit and a modem speed up to 28 8 Kbps See the documentation that came with your communications software for more information CompuServe online support CompuServe members can call the EPSON America Forum on CompuServe If you are already a CompuServe member simply type GO EPSON at the menu prompt to reach the forum If you are not currently a member of CompuServe you are eligible for a free ...

Page 9: ...h Blue Neutral Brown Live As the colours of the wires in the mains lead of this appliance may not correspond with the coloured markings identifying the terminals in your plug proceed as follows The green and yellow wire must be connected to the terminal in the plug which is marked with the letter E or with the earth symbol G or coloured green or green and yellow The blue wire must be connected to ...

Page 10: ... Do not let the power cord become damaged or frayed If you use an extension cord with the printer make sure the total ampere rating of the devices plugged into the extension cord does not exceed the cords ampere rating Also make sure the total of all devices plugged into the wall outlet does not exceed 15 amperes Except as specifically explained in this guide do not attempt to service the printer ...

Page 11: ...e Printer 1 2 Unpacking the Printer 1 4 Installing the Ribbon Cartridge 1 5 Plugging in the Printer 1 10 Running the Self Test 1 11 Connecting the Printer to Your Computer 1 14 Installing the Printer Driver 1 15 For Microsoft Windows Users 1 15 For DOS program users 1 21 DOS printer utilities 1 21 R Sunflower P Rev c A5 size Front 01 09 96 pass 2 ix ...

Page 12: ...s 2 31 Switching to continuous paper 2 32 Printing on Special Paper 2 32 Adjusting the paper thickness lever 2 33 Multipart forms 2 34 Labels 2 35 Envelopes 2 36 Postcards 2 36 Roll paper 2 36 Chapter 3 Using the Printer Control Panel 3 2 Lights 3 2 Buttons 3 4 Other control panel features 3 6 Using the Default Setting Mode 3 7 Selecting an instruction sheet language 3 7 Changing the default setti...

Page 13: ...tion Cleaning the Printer 5 2 Replacing the Ribbon 5 3 Transporting the Printer 5 4 Chapter 6 Troubleshooting Power Supply 6 2 Power is not being supplied 6 2 Printing 6 3 The printer does not print 6 3 The print is faint or uneven 6 5 Dots are missing in printed characters or graphics 6 5 Printed characters are not what you expect 6 6 The print position is not what you expect 6 6 Paper Handling 6...

Page 14: ...ng Commands A 17 Sending printer commands A 17 Using the command summary A 17 Commands Arranged by Topic A 18 General operation A 18 Paper feeding A 18 Page format A 19 Print position motion A 20 Font selection A 21 Font enhancement A 23 Character handling A 24 Spacing A 27 Graphics A 27 Bit image A 28 Barcode A 29 Character Tables A 32 International Character Sets A 32 Graphics Character Tables A...

Page 15: ...onts and four scalable fonts as well as one draft and nine letter quality bit map fonts Multipart forms printing of one original plus up to three copies A convenient control panel that allows direct selection of fonts Support of advanced EPSON ESC P 2 commands and IBM 2390 2391 Plus emulation Large printable area 68 lines with A4 size paper and 63 lines with letter size paper Software utilities in...

Page 16: ...y you can preload up to 200 A4 or letter size sheets of paper and you can use two different sizes Pull tractor unit C80032 provides easy paper handling which is useful for printing on multipart forms You can also use this tractor as a front push tractor Roll paper holder 8310 allows you to use your printer with 8 5 inch roll paper like that used with telex machines Interface cards available to sup...

Page 17: ...he basic operation of your printer Chapter 4 explains how to use optional accessories with your printer Chapter 5 provides maintenance information including transportation guidelines Chapter 6 contains troubleshooting tips If the printer does not operate properly or the printed results are not what you expect see this chapter for a list of problems and solutions The appendix lists the printer s sp...

Page 18: ... w Warnings must be followed to avoid bodily injury c Cautions must be observed to avoid damage to your equipment Notes contain important information and useful tips on the operation of your printer L Sunflower P Rev c A5 size Introduction 01 09 96 pass 1 4 Introduction ...

Page 19: ...4 Installing the Ribbon Cartridge 1 5 Plugging in the Printer 1 10 Running the Self Test 1 11 Connecting the Printer to Your Computer 1 14 Installing the Printer Driver 1 15 For Microsoft Windows Users 1 15 For DOS program users 1 21 DOS printer utilities 1 21 R Sunflower P Rev c A5 size Chapter 1 01 09 96 pass 3 Setting Up the Printer 1 1 ...

Page 20: ...t moisture or dust Use a properly grounded electrical outlet do not use an adapter plug Place the printer where you can easily unplug the power cord Avoid electrical outlets controlled by wall switches or automatic timers An interruption of power can erase information in the memory of your printer or computer Avoid outlets on the same circuit as large motors or other appliances that can cause volt...

Page 21: ...nter level If you plan to load continuous paper through the bottom of the printer choose a stand that provides an unobstructed paper path Position your printer s power cord and interface cable so they do not interfere with paper feeding If possible secure the cables to a leg of the printer stand Align the paper stack so that the paper feeds straight into the tractor s sprocket units R Sunflower P ...

Page 22: ... remove all protective materials packed around and inside your printer before you set it up and turn on the power Follow the directions on the Notice Sheet packed with the printer to remove these materials A screwdriver has been included for removing the transportation screw printer power cord 230 V version only ribbon cartridge paper separator paper guide driver 1 1 L Sunflower P Rev c A5 size Ch...

Page 23: ...he printer designed for different voltages and it is not possible to adjust the printer for use at another voltage If the label on the back of the printer does not show the correct voltage for your country contact your dealer Installing the Ribbon Cartridge Before installing the ribbon cartridge make sure that the power cord is not plugged into an electrical outlet 1 Lift the printer cover up and ...

Page 24: ...w Warning Never move the printhead while the printer is turned on this can damage the printer Also the print head may become hot during use Always let it cool before you touch it 3 Remove the ribbon cartridge from its packaging Then remove the plastic separator from the middle of the ribbon cartridge and discard the separator 1 3 1 4 L Sunflower P Rev c A5 size Chapter 1 01 09 96 pass 3 1 6 Settin...

Page 25: ...artridge flat and press gently until it clicks into place on both ends 6 Lift the ribbon guide and insert it firmly over the metal pins behind the print head Press down on the guide until it clicks into place Make sure the ribbon is not twisted or creased and that it is in place behind the print head Turn the ribbon tightening knob to remove any slack in the ribbon 1 5 1 6 R Sunflower P Rev c A5 s...

Page 26: ... it moves smoothly 8 Replace the printer cover by first inserting the front tabs into the slots near the front of the printer then lower it until it locks into place 1 7 1 8 L Sunflower P Rev c A5 size Chapter 1 01 09 96 pass 3 1 8 Setting Up the Printer ...

Page 27: ...side at a time You need not separate the paper guide and the paper separator in case you need to ship the printer 10 Attach the paper guide by sliding the slots on the bottom of the paper guide over the pegs behind the paper tension unit 1 9 1 10 R Sunflower P Rev c A5 size Chapter 1 01 09 96 pass 3 Setting Up the Printer 1 9 ...

Page 28: ...ical outlet c Caution If the rated voltage and your outlet voltage do not match contact your dealer for assistance Do not plug in the power cord 3 If the power cord is not attached to the printer connect the appropriate end to the AC inlet on the printer s rear panel 4 Plug the power cord into a properly grounded electrical outlet Before continuing test the printer to make sure it is functioning p...

Page 29: ...er 2 for more information on paper handling The printer prints the self test in the currently selected font 1 Make sure the printer is turned off and the paper path guide is open 2 Move the paper release lever to the single sheet position 3 For a letter quality test hold down the Load Eject button while you turn on the printer For a draft printing test hold down the LF FF button while you turn on ...

Page 30: ...to match the width of your paper c Caution Run the self test using paper at least 360 mm 14 inches wide otherwise the print head prints directly on the platen 5 Lift the paper path guide and rest it against the paper guide 1 13 1 14 L Sunflower P Rev c A5 size Chapter 1 01 09 96 pass 3 1 12 Setting Up the Printer ...

Page 31: ... printer cover before printing The printer stops printing when the cover is open If you want to temporarily stop printing the self test press the Pause button To resume printing press Pause again 7 To end the self test first press the Pause button If paper remains in the printer press the Load Eject button to eject the page then turn off the printer Here is part of a typical self test 1 15 R Sunfl...

Page 32: ... turned off 2 Plug the cable connector securely into the printer s parallel interface connector Squeeze the wire clips together until they lock in place on both sides of the connector Note If your cable has a ground wire connect it to the ground connector beneath the interface connector 3 Plug the other end of the cable into the computer If there is a ground wire at the computer end of the cable a...

Page 33: ...instructions Installing the driver for Windows 3 1 users Follow these steps to install the printer driver for Windows 3 1 1 Make sure Windows is running 2 Insert the EPSON driver disk into drive A or B depending on your computer 3 From the File menu choose Run 4 Type A SETUP or B SETUP then click OK 5 Select LQ 2070 ESC P 2 as the Printer Model and click Continue The printer driver is installed au...

Page 34: ...st then turn on the computer Your computer begins loading Windows 95 4 If you defined a password enter it at the prompt You see the New Hardware Found screen Note If you do not see the New Hardware Found screen please follow the procedure under Installing the driver while running Windows 95 on page 1 18 instead 5 Make sure your printer model name is displayed on the screen Then click the Driver fr...

Page 35: ... your hard disk and add an icon to the Printers folder using the printer name you assign To use the printer as the default printer for Windows 95 applications select Yes No is the default setting 10 Click the Next button 11 In the next screen select YES to print a test page 12 Click the Finish button 13 Choose Yes in the test page confirmation dialog if the page printed correctly If it did not pri...

Page 36: ...ntaining the driver into your computer s floppy disk drive 9 Type A WIN95 or B WIN95 then click OK 10 Select the port you want to use with this printer 11 Click the Next button 12 Select the Yes or No radio button to make the default printer setting 13 Click the Next button 14 Click the Yes radio button to print a test page 15 Click Finish 16 In the dialog box that appears choose Yes if the test p...

Page 37: ... Follow these steps to select the appropriate settings 1 In the Main window double click the Control Panel icon 2 Double click the Printers icon 3 Make sure your printer is highlighted and click the Setup button in the Print Setup menu 4 Select the paper size you have loaded in the printer from the Paper Size list If you don t see your paper size in the list use the arrows on the right to scroll t...

Page 38: ...ose Properties 5 Click on the Paper tab and select the paper size you have loaded in the printer from the Paper size list If you don t see your paper size scroll through the list and select the correct size The diagram on the screen changes according to the paper size you select 6 Select Portrait or Landscape orientation The diagram on the screen changes according to the orientation you select 7 S...

Page 39: ...2170 LQ 1070 1070 LQ 870 1170 LQ 850 1050 LQ 850 1050 LQ 510 550 1010 LQ 200 LQ 500 LQ 860 1060 LQ 2550 LQ 2500 LQ 800 1000 LQ 1500 See your DOS program s documentation for instructions on selecting the printer driver DOS printer utilities Your printer comes with the EPSON Remote and EPSON Calibration utilities You can use EPSON Remote to make setting changes from your computer instead of using th...

Page 40: ...ding paper with the optional tractor unit 2 13 Loading paper with the push pull tractor combination 2 27 Removing paper from the tractor 2 30 Switching Between Continuous Paper and Single Sheets 2 30 Switching to single sheets 2 31 Switching to continuous paper 2 32 Printing on Special Paper 2 32 Adjusting the paper thickness lever 2 33 Multipart forms 2 34 Labels 2 35 Envelopes 2 36 Postcards 2 3...

Page 41: ... methods Print on special paper Setting the paper release lever Before you load paper you must to set the paper release lever for the type of paper and feed method you want to use The paper release lever has four positions with icons indicating the type of paper and paper path for each position 2 1n L Sunflower P Rev c A5 size Chapter 2 01 19 96 pass 2 2 2 Paper Handling ...

Page 42: ... for loading continuous paper from the front rear or bottom Note Although some arrows show paper loading from the top the paper actually enters the printer from the rear even when using the paper guide The push pull tractor combination is recommended for enhanced paper handling when using continuous paper See page 2 13 for more details For detailed information about printing on single sheets see t...

Page 43: ...sheets from either the top or front of the printer Loading single sheets with the paper guide 1 Move the paper release lever to the single sheet position Make sure the paper guide is installed and the paper path guide is open 2 Turn on the printer 2 6n L Sunflower P Rev c A5 size Chapter 2 01 19 96 pass 2 2 4 Paper Handling ...

Page 44: ...xt to the arrow on the paper guide Then adjust the right edge guide to match the width of your paper 4 Lift the paper path guide and rest it against the paper guide 2 7n 2 8n R Sunflower P Rev c A5 size Chapter 2 01 19 96 pass 2 Paper Handling 2 5 ...

Page 45: ...nob on the right side of the printer except to clear paper jams when the printer is turned off Otherwise you may damage the printer or cause it to lose the top of form position If the platen turns but the printer doesn t load the paper completely remove the paper and re insert it To eject the paper press the Load Eject button 2 9n L Sunflower P Rev c A5 size Chapter 2 01 19 96 pass 2 2 6 Paper Han...

Page 46: ...per guide 2 Open the front paper guide 3 Turn on the printer 4 Position the left edge guide as shown below Printing starts at the arrow mark See the Appendix for more information on the left margin position Adjust the right edge guide to match the width of your paper 2 10 2 11 R Sunflower P Rev c A5 size Chapter 2 01 19 96 pass 2 Paper Handling 2 7 ...

Page 47: ...f the printer except to clear paper jams when the printer is turned off Otherwise you may damage the printer or cause it to lose the top of form position If the platen turns but the printer doesn t load the paper completely remove the paper and re insert it more firmly To eject the paper press the Load Eject button 2 12 L Sunflower P Rev c A5 size Chapter 2 01 19 96 pass 2 2 8 Paper Handling ...

Page 48: ...can come off the paper and cause damage Load labels only through the front or bottom Loading paper with the rear push tractor You can use the rear push tractor to load ordinary continuous paper and multi part forms but not labels To load labels see Loading paper with the optional tractor unit on page 2 13 Make sure you align your paper supply with the paper path so the paper feeds smoothly into th...

Page 49: ...nter is turned off 2 Remove the printer cover and paper guide 3 Make sure the paper release lever is set to the rear push tractor position 4 Release the sprockets by pushing the sprocket locks forward 2 26 2 27 L Sunflower P Rev c A5 size Chapter 2 01 19 96 pass 2 2 10 Paper Handling ...

Page 50: ...left margin position Then slide the right sprocket to match the width of your paper but do not lock it Also move the paper support midway between the sprocket units 6 Make sure your paper has a clean straight edge Then open the sprocket covers and fit the holes of the paper over the tractor pins 2 28 2 29 R Sunflower P Rev c A5 size Chapter 2 01 19 96 pass 2 Paper Handling 2 11 ...

Page 51: ...er cover before printing The printer stops printing when the cover is open You can also advance the paper to the loading position by pressing the Load Eject button As you print make sure the paper advances behind the printer guide as shown below Make sure the paper path guide rests against the paper guide c Caution Do not use the knob on the right side of the printer except to clear paper jams whe...

Page 52: ...r the paper feed method you are using Tractor position Paper release lever position Paper paths Rear push tractor or rear push pull Front push tractor or front push pull Pull tractor Note The push pull tractor combination is recommended for enhanced paper handling The rear push tractor cannot be removed but it is deactivated in some paper release lever positions Make sure you align your paper supp...

Page 53: ...aper from the front tractor position you must first purchase the optional pull tractor unit You can use the optional pull tractor unit as a front push tractor Follow the instructions below to install it 1 Make sure the printer is turned off 2 Open the front paper guide and remove it by grasping the fins on both sides and pulling it straight out of the printer Note When loading multipart forms that...

Page 54: ...push pull tractor combination on page 2 27 for instructions Removing the tractor from the front push position If you want to use the tractor in another position follow the directions below to remove it Then see the appropriate section for installation instructions 1 Make sure the printer is turned off 2 Remove any paper that is in the feed path 2 17 R Sunflower P Rev c A5 size Chapter 2 01 19 96 p...

Page 55: ...remove it by grasping both sides and pulling it straight out of the printer 4 Press the tractor s lock tabs tilt it up and lift it out of the printer 2 16a 2 17n L Sunflower P Rev c A5 size Chapter 2 01 19 96 pass 2 2 16 Paper Handling ...

Page 56: ...the tractor in the pull position Before you load continuous paper using the pull tractor position you must first purchase the optional pull tractor 1 Make sure the printer is turned off 2 Lift the printer cover and paper guide up and off the printer 2 16b R Sunflower P Rev c A5 size Chapter 2 01 19 96 pass 2 Paper Handling 2 17 ...

Page 57: ...e printer s mounting slots then press the tractor back until it locks into place Note Check the paper thickness lever position to ensure that it wasn t moved during pull tractor installation See Adjusting the paper thickness lever on page 2 33 for the correct lever position 2 18nn 2 19nn L Sunflower P Rev c A5 size Chapter 2 01 19 96 pass 2 2 18 Paper Handling ...

Page 58: ...the pull position If you want to use the tractor in another position follow the directions below to remove it Then see the appropriate section for installation instructions 1 Make sure the printer is turned off 2 Remove any paper that is in the feed path 3 Remove the printer cover and paper guide 4 Hold down the tractor s lock tabs tilt it forward and lift it off the printer 2 19n R Sunflower P Re...

Page 59: ...an move freely If it cannot the paper tension unit was incorrectly installed Remove it and install it again w Warning Never move the print head while the printer is turned on this can damage the printer Also the print head may become hot during use Always let it cool before you touch it 7 Replace the printer cover and paper guide 2 18n L Sunflower P Rev c A5 size Chapter 2 01 19 96 pass 2 2 20 Pap...

Page 60: ...oading multipart forms that are bound or one side only by line glueing use the rear push tractor This type of form cannot be fed through the front push tractor 1 Make sure the printer is turned off 2 Remove the front paper guide 3 Make sure the tractor is in the front mounting slot and the paper release lever is set to the front push tractor position as shown above 2 20 R Sunflower P Rev c A5 size...

Page 61: ...cks up and away from you 5 Position the left sprocket as shown below Printing starts at the arrow mark See the Appendix for more information on the left margin position 2 21 2 22 L Sunflower P Rev c A5 size Chapter 2 01 19 96 pass 2 2 22 Paper Handling ...

Page 62: ... paper has a clean straight edge Then open the sprocket covers and fit the holes of the paper printable side up over the tractor pins 8 Close the sprocket covers 9 Slide the right sprocket to remove any slack in the paper then lock it in place 10 Attach the front paper guide over the paper as shown below 2 23 2 24 R Sunflower P Rev c A5 size Chapter 2 01 19 96 pass 2 Paper Handling 2 23 ...

Page 63: ...advances behind the printer guide as shown below Also make sure the paper path guide rests against the paper guide c Caution Do not use the knob on the right side of the printer except to clear paper jams when the printer is turned off Otherwise you may damage the printer or cause it to lose the top of form position Loading paper with the pull tractor Note When you use this paper feed path you mus...

Page 64: ... guide 3 Make sure the tractor is in the pull tractor position and the paper release lever is set to the pull tractor position 4 Release the sprockets by pulling the sprocket locks toward you 2 31 2 32 R Sunflower P Rev c A5 size Chapter 2 01 19 96 pass 2 Paper Handling 2 25 ...

Page 65: ... Move the paper support midway between the two sprocket units 6 Make sure your paper has a clean straight edge Open the sprocket covers and insert paper from either the front bottom or rear paper slot Then fit the holes of the paper over the tractor pins 7 Close the sprocket covers 8 Slide the right sprocket to remove any slack in the paper then lock it in place 9 Attach the printer cover and pape...

Page 66: ...de rests against the paper guide c Caution Do not use the knob on the right side of the printer except to clear paper jams when the printer is turned off Otherwise you may damage the printer or cause it to lose the top of form position Loading paper with the push pull tractor combination You can load paper in the front or rear push pull position When you use the front push and pull tractors in com...

Page 67: ... front or rear push tractor as described in the appropriate section earlier in this chapter 3 Push the LF FF button to advance the paper to the next page 4 Load paper in the pull tractor as described in the previous section 5 Move the paper release lever to the pull tractor position and use Micro Adjust described in the next chapter to remove any slack in the paper 2 36n L Sunflower P Rev c A5 siz...

Page 68: ...b on the right side of the printer except to clear paper jams when the printer is turned off Otherwise you may damage the printer or cause it to lose the top of form position Note Always close the printer cover before printing The printer stops printing when the cover is open As you print make sure the paper advances behind the printer guide as shown below Also make sure the paper path guide rests...

Page 69: ...the Load Eject button to feed the continuous paper backward out of the printer and into the standby position c Caution Make sure you tear off your printed document before pressing the Load Eject button Reverse feeding several pages at a time may cause a paper jam Switching Between Continuous Paper and Single Sheets When using the push tractor in the front or rear position you can easily switch bet...

Page 70: ... cause a paper jam Never back feed labels Labels can easily come off their backing and jam the printer 3 Press the Load Eject button The printer feeds the continuous paper backward to the standby position The paper is still attached to the push tractor but is no longer in the paper path 4 Move the paper release lever to the single sheet position 5 Adjust the edge guides to match the width of your ...

Page 71: ...ion to single sheets and continuous paper your printer can print on a wide variety of other paper types such as envelopes labels postcards roll paper and multipart forms Before printing on special types of paper you need to change the paper thickness setting c Caution When printing on labels or multipart forms make sure that your software settings keep the printing entirely within the printable ar...

Page 72: ...ngle sheets or continuous 0 Multipart forms carbonless 2 sheets original 1 copy 3 sheets original 2 copies 4 sheets original 3 copies 1 2 3 Labels postcards 2 Envelopes 1 to 6 For thin envelopes such as airmail select position 1 or 2 for thick envelopes select position 5 or 6 for regular envelopes select 3 to 5 0 1 1 3 2 4 5 6 7 2 38n R Sunflower P Rev c A5 size Chapter 2 01 19 96 pass 2 Paper Han...

Page 73: ...tional pull tractor is required When loading multipart forms from the front two optional tractors are required the rear push tractor cannot be removed For details see Using Single Sheets or Using Continuous Paper earlier in this chapter Also be sure to set the loading position as described in Using Micro Adjust in Chapter 3 c Caution When printing multipart forms make sure the printing stays entir...

Page 74: ...tinuous Paper on page 2 9 for details c Caution Never feed labels backward with the Load Eject or Tear Off Bin buttons Labels can easily peel off the backing and jam the printer Since labels are especially sensitive to temperature and humidity use them only under normal operating conditions Do not leave labels loaded in the printer between jobs they curl around the platen and may jam when you resu...

Page 75: ...the envelopes See the Appendix for details Postcards You can load postcards from the front and top paper slots Load cards only under normal operating conditions Set the printer to Card mode using the Tear Off Bin button See the Tear Off Bin light and button descriptions in Chapter 3 for more information Note When the length of the card is less than 14 8 cm 5 8 inches use the top paper slot See the...

Page 76: ...de 3 7 Selecting an instruction sheet language 3 7 Changing the default settings 3 7 Printer functions 3 9 Using Quiet Mode 3 13 Using Micro Adjust 3 13 Using the Tear Off Function 3 15 Using auto tear off mode 3 16 Using the Tear Off Bin button 3 17 Using Bi d Adjustment 3 18 Printing Barcodes 3 18 R Sunflower P Rev c A5 size Chapter 3 01 09 96 pass 2 Using the Printer 3 1 ...

Page 77: ... and the buttons let you control many printer settings Lights Paper Out red On when the printer runs out of paper or paper is jammed Pause orange On when the printer is not ready to print data paper is out or jammed the cover is open or you press the Pause button to pause printing The Pause light flashes when the Micro Adjust function is enabled or the print head is too hot 3 1n L Sunflower P Rev ...

Page 78: ...e Font three lights green The font selection status is displayed by three font lights on the control panel On Off Others means the font selected in the Default Setting mode Condensed green On when you select condensed printing from the control panel Tear off position Bin 1 Bin 2 Card 3 2 Draft Roman Sans Serif Courier Prestige Script Others 3 3 R Sunflower P Rev c A5 size Chapter 3 01 09 96 pass 2...

Page 79: ... loads paper automatically If single sheet paper is already in the loading position use this button to eject the sheet If continuous paper is in the loading or tear off position press this button to feed it backward to the standby position LF FF line feed form feed Press this button briefly to feed the paper forward one line Hold the button down to eject a single sheet of paper or advance continuo...

Page 80: ...Card mode Font Press this button to select one of the following fonts Draft Roman Sans Serif Courier Prestige Script or Other Other means the font selected in the Default Setting mode Condensed Press this button to print condensed characters Press it again to return to normal character printing Note The typestyle samples on the control panel are meant as guides only actual printed results may diff...

Page 81: ...ter 1 for details Condensed Activates the Default Setting mode See Using the Default Settings Mode in this chapter Load Eject and LF FF Prints a data dump All the input data are printed as hexadecimal numbers and corresponding characters See the note at the beginning of Chapter 6 Pause Starts the Bi d adjustment See Using Bi d Adjustment in this chapter Font and Condensed Activates the Quiet mode ...

Page 82: ...language Follow these steps to select the language in which you want to print the rest of the Default Setting mode instructions 1 Press the Font button until the Font lights indicate the language you want to select 2 Press the Tear Off Bin button to save your selection 3 Press the Condensed button to print the instruction sheet Changing the default settings Follow the steps below to select printer...

Page 83: ...PC 864 PC 866 PC 869 ISO Latin 1T ISO 8859 7 MAZOWIA Code MJK Bulgaria Estonia PC774 ISO Latin 2 PC 866 LAT International character set for Italic table Italic U S A Italic France Italic Germany Italic U K Italic Denmark Italic Sweden Italic Italy Italic Spain Font OCR B Orator Orator S Script C Roman T Sans Serif H Page length for front tractor 3 3 5 4 5 5 6 7 8 8 5 11 70 6 12 14 17 inches Page l...

Page 84: ...inter has 11 standard character tables as well as tables for 20 other countries See the Appendix for character samples International character set for Italic table You can change 8 characters in the Italic character table to suit your printing needs Since these characters are often used in other languages they are named after countries and are referred to as international character sets See the Ap...

Page 85: ...idirectional however unidirectional printing allows for precise vertical printing alignment Software When you select ESC P 2 the printer operates in the EPSON ESC P 2 mode When you select IBM the printer emulates an IBM printer Interface mode The printer has two interfaces parallel and Type B optional You can choose parallel optional or automatic for the interface mode Auto interface wait time The...

Page 86: ...ge Because most application programs set their own top and bottom margins you should use this feature only if your program does not provide them Auto tear off When you use continuous paper with the front or rear push tractor this feature advances the paper perforation to the tear off position where you can then easily tear off the printed page When the printer again receives data it automatically ...

Page 87: ...ommands like those available in ESC P2 mode When you select IBM 2390 2391 mode this setting is available The default setting is off 0 slash The zero character has a slash 0 when this setting is on it has no slash 0 when the setting is off This allows you to easily distinguish between an uppercase O character and a zero Buzzer Beep The printer beeps when some errors occur See Troubleshooting in Cha...

Page 88: ... feature to adjust the loading and tear off positions This section explains how to use Micro Adjust See the next section for information on adjusting the tear off position The loading position is the position of the paper after it has been automatically loaded by the printer If your printing appears too high or low on the page you can change the loading position with the Micro Adjust feature as fo...

Page 89: ...ing position up on the page 5 For continuous paper mark a point 6 5 mm above the perforation and position the mark on the paper so it aligns with the top of the plastic ribbon guide This gives you an 8 5 mm top margin 3 6n 6 5 mm 8 5 mm margi3 L Sunflower P Rev c A5 size Chapter 3 01 09 96 pass 2 3 14 Using the Printer ...

Page 90: ...r remembers this new position even after it has been turned off and back on Using the Tear Off Function After you have finished printing you can use the tear off feature to advance continuous paper on the push tractor to the tear off edge of the printer You can then easily tear off printed sheets When you resume printing the printer automatically feeds paper back to the loading position so you can...

Page 91: ...ous paper to the tear off position when you finish printing The printer advances paper to the tear off position only when the printer receives a full page of data or a form feed command and no more data is received for three seconds Select tear off using the Default Setting mode as described earlier in this chapter Also make sure the page length for continuous paper is selected correctly in the De...

Page 92: ... Except when using the pull top tractor you can use the Tear Off Bin button to advance continuous paper to the tear off position by following the steps below 1 Make sure printing has finished Then press the Tear Off Bin button until the two lights on the control panel start flashing The printer advances the paper to the tear off edge 2 Tear off all printed pages If the perforation is not aligned w...

Page 93: ...s for adjusting Bi d alignment are printed along with the first set of alignment patterns 3 Follow the instructions on the printout 4 After completing Bi d adjustment turn off the printer Printing Barcodes Your printer has powerful barcode printing capabilities and includes the following resident barcode fonts EAN 13 EAN 8 Interleaved 2 of 5 UPC A UPC E Code 39 Code 128 and POSTNET See the Appendi...

Page 94: ... feeder 4 4 Installing the double bin cut sheet feeder 4 6 Switching between continuous paper and the cut sheet feeder 4 7 Selecting single sheets postcards or envelopes 4 8 Pull Tractor 4 9 Roll Paper Holder 4 9 Interface Cards 4 12 Installing an interface card 4 12 The C82305 and C82306 serial interface cards 4 14 R Sunflower P Rev c A5 size Chapter 4 01 09 96 pass 1 Using Printer Options 4 1 ...

Page 95: ...untry By connecting both cut sheet feeders you can operate them as a double bin cut sheet feeder This allows you to load two different types of paper See Installing the double bin cut sheet feeder on page 4 6 Before you install your cut sheet feeder assemble it by following the instructions in the manual that comes with it Note The second bin cut sheet feeder can only be used in combination with t...

Page 96: ...rinter is turned on this can damage the printer Also the print head may become hot during use Always let it cool before you touch it 5 Hold the cut sheet feeder in both hands and on both sides of the feeder Fit the notches over the mounting posts on the printer Lower the cut sheet feeder until it rests on the printer 6 Insert the cable into the connector as shown above 7 Replace the printer cover ...

Page 97: ...er 2 Push down the center support Slide the left paper guide so it is aligned with the arrow mark on the back of the center support 3 Next slide the right paper guide to match the width of your paper Slide the paper stacker midway between the paper guides 4 2 L Sunflower P Rev c A5 size Chapter 4 01 09 96 pass 1 4 4 Using Printer Options ...

Page 98: ...eet feeder 6 Insert the paper along the left paper guide The printable side of the paper should face the back of the printer 7 Adjust the position of the right paper guide so that it matches your paper s width Make sure the position of the guide allows the paper to move up and down freely Lock the guide into place 8 Push back the paper set levers to clamp the paper against the guide rollers 4 3 R ...

Page 99: ...aper by pressing the Load Eject button Installing the double bin cut sheet feeder You can connect the high capacity cut sheet feeder to the second bin cut sheet feeder to create a double bin cut sheet feeder See the cut sheet feeder manuals for more information You cannot use the second bin cut sheet feeder without the high capacity cut sheet feeder 1 Install the assembled double bin cut sheet fee...

Page 100: ...r and cut sheet feeder operation without removing the continuous paper Switching to continuous paper 1 If any single sheets are in the paper path press the Load Eject button to eject them 2 Move the paper release lever to the push tractor position 3 Move the paper selection lever to the continuous paper position Note When you print several pages of continuous paper guide the paper over the center ...

Page 101: ... tractor but is no longer in the paper path 4 Move the printer s paper release lever to the single sheet position 5 Move the cut sheet feeder s paper selection lever to the single sheet position Selecting single sheets postcards or envelopes You can select either single sheet paper postcards or envelopes using the lever on the first bin You ll see the icons next to the lever Move the lever to the ...

Page 102: ...bination See Chapter 2 for instructions Note You cannot remove the rear push tractor Roll Paper Holder The optional roll paper holder 8310 allows you to use your printer with 8 5 inch roll paper like that used with telex machines Before you use roll paper set the default setting of roll paper to on See Using the Default Setting Mode in Chapter 3 for details To use the roll paper holder follow the ...

Page 103: ... paper holder when lifting the printer Only the printer s weight holds it in place 3 Cut the leading edge of the roll paper straight across Slide the roll paper holder shaft through the center of the paper roll 4 Set the shaft and paper roll onto the roll paper holder so that paper feeds from the bottom of the roll 4 6 4 7 L Sunflower P Rev c A5 size Chapter 4 01 09 96 pass 1 4 10 Using Printer Op...

Page 104: ...and insert it into the paper path until you feel resistance 6 Install the paper guide and the printer cover 7 Turn on the printer The roll paper loads automatically rear paper path 4 8 4 9 R Sunflower P Rev c A5 size Chapter 4 01 09 96 pass 1 Using Printer Options 4 11 ...

Page 105: ...alk interface C82313 32KB IEEE 488 interface C82314 Coax interface C82315 Twinax interface C82331 Ethernet interface The asterisk is a substitute for the last digit which varies by country If you are unsure whether you need an optional interface or would like to know more about interfaces contact your dealer Installing an interface card Follow the steps below to install an optional interface card ...

Page 106: ...es of the interface compartment Push it in firmly to make sure you fully insert the connector at the back of the interface card into the printer s internal socket Then re insert the screws and tighten them To remove the interface card reverse the steps above 4 10 4 11 R Sunflower P Rev c A5 size Chapter 4 01 09 96 pass 1 Using Printer Options 4 13 ...

Page 107: ...he baud rate see the bit rate selection table in your interface card manual Handshake timing When the unused area for data in the input buffer drops to 256 bytes the printer outputs an X OFF code or sets the DTR flag to 1 MARK to indicate that it cannot receive data When the unused area increases to 512 bytes the printer outputs an X ON code or sets the DTR flag to 0 SPACE to indicate that it is r...

Page 108: ...Transportation Proof Sign off Nishi _______ Grady _______ 5 Cleaning the Printer 5 2 Replacing the Ribbon 5 3 Transporting the Printer 5 4 R Sunflower P Rev c A5 size Chapter 5 01 09 96 pass 1 Maintenance and Transportation 5 1 ...

Page 109: ...clean cloth dampened with mild detergent dissolved in water Keep the printer cover in place and close the paper guide cover to prevent water from getting inside the printer w Warning Be careful not to get water on the printer mechanism or electronic components c Caution Never use alcohols or thinners to clean the printer these chemicals can damage the components and the case Do not use a hard or a...

Page 110: ...parts Using any other ribbon may damage your printer Printer model Ribbon cartridge R Ribbon pack LQ 2070 S015086 S010033 To replace the ribbon cartridge follow the steps in Installing the Ribbon Cartridge in Chapter 1 w Warning If the printer has been used recently the print head may be hot Let it cool before attempting to replace the ribbon Note The ribbon pack can be replaced only four times af...

Page 111: ... 4 Remove the optional tractor cut sheet feeder or roll paper holder if installed 5 Remove the ribbon cartridge 6 Remove the paper tension unit Attach the protective locking clips to the paper tension unit and then replace the paper tension unit 7 Replace the transportation screw 8 Repack the printer ribbon cartridge paper guide and power cord in the original packing materials and place them in th...

Page 112: ...cs 6 5 Printed characters are not what you expect 6 6 The print position is not what you expect 6 6 Paper Handling 6 7 Single sheets do not feed properly 6 7 Continuous paper does not feed properly 6 8 Options 6 9 The paper does not feed properly with the cut sheet feeder 6 9 Continuous paper does not feed properly when using the tractors in a push pull position 6 11 6 R Sunflower P Rev c A5 size ...

Page 113: ...while you turn on the printer Then send data from your computer The printer prints all the codes it receives in hexadecimal format Power Supply This section explains solutions for problems related to the power supply Power is not being supplied The lights on the control panel do not light up If your power cord is not permanently attached to the printer check that the power cord is properly plugged...

Page 114: ...e Pauselight is off but nothing is printed Check that the software is installed properly for your printer Check the software s printer settings Check both ends of the interface cable Make sure the cable meets both the printer and computer specifications The Pauseand Paper Outlights are flashing and the printer beeps three times The printer may be out of paper Load paper in the printer The Pauselig...

Page 115: ...a ribbon jam or other problems Try to print again If the printer still does not print correctly contact your dealer The printer beeps several times An error has occurred Turn off the printer and turn it on again If the printer beeps three times check to see if the paper has run out or the printer cover is open If the printer beeps five times check for a paper jam and make sure the paper release le...

Page 116: ...ss lever in Chapter 2 Dots are missing in printed characters or graphics A line of dots is missing in the printout Print the self test as described on page 1 11 If the self test prints correctly check the ribbon cartridge The print head may be damaged Stop printing and contact your dealer to have the print head replaced Dots are missing in random positions Either there is too much slack in the rib...

Page 117: ... the bottom part of one page is printed at the top of the next page You can adjust the loading position using the LF FF button in the micro adjust mode See Using Micro Adjust in Chapter 3 Page length does not match the length of the paper Check the page length set by your software and adjust it if necessary If you are using continuous paper change the page length using the Default Setting mode See...

Page 118: ...s are set correctly Insert a new sheet straight into the paper guide Be sure you re using the right type of paper See the paper specifications in the Appendix Make sure that the printer cover is closed Make sure the paper release lever and paper thickness lever are set correctly Paper does not eject completely Use the LF FF button to eject the page Make sure the printer cover is closed The paper m...

Page 119: ...eeding straight Make sure the paper supply is not obstructed Make sure your paper supply is positioned within 1 meter 3 feet of the printer Make sure the printer cover is closed Make sure the tractor is installed correctly Check that the holes on the sides of the paper are aligned with each other Also make sure the sprockets are locked and their covers are closed Check that the paper size and thic...

Page 120: ...and the Pauselight comes on You may have tried to change the paper release lever position while paper was still in the printer Return the paper release lever to the original position and eject the paper Then change the lever position Options See this section if you have problems with optional equipment The paper does not feed properly with the cut sheet feeder The paper does not feed The cut sheet...

Page 121: ...n 150 sheets You may have forgotten to fan the stack of paper before loading it into the bin Remove the paper fan it and re load it The paper may not have been stored properly Too much humidity can cause paper to stick together The paper feed is crooked The paper may be old or creased Use only new clean sheets of paper There may be too much paper in the stacker Make sure the paper thickness lever ...

Page 122: ...on Pull the lever forward to load continuous paper or push the lever back to load single sheets Continuous paper does not feed properly when using the tractors in a push pull position Paper feed is crooked or jams The pull tractor and push tractor sprockets may not be aligned correctly The paper may have too much slack Adjust the position of the sprockets to remove any slack along the width of the...

Page 123: ...L Sunflower P Rev c A5 size Chapter 6 01 09 96 pass 1 6 12 Troubleshooting ...

Page 124: ...Using Commands A 17 Sending printer commands A 17 Using the command summary A 17 Commands Arranged by Topic A 18 General operation A 18 Paper feeding A 18 Page format A 19 Print position motion A 20 Font selection A 21 Font enhancement A 23 Character handling A 24 Spacing A 27 Graphics A 27 Bit image A 28 Barcode A 29 Character Tables A 32 International Character Sets A 32 Graphics Character Table...

Page 125: ... draft 10 300 Draft 10 12 15 275 330 413 Draft condensed 17 20 236 275 Letter quality 10 12 15 92 110 138 Letter quality condensed 17 20 157 183 The paper thickness lever position or an overheated print head may affect the printing speed L Sunflower P rev c A5 size Appendix 01 09 96 pass 2 A 2 Specifications Command Summary and Character Tables ...

Page 126: ...aper feed speed 45 msec in 1 6 inch feed 0 127 m sec in continuous feed 5 0 inches sec in continuous feed Buffer 0K byte or 64K byte Depends on default settings Character tables 11 standard 20 other character tables Character sets 14 international character sets and one legal character set Bit map fonts 10 bit map fonts Scalable fonts 4 scalable fonts Barcode fonts 8 fonts R Sunflower P rev c A5 s...

Page 127: ...ar 101 to 420 mm 4 0 to 16 5 inches Copies 1 original 3 copies Thickness 0 12 to 0 32 mm 0 0047 to 0 013 inch Weight 40 to 58 g m2 12 to 15 lb Jointing Line glue at the top of form single side line glue is available only with front entry Use under normal operating conditions Envelopes rear entry only Size No 6 166 92 mm 6 5 3 6 inches No 10 240 104 mm 9 5 4 1 inches Thickness 0 16 to 0 52 mm 0 006...

Page 128: ...ngle sheet and multipart front rear and bottom entry Width 101 to 406 mm 4 to 16 inches Length 101 to 559 mm 4 to 22 inches Copies 1 original 3 copies Thickness 0 065 to 0 32 mm 0 0025 to 0 013 inch Weight not multipart 52 3 to 82 g m2 14 to 22 lb Weight one sheet of multipart 40 to 58 g m2 12 to 15 lb Jointing Point glue or paper staple both sides R Sunflower P rev c A5 size Appendix 01 09 96 pas...

Page 129: ... 22 inches Base sheet thickness 0 07 to 0 09 mm 0 0028 to 0 0035 inch Total thickness 0 16 to 0 19 mm 0 0063 to 0 0075 inch Label weight 68 g m2 17 lb Roll paper rear entry only Width 216 mm 8 5 inches Thickness 0 07 to 0 09 mm 0 0028 to 0 0035 inch Weight 52 3 to 82 g m2 14 to 22 lb L Sunflower P rev c A5 size Appendix 01 09 96 pass 2 A 6 Specifications Command Summary and Character Tables ...

Page 130: ...he unprintable area is to the left of the arrow mark Rear paper alignment Printing starts at 0 on the scale The unprintable area is to the left of the 0 margi2 margin R Sunflower P rev c A5 size Appendix 01 09 96 pass 2 Specifications Command Summary and Character Tables A 7 ...

Page 131: ...than 351 4 mm 13 84 inches the side margins increase to match the width of the paper C The minimum bottom margin is 4 2 mm 0 17 inch Continuous paper A The minimum top and bottom margins above and below the perforation are 4 2 mm 0 17 inch B The minimum left and right margins are 13 mm 0 51 inch The maximum printable width is 345 2 mm 13 5 inches A B A B C C B Printable area Printable area a 1 A B...

Page 132: ...32 Push Pull tractor feed rear standard push with optional pull tractors C80032 front with two optional pull tractors C80032 Pull tractor feed front rear and bottom with optional pull tractor C80032 Cut sheet feeder option C80673 C80674 Ribbon life 8 million characters LQ 10 cpi at 48 dots character Total print amount 6 million lines except print head Print head life 200 million strokes wire A B P...

Page 133: ...4 W ISO 10561 Letter pattern Insulation resistance 10MΩ min between AC line and chassis DC 500 V Dielectric strength AC 1000 Vrms 1 min or AC 1200 Vrms 1 sec between AC line and chassis Maximum 2 0 A depending on the character type 230V model Rated voltage AC 220 to 240 V Input voltage range AC 198 to 264 V Rated frequency range 50 to 60 Hz Input frequency range 49 5 to 60 5 Hz Rated current 0 5 A...

Page 134: ... to 80 RH operating 1 30 to 60 RH operating 1 2 0 to 85 RH storage 1 Resistance to shock 1 G within 1 ms operating 2 G within 2 ms storage Resistance to vibration 0 25 G 55 Hz max operating 0 50 G 55 Hz max storage 1 without condensation 2 when printing multipart papers envelopes postcards or labels Safety approvals 120 V model Safety standards UL1950 with D3 CSA C22 2 No 950 with D3 EMI FCC part ...

Page 135: ... 23 EEC EN60950 EMC Directive 89 336 EEC EN55022 class B EN50082 1 IEC801 2 IEC801 3 IEC801 4 Non Automatic Weighting Instruments Directive 90 384 EEC EN45501 Interface specifications The printer provides a bidirectional 8 bit parallel interface and Type B optional interface slot as standard L Sunflower P rev c A5 size Appendix 01 09 96 pass 2 A 12 Specifications Command Summary and Character Tabl...

Page 136: ...g edge of the signal 2 DATA1 20 In Parallel input data to the printer bit 0 LSB 3 DATA2 21 In bit 1 4 DATA3 22 In bit 2 5 DATA4 23 In bit 3 6 DATA5 24 In bit 4 7 DATA6 25 In bit 5 8 DATA7 26 In bit 6 9 DATA8 27 In bit 7 MSB 10 ACKNLG 28 Out This signal negative pulse indicates that the printer has received data and is ready to accept more 11 BUSY 29 Out This signal s high level means that the prin...

Page 137: ...ssis GND 16 33 19 30 GND Signal GND 15 34 NC Not connected In Out shows the direction of signal flow from the printer s point of view Parallel interface reverse channel Transmission mode IEEE 1284 nibble mode Adaptable connector 57 30360 Amphenol or equivalent Synchronization Refer to the IEEE 1284 specification Handshaking Refer to the IEEE 1284 specification Signal level IEEE 1284 level 1 device...

Page 138: ... 5 DATA4 23 In bit 3 6 DATA5 24 In bit 4 7 DATA6 25 In bit 5 8 DATA7 26 In bit 6 9 DATA8 27 In bit 7 MSB 10 PtrClk 28 Out Printer clock signal 11 PtrBusy DataBit 3 7 29 Out Printer busy signal and reverse channel transfer data bit 3 or 7 12 AckDataReq DataBit 2 6 28 Out Acknowledge data request signal and reverse channel transfer data bit 2 or 6 13 Xflag DataBit 1 5 28 Out X flag signal and revers...

Page 139: ... a valid state 35 5 V Out This line is pulled up to 5 V through 3 3 kΩ resistor 17 Chassis Chassis GND 16 33 19 30 GND Signal GND 15 34 NC Not connected In Out shows the direction of signal flow from the printer s point of view L Sunflower P rev c A5 size Appendix 01 09 96 pass 2 A 16 Specifications Command Summary and Character Tables ...

Page 140: ...ifies certain punctuation you must use to enter the command The software manual should explain the required format and punctuation Using the command summary The following section lists and describes all the commands by topic If a command has no parameters it is merely listed If it has parameters they are explained The parameters are indicated by lowercase italicized letters usually n The examples ...

Page 141: ... n 2 Select bin 2 of CSF n R Eject a sheet Paper feeding ASCII Dec Hex Description CR 13 0D Carriage Return FF 12 0C Form Feed LF 10 0A Line Feed ESC 0 48 30 Select 1 8 inch Line Spacing ESC 2 50 32 Select 1 6 inch Line Spacing ESC 3 n 51 33 Set n 180 inch Line Spacing ESC n 43 2B Set n 360 inch Line Spacing L Sunflower P rev c A5 size Appendix 01 09 96 pass 2 A 18 Specifications Command Summary a...

Page 142: ... defined units ESC C nn 40 67 28 43 Set Page Length in Defined Units ESC C 2 0 n1 n2 n n1 n2 256 n Number of defined units ESC C n 67 43 Set Page Length in Lines n number of lines ESC C 0 n 67 43 Set Page Length in Inches n number of inches ESC N n 78 4E Set Bottom Margin for Continuous Paper n number of lines ESC O 79 4F Cancel Bottom Margin for Continuous Paper R Sunflower P rev c A5 size Append...

Page 143: ...nit the default is 1 120 inch in draft and 1 180 inch in LQ for this command ESC V nn 40 86 28 56 Set Absolute Vertical Print Position ESC V 2 0 n1 n2 n n1 n2 256 n Specifies print position from top margin in defined units ESC v nn 40 118 28 76 Set Relative Vertical Print Position ESC v 2 0 n1 n2 n n1 n2 256 n Moves current print position in defined units ESC D nn 68 44 Set Horizontal Tabs Up to 3...

Page 144: ... Script 11 Sans Serif H 5 OCR B ESC X m nn 88 58 Select Font by Pitch and Point ESC X m n1 n2 m Set pitch to 360 m cpi m 0 No change in pitch m 1 Select proportional m 0 1 18 21 24 30 36 42 48 60 or 72 n Set point size in 0 5 points Total points n1 n2 256 0 5 n 0 No change in point n 0 16 20 21 24 28 32 36 40 42 44 48 52 56 60 or 64 for Roman Sans Serif Roman T and Sans Serif H n 0 21 42 for other...

Page 145: ...ESC 4 52 34 Select Italic Font ESC 5 53 35 Cancel Italic Font ESC E 69 45 Select Bold Font ESC F 70 46 Cancel Bold Font ESC n 33 21 Master Select To find the value of n add together the numbers of the typestyles you want to combine from the list below n 0 10 cpi 16 double strike 1 12 cpi 32 double width 2 prop 64 italic 4 cond 128 underline 8 bold L Sunflower P rev c A5 size Appendix 01 09 96 pass...

Page 146: ...el Double Strike Printing ESC S 0 83 53 Select Superscript Printing ESC S 1 83 53 Select Subscript Printing ESC T 84 54 Cancel Superscript Subscript Printing ESC q n 113 71 Select Character Style n 0 Normal style 1 Outline 2 Shadow 3 Outline with shadow ESC nn 40 45 28 2D Select Line Score ESC 3 0 1 n1 n2 n1 1 Underline n1 2 Strikethrough n1 3 Overscore n2 0 Cancel score line selected by n1 n2 1 S...

Page 147: ... d0 d1 d2 data n1 first character number n2 last character number d0 left space of character d1 body width of character d2 right space of character data 3 bytes required for each column super subscripts require only 2 bytes per column ESC n 37 25 Select User Defined Set n 0 Normal set 1 User defined set ESC nn 40 94 28 5E Print Data as Characters ESC n1 n2 data n n1 n2 256 n amount of data data pr...

Page 148: ...downloaded characters from 0 127 to 128 255 ESC 6 54 36 Enable Printing of Upper Control Codes With graphics character tables this command enables the printing of codes 128 159 ESC 7 55 37 Enable Upper Control Codes Cancels ESC 6 R Sunflower P rev c A5 size Appendix 01 09 96 pass 2 Specifications Command Summary and Character Tables A 25 ...

Page 149: ...850 A 10 PC 852 5 0 PC 853 6 0 PC 855 B 0 PC 857 7 0 PC 860 18 0 PC 861 8 0 PC 863 D 0 PC 864 9 0 PC 865 E 0 PC 866 E 20 PC 866 LAT F 0 PC 869 19 0 BRASCII 1A 0 Abicomp 7F 1 ISO Latin 1 1F 0 ISO Latin 1T 7F 2 ISO Latin 2 1D 7 ISO 8859 7 1B 0 MAZOWIA 1C 0 Code MJK 20 0 Bulgaria 25 0 Estonia 23 0 Roman 8 Available in certain areas L Sunflower P rev c A5 size Appendix 01 09 96 pass 2 A 26 Specificati...

Page 150: ...t ESC U 1 0 n Define positioning unit as n 3600 inch n 10 20 30 40 50 or 60 n 10 default Graphics ASCII Dec Hex Description ESC nn 46 2E Print Raster Graphics ESC c v h m n1 n2 data c 0 Full graphics mode 1 Compressed mode v 10 20 Dot density for vertical in 3600 v DPI h 10 20 Dot density for horizontal in 3600 h DPI m Number of vertical dots Total dots n1 n2 256 ESC G nn 40 71 28 47 Select Graphi...

Page 151: ... dpi Pins Adjacent dot printing t 0 60 60 8 enable 1 1 120 60 8 enable 1 2 120 60 8 disable 1 3 240 60 8 disable 1 4 80 60 8 enable 1 6 90 60 8 enable 1 32 60 180 24 enable 3 33 120 180 24 enable 3 38 90 180 24 enable 3 39 180 180 24 enable 3 40 360 180 24 disable 3 L Sunflower P rev c A5 size Appendix 01 09 96 pass 2 A 28 Specifications Command Summary and Character Tables ...

Page 152: ...OSTNET m Module width 180 dpi m 2 2 dots 3 3 dots 4 4 dots 5 5 dots s Space adjustment value 3 s 3 1 360 inch units v1 v2 Bar length v1 v2 256 1 180 inch units The v1 and v2 values are ignored when POSTNET is selected The long bar length of POSTNET is always 0 125 inch the short bar length is always 0 050 inch R Sunflower P rev c A5 size Appendix 01 09 96 pass 2 Specifications Command Summary and ...

Page 153: ...e symbology The data number of each barcode type is constant The barcode is not printed if the following valid characters are not set Barcode Type Number of valid characters 1 HEX Number of valid characters 2 HEX EAN 13 EAN 8 Interleaved 2 of 5 UPC A UPC E Code 39 Code 128 POSTNET 0D 8 2 to FF 0C 0C or 8 1 to FF 2 to FF 6 or 0A or 0C 0C 7 2 to FF 0B 0B or 7 1 to FF 2 to FF 5 or 9 or 0B Number of v...

Page 154: ...barcode nor raster bit image is printed A barcode is not printed when part of the barcode extends beyond the right margin When barcode data and text data are mixed in a data sequence barcode and text are printed in the same place The initial data of Code 128 Set A B or C is identified as the firstdata of Code 128 and must be hexadecimal 41 42 and 43 respectively When Code 128 Set C and Interleaved...

Page 155: ...aracter Tables International Character Sets Graphics Character Tables PC 437 United States A 2 L Sunflower P rev c A5 size Appendix 01 09 96 pass 2 A 32 Specifications Command Summary and Character Tables ...

Page 156: ...PC 850 PC 860 PC 863 PC 865 A 3 A 4 R Sunflower P rev c A5 size Appendix 01 09 96 pass 2 Specifications Command Summary and Character Tables A 33 ...

Page 157: ...PC 861 BRASCII Abicomp ISO Latin 1 A 5 L Sunflower P rev c A5 size Appendix 01 09 96 pass 2 A 34 Specifications Command Summary and Character Tables ...

Page 158: ...Roman 8 PC 437 Greek PC 852 A 6 R Sunflower P rev c A5 size Appendix 01 09 96 pass 2 Specifications Command Summary and Character Tables A 35 ...

Page 159: ...PC 853 PC 855 PC 857 PC 864 L Sunflower P rev c A5 size Appendix 01 09 96 pass 2 A 36 Specifications Command Summary and Character Tables ...

Page 160: ...PC 866 PC 869 ISO Latin 1T ISO 8859 7 A 7 R Sunflower P rev c A5 size Appendix 01 09 96 pass 2 Specifications Command Summary and Character Tables A 37 ...

Page 161: ...MAZOWIA Code MJK Bulgaria Estonia A 8 A 9 L Sunflower P rev c A5 size Appendix 01 09 96 pass 2 A 38 Specifications Command Summary and Character Tables ...

Page 162: ...PC 774 ISO Latin 2 PC 866 LAT Italic Character R Sunflower P rev c A5 size Appendix 01 09 96 pass 2 Specifications Command Summary and Character Tables A 39 ...

Page 163: ...L Sunflower P rev c A5 size Appendix 01 09 96 pass 2 A 40 Specifications Command Summary and Character Tables ...

Page 164: ...acters used in a particular language characters per inch cpi A measurement of the size of text characters condensed Printing in which each character is approximately 60 of the width of standard characters For example condensed 10 cpi printing actually has 17 characters per inch Useful for fitting wide table or spreadsheets onto the paper continuous paper Paper that has sprocket feed holes on both ...

Page 165: ...mputers ESC P 2 The enhanced version of the ESC P printer command language Commands in this language produce laser like results such as scalable fonts and enhanced graphics font A style of type designated by a name such as Palatino or Helvetica form feed A control code and control panel button that advances the paper to the next top margin position hex dump A troubleshooting feature that helps ide...

Page 166: ...s commands for using the functions of a particular printer pull tractor unit An optional device that feeds continuous paper through the printer RAM Random Access Memory The portion of the printer s memory used as a buffer and as a place for storing user defined characters reset To return a printer to its defaults self test A method for checking the operation of the printer When you run the self te...

Page 167: ... position on the paper that the printer recognizes as the first printable line This is the default top margin position unidirectional printing Printing in which the print head prints in one direction only Unidirectional printing is useful for printing graphics because it allows precise vertical alignment L Sunflower P Rev c A5 size Glossary 96 01 09 DR pass 1 4 Glossary ...

Page 168: ... 10 Continuous paper 2 9 30 advancing to tear off position 3 17 loading 2 9 29 problems 6 11 switching to or from cut sheet feeder 4 7 8 switching to or from single sheets 2 30 32 unloading 2 30 Control panel 3 2 6 Cut sheet feeders 4 2 8 double bin 4 6 7 high capacity 4 2 6 problems 6 7 11 second bin 4 2 8 switching to continuous paper 4 7 D Data dump 3 6 Default setting mode 3 7 12 instruction s...

Page 169: ...Load Eject button 3 4 Loading paper continuous paper 2 9 29 cut sheet feeder 4 4 envelopes 2 36 labels 2 35 multipart form 2 34 postcards 2 36 single sheets 2 4 8 Location for printer 1 2 3 M Microsoft Windows See Windows Micro Adjust button 3 4 Micro Adjust feature 3 13 15 Moving the printer 5 2 Multipart forms 2 34 O Operate button 3 4 5 Options 2 4 2 14 P Paper continuous See Continuous paper e...

Page 170: ...9 R Release lever See Paper release lever Ribbon cartridge installing 1 5 10 replacing 5 3 Ribbon pack 5 3 Roll paper 2 36 4 9 11 holder 4 9 11 S Safety instructions viii Second bin cut sheet feeder 4 2 8 Self test 1 11 13 Shield plate 4 13 Single sheet paper 2 4 8 4 7 loading from front 2 7 8 loading from top 2 4 6 Skip over perforation 3 11 Software DOS 1 21 setting up 1 15 22 Windows 1 15 20 Sp...

Page 171: ...0 Unpacking the printer 1 4 Utilities EPSON Calibration 1 22 EPSON Remote 1 22 V Voltage caution 1 5 1 10 W Weight A 10 Windows 1 15 20 installing printer driver 1 15 18 L Sunflower P rev c A5 size Index 01 09 96 pass 0 IN 4 Index ...

Page 172: ... No 1 Temasek Avenue 36 00 Millenia Tower Singapore 039192 Phone 065 33 77 911 Fax 065 33 41 185 EPSON HONG KONG LTD Rooms 4706 10 47 F China Resources Bldg 26 Harbour Road Wanchai Hong Kong Phone 2585 4300 Fax 2827 7083 EPSON TAIWAN TECHNOLOGY TRADING LTD 10F No 287 Nanking E Road Sec 3 Taipei Taiwan R O C Phone 02 717 7360 Fax 02 712 9164 EPSON ITALIA S p A V le F lli Casiraghi 427 20099 Sesto S...

Page 173: ...Printed in Japan 96 04 2 ...

Reviews: