background image

SET UP

Before use

1. Preparing the power supply

This product operates on batteries or with the dedicated AC adapter.

Using on batteries

Prepare six AA alkaline batteries.

If the rubber guard is attached, remove it. Attach the rubber guard after 

inserting batteries.

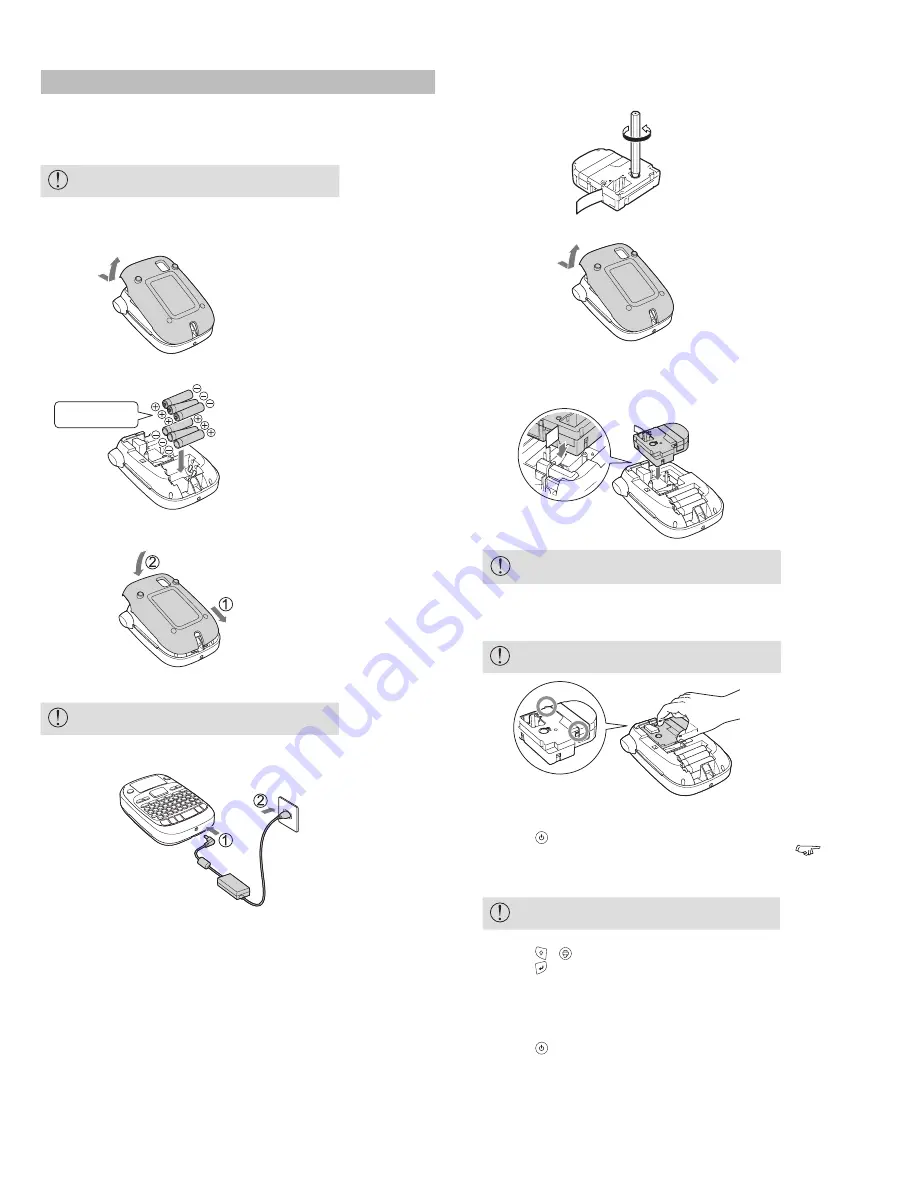
1. Remove the cover on the rear.

2. Insert the batteries. 

Do not reverse 

polarity.

3. Close the cover. Close it until it snaps into place.

Using with the AC adapter (APT0615Z2-1)

Make sure to use the specified AC adapter 

(APT0615Z2-1).

1. Connect the AC adapter firmly into the power socket of the product.
2. Plug the AC adapter into the outlet.

2. Installing a tape cartridge

If the rubber guard is attached, remove it. Attach the rubber guard after 

installing the tape cartridge.

1. Remove the slack of the ink ribbon.

2. Remove the cover on the rear.


3. Set the tape cartridge.  

Press it firmly until it snaps into place.

When installing a new tape or the tip of the tape is longer than usual, put 

the tape through the "Tape Guide" slot.

• Do not press the "Cut Button" before the tape stops.

• Do not pull the tape out with your fingers.

4. Close the cover on the rear.  

Close it until it snaps into place.


How to remove the tape cartridge

Hold the tape cartridge by the tabs, and lift it 

straight up.

3. Turning the power on

1. Press  .  

When changing the language of messages on the display 

 Display 

Settings ("Display" menu)

4. Feeding the tape

Do not press the "Cut Button" before the tape stops.

After setting a tape cartridge, make sure to feed tape. 

1. Press   +  .
2. Press  .
3. Cut the tape.  

Cut it by pressing the "Cut Button".


J

Turn the power off after use

1. Press  .

Batteries:  

   Take them out if not in use for a long time.

AC adapter:  

   Disconnect from the outlet and the product.

6

Summary of Contents for LABELWORKS LW-PX300VP

Page 1: ...l Support labelworks epson com 800 622 6312 support labelworks epson com K Sun Corporation Epson Labelworks 370 SMC Drive PO Box 309 Somerset WI 54025 Printer Operator s Manual LW PX300 LW PX300VP LABELWORKS PX ...

Page 2: ... a heater Do not use any damaged AC adapter or power cable Do not touch the plug during thunderstorms Do not unplug the AC adapter while the product is in operation Do not use the AC adapter in a small confined space or cover it with a cloth When handling batteries Keep batteries out of reach of children They are extremely dangerous if swallowed Contact a doctor immediately if swallowed WARNING co...

Page 3: ... Create a label printing adjusting print density Editing Characters 7 Useful Functions 8 Fonts Layout Margin Mirror Printing Special Features 8 Print on Shrink Tube 9 Creating Barcode 9 Create Folder Tape Label 9 Create a Ribbon 9 Making Cable Labels 9 Specifying the Label Length 9 Using Symbols 10 Accent Characters 11 Adding a Frame 11 Troubleshooting 12 Initializing Cleaning 13 Supplies for your...

Page 4: ...ht Approx 400g excluding batteries tape cartridge J Usage conditions Operating temperature 10 to 35 degrees C Storage temperature 10 to 55 degrees C J Supported tape width 6 mm 9 mm 12 mm 18 mm J Power supply AC adapter Type APT0615Z2 1 Manufacturer Seiko Epson Corp Input AC100 240V 0 3A 50 60Hz dedicated adapter power cable only Output DC6 5V 1 5A Total output power 10W Battery AA alkaline batter...

Page 5: ...ff Contrast Adjusts the density of the fonts on the display Value 5 to 5 Language Selects the language of the settings and messages on the display Language English Spanish French Portuguese Br Portuguese EU Italian Dutch German inch cm Selects the unit to indicate the length Value inch cm Procedure 1 Press 2 Select a setting item with and press 3 When the options of the selected item appear select...

Page 6: ...slack of the ink ribbon 2 Remove the cover on the rear 3 Set the tape cartridge Press it firmly until it snaps into place When installing a new tape or the tip of the tape is longer than usual put the tape through the Tape Guide slot Do not press the Cut Button before the tape stops Do not pull the tape out with your fingers 4 Close the cover on the rear Close it until it snaps into place How to r...

Page 7: ...t Part Names and Functions Text is entered from the cursor position Display To keep the already entered text first move the cursor to a number to which no text is entered yet with or then enter text J Switching upper case or lower case 1 Press The setting is indicated on the display Characters are set to upper case or lower case To capitalize partially Enter with pressed J Deleting characters 1 Pr...

Page 8: ...comma space pictograms Font style Normal Frame Off If the label can use the extra large font the indicator appears on the display 2 Enter text J Changing the layout 1 Press 2 Select Layout with and press 3 Select a layout option with and press MEMO To apply the Justify layout option change the Char spacing setting to Wide Adjusting the space between characters J Changing the label margin 1 Press 2...

Page 9: ... form mode press then select the 9 Exit and press Specifying the Label Length If the font size is set to Auto the font size will adjust automatically allowing you to create labels of a specified length 1 Press 2 Select Label length with and press 3 Select a value with or enter it and press Maximum length 40cm 15 0 inch Auto Adjusts to the proper length automatically 4 Select a text alignment setti...

Page 10: ... 9 Number 10 Number 11 Greek 12 Office 13 Safety 14 Facility 15 Prohibition 16 Household 17 Food 18 Sports 19 Activity 20 Occasion 21 Shipping 22 Electrical 23 Animals 24 Zodiac 25 Emoticons SYMBOLS J Adding a symbol to the label 1 Press 2 When the category appears select an item with and press 3 When symbols appear select a symbol with and press 10 ...

Page 11: ...75 76 77 78 79 80 81 82 83 84 85 86 87 88 89 Adding Accent Mark or Frame J Adding characters with an accent mark to the label If there is a choice of characters with an accent mark they are indicated on the display Example École 1 Press 2 Press A choice of characters with an accent mark appears 3 Select an item with and press Go on and enter the next character J Adding a frame 1 Press 2 Select an ...

Page 12: ...ace the batteries with new ones or use the dedicated AC adapter APT0615Z2 1 Is the AC adapter securely connected Connect the AC adapter and the power cable firmly to the power socket of the product the AC adapter connector and the outlet Are you using an AC adapter other than the dedicated one Using an AC adapter other than the dedicated one APT0615Z2 1 is very dangerous and may cause overheating ...

Page 13: ...nitialized To abort Press any button other than When the exterior is dirty Wipethedirtoffwithasoftcloth Ifitisverydirty useaclothwrungout ofwater Never use chemicals or solvents such as benzine thinner or alcohol or use a chemical duster When the printhead is dirty If the print becomes faint or some parts are missing there may be some dirt on the printhead Clean the print head with a cotton swab m...

Page 14: ... Black on blue White on black 1 8 14 22 203B20BYPX 203B20BWPX 1 8 16 22 203STBWPX 3 16 8 12 205STBRPX 205STBYPX 205STBWPX 205STWBPX 3 16 10 20 205STBGPX 205YLBBPX Polyolefin Shrink Tube Cartridge Color Sizes length 96 Fluorescent 3 4 18mm 30 Blackon fluorescent red Black on fluorescent pink Black on fluorescent orange Black on fluorescent yellow Black on fluorescent green 218FRPX 218FPPX 218FOPX 2...

Reviews: