background image

Confidential

Disassembly/Reassembly

Overview

11

L200/L201/L100/L101

Revision A

†

Means do to minimize the ink spill

Before disassembling, confirm that the printer is in the following condition.

„

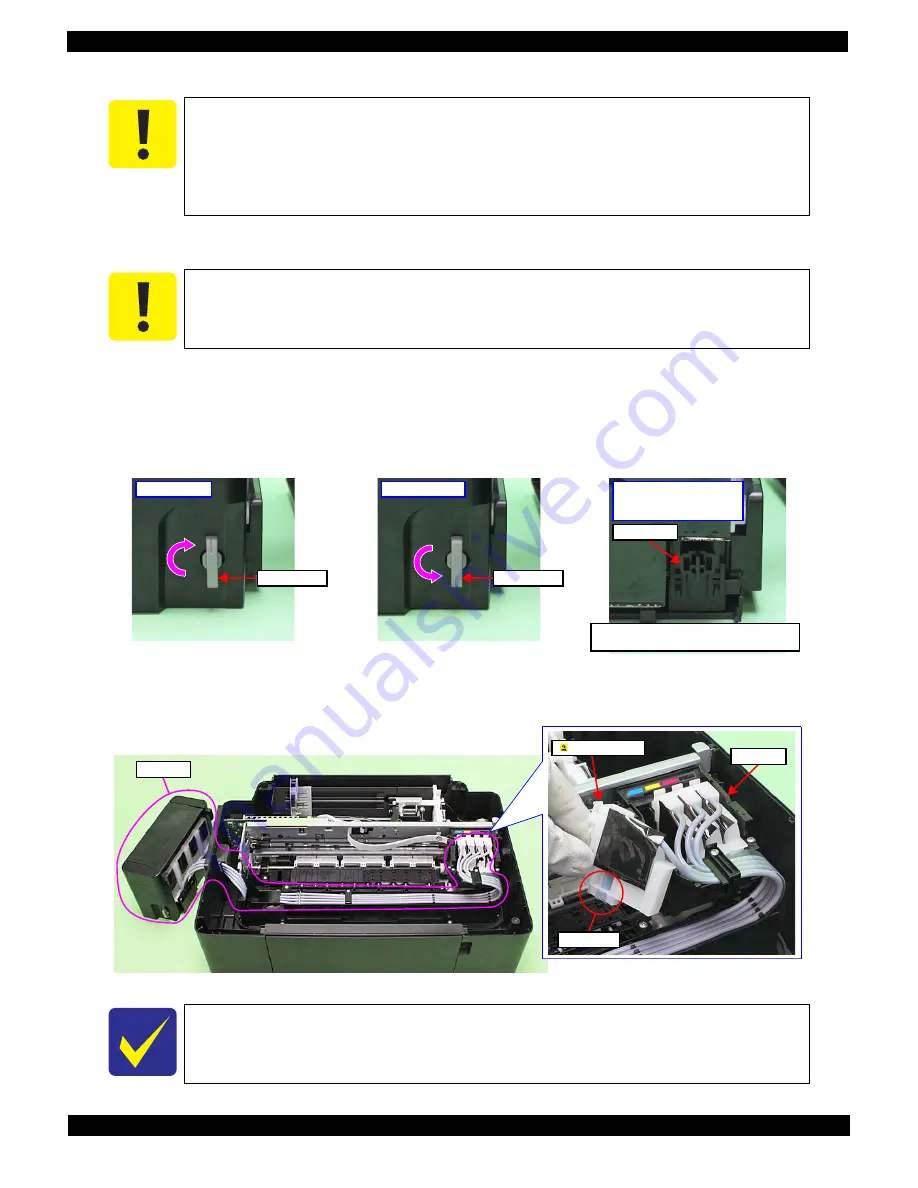
Choke Valve is closed

Before disassembling:
Turn the Valve Lever and be sure to close the Choke Valve.

After reassembling is complete:
Open the Choke Valve to perform the print inspection.

Before returning the printer to the user after repairing:
Make sure to turn the Valve Lever up to the choke position to close the Choke Valve before packing the printer.

Figure 1-2. Opening/closing the Choke Valve

„

Adapter Assy is removed
Before disconnecting the joint parts of the ink path, make sure that the Adapter Assy is removed from the Carriage.

Figure 1-3. Adapter Assy

Even observing the points described in this section, ink may spill in the following situations. 
Therefore, be careful not to contaminate the inside of the printer or its surroundings by 
preparing the container to receive the leaked ink, or the like.

„

When removing the Valve Assy, some ink will spill from both ends of the ink tube even 
the Valve Lever is closed.

„

When removing the Tube Assy, all the ink in the ink tube will spill.

Do not turn the Valve Lever too much when closing the Choke Valve, otherwise, the Valve 
Lever and/or Valve Assy may get damaged.

The Adapter Assy has an ink valve which cuts off the ink path when removing the Adapter 
Assy from the carriage.

Valve Lever

Valve Lever

Open position

Choke position

Choke Valve shaft is secured more tightly 

in Choke position than in Open position.

Choke position

 (When checking with the 

Valve Lever removed.)

Valve shaft

Ink path

Carriage

Ink valve

 Adapter Assy

Summary of Contents for L200

Page 1: ...SERVICE MANUAL CONFIDENTIAL Color Inkjet Printer L200 L201 L100 L101 SEMF10 001 ...

Page 2: ... SEIKO EPSON would greatly appreciate being informed of them The contents of this manual are subject to change without notice The above not withstanding SEIKO EPSON CORPORATION can assume no responsibility for any errors in this manual or the consequences thereof EPSON is a registered trademark of SEIKO EPSON CORPORATION Note Other product names used herein are for identification purpose only and ...

Page 3: ...ts containing flammable gas is prohibited PRECAUTIONS Strictly observe the following cautions Failure to comply may lead to personal injury or damage of the product 1 Repairs on Epson product should be performed only by an Epson certified repair technician 2 No work should be performed on this product by persons unfamiliar with basic safety knowledge required for electrician 3 The power rating of ...

Page 4: ...ease other than those specified in this manual Use of different types of oil or grease may damage the component or give bad influence on the printer function 13 Apply the specified amount of grease described in this manual 14 Make the specified adjustments when you disassemble the printer 15 When cleaning this product follow the procedure described in this manual 16 When transporting this product ...

Page 5: ...nformation on a specific topic or to warn of possible danger present during a procedure or an action Pay attention to all symbols when they are used and always read explanation thoroughly and follow the instructions Indicates an operating or maintenance procedure practice or condition that if not strictly observed could result in serious injury or loss of life Indicates an operating or maintenance...

Page 6: ...Confidential Revision Status Revision Date of Issue Description A October 8 2010 First Release ...

Page 7: ...ng Flowchart 18 1 2 2 1 Housing Part 18 1 2 2 2 Printer Mechanism Part 20 1 3 Details of Disassembling Reassembling by Parts Unit 23 1 4 Routing FFCs cables 31 Chapter 2 Adjustment 2 1 Required Adjustments 34 2 2 Details of Adjustments 36 2 2 1 TOP Margin Adjustment 36 Chapter 3 Maintenance 3 1 Overview 38 3 1 1 Cleaning 38 3 1 2 Lubrication 38 3 2 Lubrication Points and Instructions 39 Chapter 4 ...

Page 8: ...Confidential CHAPTER 1 DISASSEMBLY REASSEMBLY ...

Page 9: ...owing before disassembling and reassembling Safety Precautions p3 1 1 2 Checks and precautions before disassembling p10 When you have to remove units or parts that are not described in this chapter see the exploded diagrams of SPI Service Parts Information 1 1 1 Tools Use only specified tools to avoid damaging the printer Note All of the tools listed above are commercially available EPSON provides...

Page 10: ...isassembly reassembly flowchart See 1 2 Disassembly Reassembly Procedures p14 Figure 1 1 Location Parts When ink may spill Location Joint Removing the tubes of the Valve Assy Tube Assy from the Joint A Ink Supply Tank Assy Removing the tubes of the Valve Assy from the Joint Removing the tubes of the Valve Assy from the Ink Supply Tank Assy A B Valve Assy Adapter Assy Removing the Tube Assy from th...

Page 11: ...gure 1 3 Adapter Assy Even observing the points described in this section ink may spill in the following situations Therefore be careful not to contaminate the inside of the printer or its surroundings by preparing the container to receive the leaked ink or the like When removing the Valve Assy some ink will spill from both ends of the ink tube even the Valve Lever is closed When removing the Tube...

Page 12: ... is locked in the home position 2 Attach the unfolded end of strong tape fold the other end back 5 mm on the bottom left of the CR Cover 3 Pull the tape to the right side of the housing and attach it tightly Figure 1 4 Securing the Carriage Assy Securing the Ink Tank Secure both sides of the Top Cover with strong tape x2 Secure the Ink Supply Tank Assy and Ink Supply Holder Assy with strong tape x...

Page 13: ...ever is on the position shown below the Choke Valve is closed See Figure 1 2 All the caps of the Ink Supply Tank Assy are securely closed The hooks x2 of the Ink Supply Tank Assy are securely engaged with the Ink Supply Holder Assy The opened ink bottle is not included in the box Valve Lever Cap Ink Supply Tank Assy Ink Supply Holder Assy ...

Page 14: ... observed Indicates the reference page in blue letter Indicates the parts that are inevitably broken in the disassembling procedure and should be replaced with a new one for reassembly Indicates the parts that may cause the ink spill when they are removed 1 1 2 Checks and precautions before disassembling p10 Indicates necessary check items in the disassembling reassembling procedure Indicates the ...

Page 15: ...nner 15 0 15 Cover Flashing 195 0 195 Tray Exit Outer 18 0 18 Porous Pad Front Paper Guide 159 0 159 Jam Cover 17 0 17 CR Motor 235 406 641 Document Cover 9 0 9 Power Supply Unit 129 406 535 Document Pad 20 0 20 Waste Ink Tray Assy 163 35 198 ASF Cover 5 0 5 Waste Ink Pads 239 35 274 Ink Cartridge Cover 18 0 18 Main Frame 501 406 907 Rear Cover 10 0 10 Carriage Assy 906 406 1312 Scanner Unit 228 0...

Page 16: ... 204 EJ Frame Assy 90 0 90 Paper Support Assy 9 0 9 EJ Roller 111 406 517 Paper Support Tray 17 0 17 EJ Roller Gear 75 0 75 Paper Support Tray 2 23 0 23 Waste Ink Pads for flushing 171 0 171 Stacker Assy 3 0 3 Cover Flushing 136 0 136 Rear Cover 10 0 10 Porous Pad Front Paper Guide 100 0 100 Upper Housing Assy 144 0 144 CR Motor 176 406 582 Upper Housing 87 0 87 Power Supply Unit 70 406 476 USB Co...

Page 17: ...Pump 768 0 768 Ink Tube Guide 2nd 376 0 376 Waste Ink Tube 833 0 833 Cap 6 0 6 Pump Housing 833 0 833 Joint 365 0 365 Upper Paper Guide 195 0 195 Tube Guide Plate 431 0 431 PF Roller 476 0 476 Tube Guide Plate Support 461 0 461 PF Motor 472 0 472 Tube Assy 520 0 520 Printhead 305 1642 1947 FFC Cover 377 0 377 Ink Tube Guide 1st 194 0 194 Valve Assy 747 0 747 Tube Pressing Plate 190 0 190 Ink Suppl...

Page 18: ... kgf cm C B P TITE SCREW 3x6 5 0 6 0 kgf cm C B P TITE SCREW 2 6x16 5 0 6 0 kgf cm S1 S2 S3 S4 S5 S6 S7 S8 S9 S10 S11 Jam Cover Middle Housing p 29 Panel Unit 4 p 23 Panel Board 1 S1 Document Cover 2 Document Pad p 23 Tray Exit Outer 2 Tray Exit Inner 2 Paper Support Tray 2 Paper Support Tray 2 2 Middle Housing Assy 4 4 S2 Printer Mechanism B p 21 p 20 CIS 4 p 23 p 31 p 39 S2 Scanner Unit 4 4 p 23...

Page 19: ...19 D L200 L201 p 18 L100 L101 p 19 Valve Position Label p 29 Refilling Ink Label p 30 L100 L101 START Screw type torque list Symbol Screw type Torque C B P TITE SCREW 3x8 5 0 0 5 kgf cm C B P TITE SCREW 3x10 5 0 0 5 kgf cm C B S TITE SCREW 3x5 7 5 0 5 kgf cm C B P TITE SCREW 2 6x8 4 0 0 25 kgf cm C P P1 SCREW 2 6x3 5 3 5 0 25 kgf cm C B S TITE SCREW 2x5 3 5 0 25 kgf cm C B P TITE SCREW 2x6 3 0 0 2...

Page 20: ...r Driven Pulley Assy p 40 CR Scale CR Cover Adapter Assy PF Roller p 40 p 34 Cover Flashing EJ Roller EJ Roller Gear EJ Frame Assy Ink Tube Guide 2nd Pick Assy 2 p 31 S1 Screw Tube Holder Top Tube Holder Lower L200 L201 p 18 L100 L101 p 19 Screw type torque list Symbol Screw type Torque C B P TITE SCREW 3x8 5 0 0 5 kgf cm C B P TITE SCREW 3x10 5 0 0 5 kgf cm C B S TITE SCREW 3x5 7 5 0 5 kgf cm C B...

Page 21: ... Gear Pump p 26 Bracket Pump p 26 Pump Housing p 26 Waste Ink Tube p 26 Lever Pick Clutch p 26 Roller Pump p 26 p 20 2 Joint 2 p 28 Tube Pressing Plate 1 S9 Screw p 28 S11 Holder Contact L200 L201 p 18 L100 L101 p 19 Tube Guide Plate Support p 29 Screw type torque list Symbol Screw type Torque C B P TITE SCREW 3x8 5 0 0 5 kgf cm C B P TITE SCREW 3x10 5 0 0 5 kgf cm C B S TITE SCREW 3x5 7 5 0 5 kgf...

Page 22: ...1 2 p 30 p 27 S9 FFC Cover Holder Contact CR Front Tube Pressing Plate Cap L200 L201 p 18 L100 L101 p 19 Top Cover Right Cover Left Cover Screw type torque list Symbol Screw type Torque C B P TITE SCREW 3x8 5 0 0 5 kgf cm C B P TITE SCREW 3x10 5 0 0 5 kgf cm C B S TITE SCREW 3x5 7 5 0 5 kgf cm C B P TITE SCREW 2 6x8 4 0 0 25 kgf cm C P P1 SCREW 2 6x3 5 3 5 0 25 kgf cm C B S TITE SCREW 2x5 3 5 0 25...

Page 23: ...the rear side of the Scanner Unit Tighten the screws in the order indicated in the figure above 3 Panel FFC Scanner FFC Scanner Motor cable Scanner Unit Scanner Unit 1 2 4 C B P TITE SCREW 3x10 5 0 0 5 kgf cm CIS L200 L201 Be careful not to lose the Spacer because it comes off easily when disassembling the CIS When installing the spacers be sure to place them with the cutout facing inward Align th...

Page 24: ...aner Case Spring Hook Cleaner Case Spring Cap Unit Cap Unit Dowel for temporarily secure Frame Base Step 1 Step 2 Step 3 Step 4 Hook Main Frame When installing the Grounding Spring of the lower part of the 80 digit side follow the instruction below 1 Insert the tip of the spring to the hole of the Frame Base 2 Attach the eye of the spring to the Bracket and secure the other eye to the hook on the ...

Page 25: ...ckler Friction Buckler R Friction Buckler Sheet BF2 A Double sided tape Housing Buckler Friction Buckler Housing Buckler Friction Buckler R Carriage When replacing the Carriage be careful about the following and remove the Grounding Plate Guide Carriage Compression Springs from the Carriage to be replaced then attach them to the new Carriage as shown in the figure above Insert the protrusion of th...

Page 26: ...cket Pump Roller Pump Step 9 Gear Pump Cap Unit side Waste Ink Tray Assy side Pump Assy Route the Ink Tube along the ribs on the Frame Base After installing the Ink Tube make sure that no part of the tube is pressed flat Rib Waste Ink Tube Waste Ink Tray Assy When installing the Waste Ink Tube pay attention to the following instructions Align and secure the point E p 26 of the Waste Ink Tube to th...

Page 27: ...es of the ink tubes the red lines for L100 L101 in the same direction as shown in the figure above and be careful not to let the ink tubes go slack on the bottom of the Ink Tube Guide 1st After securing the Ink Tube Guide 1st pull the ink tubes from the Ink Supply Tank Assy side to make sure that the ink tubes are not caught Attach acetate tape x2 in the positions shown above to secure the Ink Tub...

Page 28: ...L100 L101 respectively in the same direction as shown in the figure above and insert them to the joint to the full to its base Be careful not to damage the ink tubes and joint Valve Assy side Valve Assy side Tube Assy side Tube Assy side Front Joint Joint Back Tube Assy Before installing the Tube Assy align the positioning holes x2 of the Tube Guide Plate with the dowels x2 of the Ink Tube Guide 2...

Page 29: ...ve 6 4 mm 7 5 mm 7 5 mm Valve Position Label Middle Housing L200 L201 When replacing the Middle Housing peel off the Voluntary Label from the old housing and attach it to the new housing as specified in the figure above Left side Voluntary Label 10 0 mm 45 0 mm Middle Housing Ink Supply Holder Assy L200 L201 When installing the Ink Supply Holder Assy align the hooks x2 with the hole of the Middle ...

Page 30: ...tep 3 Upper Housing Assy Panel FFC Step 5 1 C B P TITE SCREW 3x6 5 0 6 0 kgf cm Ink Supply Holder Assy Hook 2 C B P TITE SCREW 3x10 5 0 0 5 kgf cm Upper Housing Assy Upper Housing Assy Ink Supply Holder Assy Left side Rear side Step 1 Step 2 Step 4 Left side Voluntary Label 5 0 mm 30 0 mm Refilling Ink Label L100 L101 Attach the Refilling Ink Label on the position shown in the figure above 23 2 mm...

Page 31: ...turn around the frame of the section A Panel FFC Rib Double sided tape Panel FFC Panel FFC Ferrite Core Bottom of the Scanner Unit Scanner Motor cable Hook Section A Scanner FFC Ferrite Core Housing CR Motor Route the CR Motor cable through the ribs x10 and make one turn around the rib A Route the CR Motor cable so as not to touch the surrounding gears Pick Assy Rib CR Motor CR Motor cable Pick As...

Page 32: ...e 3 Align the hooks x4 of the Holder FFC with the holes x4 on the Main Frame and secure the Holder FFC to the Main Frame by sliding it to the 80 digit side CR Encoder Holder FFC Head FFC Hole Step 2 Main Frame Holder FFC Head FFC Step 1 Fold line Main Frame Step 3 Rib Hook Head FFC Holder FFC PF Motor Set the Ferrite Core of the PF Motor cable into the ribs of the Frame Base PF Motor PF Motor cabl...

Page 33: ...Confidential CHAPTER 2 ADJUSTMENT ...

Page 34: ...to the new board when the Main Board needs to be replaced To apply settings for the target market after replacing the Main Board To reset the waste ink counter the ink tube counter after replacing the Waste Ink Pad the Tube Assy To fill ink inside the new Printhead to make it ready for print after replacing the Printhead To correct characteristic variation of the replaced printhead by entering its...

Page 35: ...tment values or the like stored on the old Main Board to the new board when the Main Board needs to be replaced To apply settings for the target market after replacing the Main Board To reset the waste ink counter the ink tube counter after replacing the Waste Ink Pad the Tube Assy To fill ink inside the new Printhead to make it ready for print after replacing the Printhead To correct characterist...

Page 36: ... If it is not within the OK range select the adjustment value 4 to 4 steps on the adjustment program to adjust the top edge of paper until it becomes within 3 to 3 steps from the standard line Then print the adjustment pattern again to check the result The patterns are printed on three sections If those three patterns are in different position to the top edge of paper the paper was fed on a skew S...

Page 37: ...Confidential CHAPTER 3 MAINTENANCE ...

Page 38: ...ructions for cleaning ink stains Wipe the stains off with a cloth wrung out of diluted alcohol 3 1 2 Lubrication The type and amount of the grease used to lubricate the printer parts are determined based on the results of the internal evaluations Therefore refer to 3 2 Lubrication Points and Instructions p39 for the repairing procedures below and apply the specified type and amount of the grease t...

Page 39: ...ection view 1 mm Lubrication area Figure 3 3 Lubrication on EJ Roller Lubrication Point 1 Ribs x20 of the Frame Base contacting points with the EJ Roller 2 Bearings of the Frame Base contacting points with the EJ Roller 3 Shaft on the right side of the EJ Roller Type G 71 Application Amount 1 0 04g point 2 Appropriate amount 3 Appropriate amount Remarks Apply with injector Left side Bearing EJ Rol...

Page 40: ...ing points with the PF Roller Type G 71 Application Amount φ 1 mm x around shaft x 3 Remarks Apply with injector Lubrication Point Figure 3 8 Lubrication on LD Roller Assy Lubrication Point Contacting points x5 between the shafts and bushings of the Head Pick Housing Contacting point x1 with the Right Pick Housing Contacting points x3 between the shafts and bushings of the Left Pick Housing Type G...

Page 41: ...Confidential CHAPTER 4 APPENDIX ...

Page 42: ...he CR lock 2 2 The carriage moves to the 0 digit side slowly to leave from the CR lock 2 3 Checks if paper does not exist with the PE sensor and the PF Motor rotates clockwise to release the CR lock 2 4 The carriage moves to the 80 digit side slowly and confirms that the CR lock is released 2 5 The carriage quickly moves to the 80 digit side by the Left Frame 2 6 After the carriage continuously mo...

Page 43: ...F by the thermistor on the Printhead 4 The empty sanction operation may occur depending on the situation 4 Detecting ink cartridge and initializing ink system 4 4 1 The carriage moves to the 80 digit side for IES detection 4 2 The carriage returns to its home position 4 3 The carriage slowly moves to the CR lock set position 4 4 The PF Motor rotates clockwise 4 5 The PF Motor rotates counterclockw...

Page 44: ...ections of this printer are shown below Figure 4 1 Connector Diagram PS Board Panel Board Panel Board J301 J3 J2 J5 J8 J7 J11 J10 J9 J4 Scanner Unit Panel Unit CIS Module J201 J201 PF Motor Main Board PF Encoder Scanner Motor Printhead CR Encoder CR Motor AC in Only L200 L201 Panel Unit L100 L101 L200 L201 ...

Page 45: ...100 L101 Revision A 4 3 Troubleshooting This section describes the troubleshooting workflow and fatal error information 4 3 1 Troubleshooting Workflow The following page describes the troubleshooting workflow Follow the flow when troubleshooting problems ...

Page 46: ...ical one Major Occurrence Timing Paper loading timing Paper feed timing Paper eject timing Troubleshooting PE Sensor Lever replacement Main Board replacement No Power 1 Presumable Cause Power Supply Board damage Main Board damage Major Troubleshooting Power Supply Board replacement Main Board replacement Poor Printing Phenomenon Poor printing quality Ink stain on paper Dot missing Paper eject with...

Page 47: ... scale Encoder Board failure Motor driver failure Main Board failure CR Motor failure Tooth skip of the CR Timing Belt Improper tension of the CR Timing Belt Carriage overload error paper jam foreign object 02H Feed stall error PF Encoder failure contaminated detached scale Encoder Board failure PF Motor failure PF drive mechanism overload paper jam foreign object Cable disconnection Printhead sys...

Reviews: