4-51
CONFIDENTIAL
EMP-1825/EMP-1815/EMP-1810
SEIKO EPSON
Revision:C
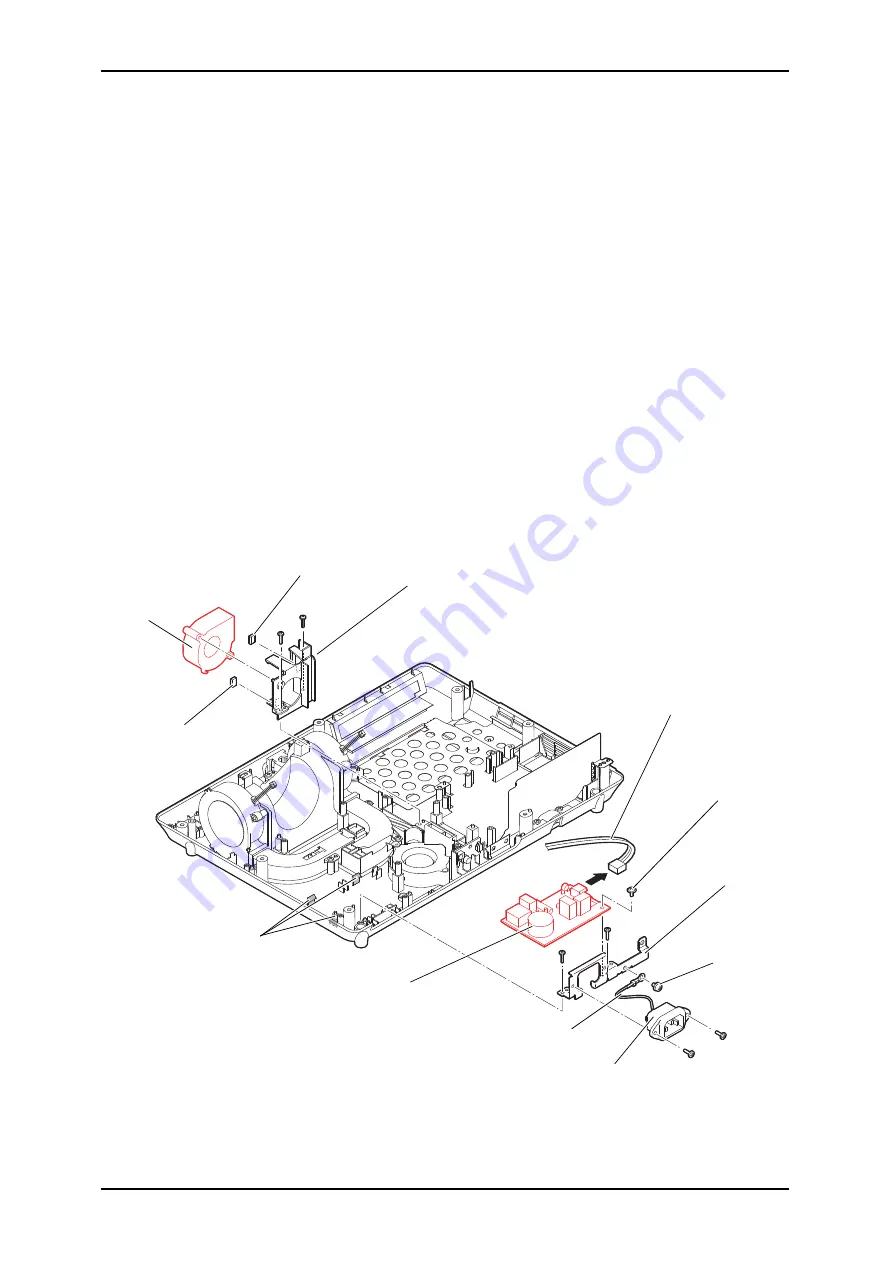
4.5.3 Removing the PS Ballast Assy.(2) (Filter Board Unit)/Lamp Fan
Removing the Filter Board Unit
1). Remove the two screws (C.B.P-TITE SCREW,2.5X10,F/ZN-3C) that secure the AC
Inlet Fastening Plate.
2). Disconnect the AC Cable from the connector on the Filter Board Unit, and unlock the
three hooks and remove the Filter Board Unit together with the AC Inlet Fastening Plate.
3). Remove the screw (C.P.(S-P1)SCREW,4X6,F/ZN-3C) that secures the AC Inlet’s GND
cable.
4). Remove the two screws (C.B.SCREW,3X8,F/ZB-3C) that secure the AC Inlet, and
remove the AC Inlet Fastening Plate.
5). Remove the screw that secures the Filter Board Unit’s GND, and remove the Filter Board
Unit.
Removing the Lamp Fan
6). Remove the two screws (C.B.P-TITE SCREW,2.5X10,F/ZN-3C) that secure the Lamp
Duct, and remove the Lamp Duct together with the Lamp Fan from the Lower Case.
7). Remove the Lamp Fan from the Lamp Duct.
8). Remove the two BS Sheet FIF from the Lamp Duct.
Figure 4-61.
Lamp Fan
Lamp Duct
BS Sheet FIF
BS Sheet FIF
Filter Board Unit
AC Inlet
Fastening
Plate
AC Inlet
AC Inlet’s
GND cable
C.P.(S-P1)
SCREW,4X6,
F/ZN-3C
C.C.SCREW,
3X6,F/ZN-3C
AC Cable
hooks
Summary of Contents for EMP-1815
Page 1: ...Service Manual Data Projector EMP 1825 EMP 1815 EMP 1810 ...
Page 9: ...Chapter 1 Product Specifications ...
Page 16: ...Chapter 2 Theory of Operation ...
Page 23: ...Chapter 3 Troubleshooting ...
Page 44: ...Chapter 4 Disassembly Assembly ...
Page 105: ...Chapter 5 Adjustment ...
Page 113: ...Chapter 6 Appendix ...


