7
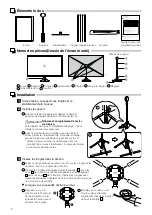
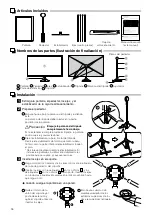
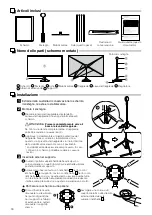
Éléments inclus
1
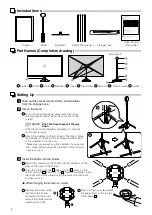
Sortez l’écran, le support, les tringles et le
stabilisateur de la housse.
2
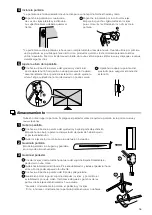
Installez le support.
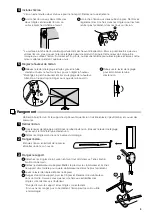
1
Baissez le levier de trépied et dépliez le trépied.
Le levier de trépied doit être à l’arrière de l’écran.
Attention
Rabaissez complètement le levier
de trépied.
Si le trépied n’est pas complètement déployé, il peut
tomber et causer des blessures.
2
Fixez le stabilisateur à la jambe avant du trépied.
Faites glisser le stabilisateur de sorte que la jambe
avant et le bas du stabilisateur reposent sur le sol.
* Veillez à toujours utiliser le stabilisateur. Si vous
installez l’écran sans stabilisateur, il risque de tomber
et de causer des blessures.
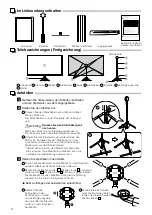
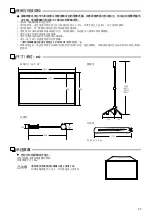
Noms des pièces(Dessin de l’écran monté)
Installation
Housse
1
Écran
2
Support
3
Tringles
4
Stabilisateur
5
Trépied
6
Levier du trépied
7
Régleur
8
Tube d’extension
9
Fixation
Guide d’utilisation
(le présent guide)
Écran
Support
Tringles (quatre pièces)
Pièces du support
3
Insérez les tringles dans la fixation.
1
Faites correspondre les numéros inscrits sur les tringles et les
numéros inscrits à l’arrière de la fixation.
2
Insérez les tringles désignées par les étiquettes
1
dans les
trous
1
de la fixation et celles désignées par les étiquettes
2
dans les trous
2
de la fixation. Insérez les tringles avec
toutes les étiquettes orientées dans la même direction jusqu’à
ce qu’un clic soit audible.
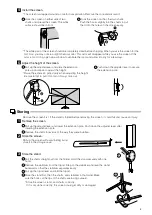
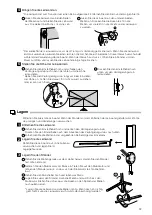
Lorsque vous suspendez l’écran à un mur
1
Déposez la vis à la
jonction de la fixation et
du tube d’extension et
enlevez la fixation avant
d’insérer les tringles.
2
Enroulez un cordon ou un
fil autour des extrémités
supérieures des deux tringles
du haut (étiquette
1
).
Stabilisateur
Mobile Screen (X type)
ELPSC21/ELPSC21B
Read this document carefully to use this product safely and correctly. Keep this information with the screen so that
it can be used to solve any problems that arise.
Explanation of symbols
Warnings and Precautions
Problem Solving
If you notice any damage or anything unusual, stop using the screen immediately and contact the store where you
purchased it.
Notes on Disposal
Dispose of the screen properly in accordance with your local regulations. If relevant, follow company regulations.
Refer to the following for more information.
Screen material: Polyvinyl chloride
Storage case material: Nylon
Stand material: Steel/Aluminum
Shaft material: Aluminum
This symbol indicates information that, if ignored, could possibly result in personal
injury or even death due to incorrect handling.
Caution
This symbol indicates information that, if ignored, could possibly result in personal
injury or physical damage due to incorrect handling.
Warning
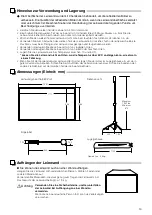
Do not set up the screen near any kind of heater or cooker.
The screen is made from plastic materials and may catch fire.
Caution
Do not set up the screen on a slanted or unstable surface.
It could fall over and cause an injury.
Extend the tripod properly and steady the screen before using it.
If you install or remove the screen without extending the tripod properly, it could fall and cause an injury.
Do not hang from the screen or hang any objects on the screen.
If there are young children in the house, make sure that they do not play with the screen.
It could pinch their fingers, or fall over and cause an injury.
Do not disassemble or modify the screen.
Parts may spring out and cause an injury.
Be careful not to pinch your finger when setting up or storing the screen and stand.
Be careful when storing the screen.
The screen could fall and cause an injury.
Do not set up the screen where it is exposed to wind or drafts.
The screen may be blown over if it is set up outdoors, in front of an open window, or in front of a fan or air
conditioner. If the screen falls, it may cause an injury.
Do not play with the shafts or use them for other purposes.
Warning

