background image


DI-Pilot 

Status Window for Printers and Cameras 


Installation Manual 

– Configuration DJet Software 

4-11 

D

J

e

 D

I7

4

6

7

1

8

-2

1

 E

N


5.2 

Status Window for Printers and Cameras 

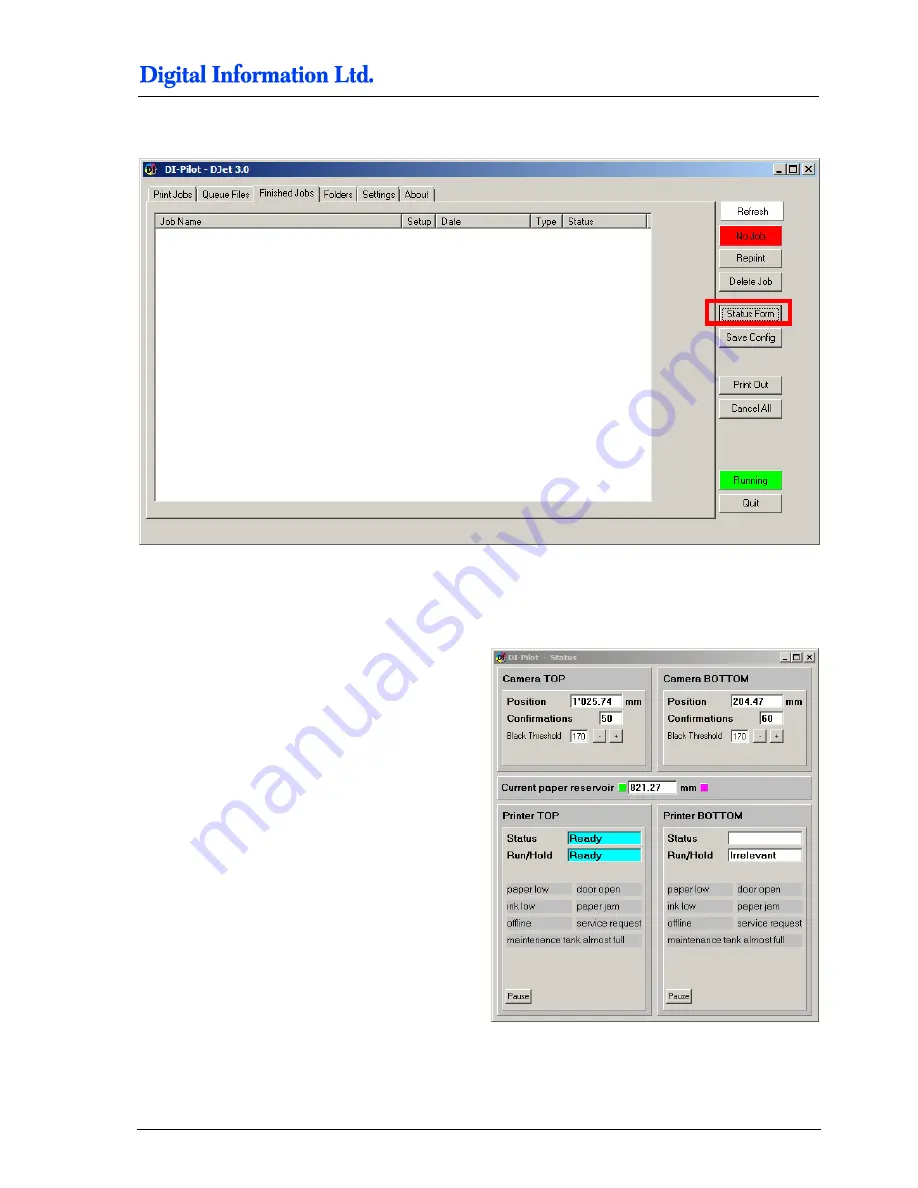
Use the button “Status Form” to display the status window. 


In a separate window the status for both cameras 
and printers and the paper reservoir is indicated. 


Summary of Contents for D-Jet 300

Page 1: ...D Jet 300 500 700 Installation and Configuration DI Pilot ...

Page 2: ...al and or capabilities described herein All the documentation in this manual is instructional and for the operation of DJet machine Digital Information shall not be responsible for any damage or claims resulting from any errors or omissions in this manual Owning to our policy of continuous product development specifications terms and description of DJet are subject to change without prior notice I...

Page 3: ... Control 2 6 3 Software Configuration 3 1 3 1 Set Input and Output Format 3 1 3 2 DJet Setup 3 2 3 2 1 Menu Settings 3 2 3 2 2 not supported yet Menu General Correction Paper Feed Adjustment 3 3 3 2 3 Basic Paper Adjustment Width 3 3 3 2 4 Basic Paper Adjustment Horizontal SKEW Back Printer 3 4 3 2 5 Setup Conversion 3 5 3 2 6 Menu Printer Setup 3 6 3 2 7 Colour Management Settings 3 7 4 Configure...

Page 4: ... Error Indicator 5 12 6 Register Front and Back side 6 1 6 1 Start DI Plot 6 1 6 2 Start DI P i lot Output Manager 6 2 6 3 Adjust Front and Back Side 6 3 6 3 1 Registration Adjustment X Direction 6 6 6 3 2 Registration Adjustment Y Direction 6 7 7 Hotfolder Mode 7 2 7 1 Workflow Job File Names 7 2 7 2 Work Types 7 2 7 3 Setup Hotfolders 7 3 7 4 Name Schemes for Hotfolder Mode 7 6 7 5 Colour Separa...

Page 5: ...com 4 Check if the correct T Series printer firmware is installed Use the Epson Remote Panel for the verification Latest version see www epson com 5 Connect each T Series printer with an Ethernet and USB cable to the DI Pilot computer 6 Set the IP address on both printer Each IP address is configured in the DI Pilot program also Note When installing the software to an Asian Windows system add the ...

Page 6: ...printer the Roll Paper Margin to NORMAL On the Printer control panel go to Setup Printer Setup Roll Paper Setup Roll Paper Margin Set to NORMAL 11 Set on booth Epson printer the Auto Cut to Off On the Printer control panel go to Setup Printer Setup Roll Paper Setup Auto cut Set to OFF 12 Set on booth Epson printer the Refresh Margin to On On the Printer control panel go to Setup Printer Setup Roll...

Page 7: ...DI Pilot software Set the application compatibility mode to WinXP SP2 and select Run as administrator Do the same for DI Pilot and DI Plot After starting up it is accessible through a GREEN dot in the lower right corner Open the UI and select here the USB Windows printer queue for the Front and Back T Series printer 16 Install the latest uEye Camera driver and connect both cameras directly to the ...

Page 8: ...r PDF Manual 21 Convert with DI Plot a test job Available on the DI Preproofer Product CD or at http www digiinfo com support manuals 8FILES_IMPOSED_8UP_F B_TIFF LZW 22 Print several jobs before starting with the front back registration adjustment 23 Backup the registration Backup the x axis print head movement direction The x correction is done in the Page Setup of DI Plot Change only the back si...

Page 9: ... is done in the DI Pilot In DI Pilot change to the tab Setting For the y correction change the value Adjust distance bottom cam to print tool During production system is printing the parameter is accessible in the Tab Settings A detailed explanation for the register adjustment can be found in the chapter 6 Register Front and Back Side 26 Verify and adjust a rare horizontal skew See chapter 3 2 4 ...

Page 10: ......

Page 11: ...The software uses a hardware key from Sentinel Install the driver which is located in the DI Plot program directory in the folder _DongleDriver The detailed software installation procedure is described in the manual DI Plot admin chapter 2 Find the manual on the CD 2 2 Install DI P i lot Use the installer from the CD to install the DI P i lot Output Manager software on the system ...

Page 12: ...ams the compatibility mode and the privilege level Select here the Windows XP SP2 compatibility mode and the enable the checkbox Run this program as an administrator 2 4 uEye Camera Driver 2 4 1 Install Start the uEye camera installer from START Programs Digital Information DI Pilot Installer Depending on the Windows version select either the uEye Camera Installer 32Bit or uEye Camera Installer 64...

Page 13: ...o close up and set the lens aperture between 8 and 16 Each camera needs its own and therefore unique camera ID Change the ID with the uEye Camera Manager see the manual uEye Camera Setup Guide ENG pdf 2 4 3 Access DI Camera The DI Camera software starts up while DI Pilot is launched The program is accessible through the icon from the program tray area 1 ...

Page 14: ...ameter Select the camera setup files from the folder d Program Files DI DI Pilot DI Camera parameter TOP camera cameratop ini cameratop 64bit ini BOTTOM camera camerabottom ini camerabottom 64bit ini 3 Output Path Set the output path for the bmp images with the OCR code Output TOP camera d Program Files DI DI Pilot _CAMERA1 Output BOTTOM camera d Program Files DI DI Pilot _CAMERA2 4 Auto start Act...

Page 15: ...Control Software 2 5 1 Access DJet Control DI Pilot communicates through the DJet Control software The DI Camera program like the DJet Control starts up during the program start The program is accessible from the program tray area 1 Set the compatibility mode to WinXP SP2 and activate the checkbox Run as administrator ...

Page 16: ... Control software In the program UI select the Front and Back printer Windows queue which connect to the printer through USB Note Use only USB connected Windows queues An Ethernet connected queue can not work Parameter Function 1 Front Printer Select the Windows queue connected to the Front printer through USB 2 Back Printer Select the Windows queue connected to the Back printer through USB ...

Page 17: ...mat and input path Setup the input bitmap format and directory from your workflow 2 Flip Negative Depending on the workflow setup you may have to set the check boxes Flip mirroring or Negative 3 Output format and output path The output format is Epson DJet Select an output directory where the generated files are stored and further processed by DI P i lot 4 Front Back enable Enable the double sided...

Page 18: ... Settings When running the software the fully automated hotfolder mode select here a Name Scheme 1 wh Note Every prepress workflow use its own way to handle the file naming for front and back side jobs The simplest way is by setting a _F on the front side file name and a _B on the back side file name Demo_F tif Demo_B tif OR Demo_FRONT tif Demo_BACK tif For the code strip select the checkbox Wide ...

Page 19: ...the field Actual 2 In the field Requested enter the value you need to match the other side Example When comparing the front and the back side the back side job image is longer by 0 5 mm The distance between the crop marks in the paper feed direction the back side is 640 mm At the field Actual enter the value 640 and on the field Requested enter 639 5 mm 3 2 3 Basic Paper Adjustment Width If the pa...

Page 20: ...ameter Horizontal Skew Correction Back 1 to 0 There is no need to correct a vertical value paper feed direction If a skew occurs in the Y direction print two or three jobs more or then reload the paper A positive skew value on the X axis horizontal rotates the back page anti clock wise center rotation Example A value of 15 rotates the job as shown in the picture to the right 1 ...

Page 21: ...s the bitmap data in the Y axis vertical on the page Orientation F Turns the bitmap by 90 180 and 270 degrees including mirroring Page adjustment left centre right Select the bitmap alignment to left centre or right The centre position is recommended control right of the orientation control F Scaling X Scales the bitmap data in X axis print head direction Scaling Y Scales the bitmap data in Y axis...

Page 22: ...eight Sets the minimum printed paper height For jobs smaller than the minimum height Total paper height Minimum height printer margin For jobs larger than the minimum height Total paper height Bitmap job height printer margin Note the minimum paper height is internally set to 600mm Adds a value to the job height Total paper height Bitmap job height printer margin Additional height Paper Width Sele...

Page 23: ...DJet Software 3 7 DJet DI746718 21 EN 3 2 7 Colour Management Settings The colour management setting for the manual and hotfolder mode is set for each printer individually Select the printer paper profile 2 and the reference profile 1 Activate the CMM with the check box 3 ...

Page 24: ......

Page 25: ...is directory should be on the high performance SSD disk Finished Jobs Directory where already printed jobs are stored The location is usually the disk with the higher capacity Log Files Directory for the log files The location is usually the disk with the higher capacity Capacity Finished The number of jobs which are kept in the finished jobs folder for job reprints Epson Printing System Select he...

Page 26: ...length for the Load Paper job and the Output Now job The length is set automatically by the Load Paper Job JobLoad_Txk_1650 prn Reservoir Min Max Minimum and maximum Length of the Paper Reservoir Paper Reservoir Paper between Camera 1 and Camera 2 Recommended values are Min 700 mm Max 1400 mm Change the values only after contacting the technical support of DI Leading white space for front back adj...

Page 27: ...tion DJet Software 4 3 DJet DI746718 21 EN 4 2 2 Setting Distances Parameter name Function Height of gaps btw jobs Set to 300 Adjust distances bottom cam to print tool Default value is 0 zero Note Adjust this value to register the front back data in Y direction paper feed direction ...

Page 28: ...ger Tab Settings 4 4 Installation Manual Configuration DJet Software DJet DI746718 21 EN 4 2 3 Setting Time Intervals Parameter name Function Post print setting time Set to 11 Pre cut setting time Set to 0 Post cut setting time Set to 0 ...

Page 29: ...N 4 2 4 Setting Work Modes Parameter name Function Enable Auto PrintOut The system outputs all pending jobs which are waiting in the paper loop between TOP and BOTTOM printer after x seconds of inactivity no new jobs arrived Auto PrintOut time The waiting time to output all jobs Load Paper Print wide code strip Activated ...

Page 30: ...inter s IP address Note before changing the address press the button Break SNMP Com IP Printer Bottom Set the Bottom printer s IP address Note before changing the address press the button Break SNMP Com Capacity Finished Number of printed jobs which are kept for reprint in the Finished Jobs area Log Frequency The value zero disables logging Activate the logs by changing the value to 8 Delete log f...

Page 31: ...e Print Jobs 5 Installation Manual Configuration DJet Software 4 7 DJet DI746718 21 EN 5 DI Pilot 5 1 Manage Print Jobs 5 1 1 Tab Print Jobs All processed and pending print jobs created by DI Plot appear in this tab ...

Page 32: ...job status from Release to Hold Up Change the job position in the list Down Change the job position in the list Top Change the job to the top position Bottom Change the job to the lowest position Copies 1 Increase the number of copies by 1 Copies 1 Decrease the number of copies by 1 Duplicate Duplicates a job Copy to fin Copies the job to the tab Finished jobs Delete Deletes the job ...

Page 33: ...rt from here a Load paper process Loading paper can be done only when the button PRINT is gray After successfully loading the paper to the DJet activate the system with the button Print which then turns to green Button Function Status Form Shows the camera values and the printer status in an additional window Save config Saves current setup Cancel Deletes all jobs from the queues Load Paper Prints...

Page 34: ...A job completed job appears in the Finished Job list With the button Reprint an already printed job is resent to the Print Job area By default the job becomes the status Hold To send it to the queues the status need to be changed to Ready Use the button Delete Jobs to remove jobs from the list The buttons Quit ends the program ...

Page 35: ...ion Manual Configuration DJet Software 4 11 DJet DI746718 21 EN 5 2 Status Window for Printers and Cameras Use the button Status Form to display the status window In a separate window the status for both cameras and printers and the paper reservoir is indicated ...

Page 36: ...rror Indicator A red frame indicates a camera problem The camera is not able to process current receiving image Caused by USB cable disconnected OCR code is invalid check DI Camera OCR code is not printed correctly Distance between camera lens and paper is not correct The printer status such as low ink low paper etc is highlighted orange or red ...

Page 37: ...DI Pilot Status Window for Printers and Cameras 5 Installation Manual Configuration DJet Software 4 13 DJet DI746718 21 EN ...

Page 38: ......

Page 39: ... Conversion 1 Print jobs 1 All workflow jobs are displayed in the job list area 1 2 Select first the correct page template using the button Setups 5 3 It opens the PageSetup list 6 Select a page setup 4 Then select a job from the job list area 1 by clicking once on it 5 The selected job gets into the Queue waiting list area 2 6 To deselect a job from the Queue waiting list area click on it The job...

Page 40: ...list area All select jobs get into the queue area Visible parameters DF Front job front side setting from template is active DB Back job back side setting from template is active 00 99 Page ID from the selected page template 3 Input path Shows the input directory 4 Job information Information from the selected job Shows data type size in pixel and millimetre Resolution and number of colour planes ...

Page 41: ...ceed like 1 Select the alignment centred 1 Standard is centred for both sides 2 Select the orientation 1 With a click on the F the next setting can be selected For the front side set the offset for X and Y to 0 For the back side set the Y value to 150 and the X value to 0 2 3 Process and print several front back jobs 4 Measure the registration If necessary scale the x and or y axis for front and b...

Page 42: ...ck Side 6 4 Installation Manual Configuration DJet Software DJet DI746718 21 EN 5 The job comes out on the back printer We look now on the back side like 1 Print head direction X axis 2 Paper feed direction Y axis 3 Reference point back side X and Y 0 ...

Page 43: ...head direction 7 The measured difference in this example would be Deviation X 15 mm Deviation Y 9 mm In the x direction the crop mark from the back side is too much on the right To register the x axis the image on the back side has to move to the left into the sheet away from the paper edge Therefore the correction value is positive 15 mm In the y direction the crop mark from the back side is too ...

Page 44: ...e DJet DI746718 21 EN 6 3 1 Registration Adjustment X Direction The correction value is applied in the DI Plot page template Apply the correction only to the back side If later on more correction is necessary add the difference to the existing value Don t forget to recalculate the job to apply the adjustment ...

Page 45: ...et DI746718 21 EN 6 3 2 Registration Adjustment Y Direction The correction for the Y axis paper feed direction is applied in the DI Pilot Change to the Tab Settings and apply the registration correction in Adjust distance bottom cam to print tool For adjustment add or remove the difference from the current value ...

Page 46: ......

Page 47: ...Hotfolder Mode 7 Installation Manual Configuration DJet Software 7 1 DJet DI746718 21 EN ...

Page 48: ...de as WD 98120SpeschaBuchF2SD tif 98120SpeschaBuchF2WD tif Front and back page for the second sheet of the job 98120SpeschaBuch Front side is marked as SD back side as WD 98596FarnerF1SD tif 98596FarnerF1WD tif Front and back page for the first sheet of the job 98596Farner Front side is marked as SD back side as WD 98596FarnerF2SD tif 98596FarnerF2WD tif Front and back page for the second sheet of...

Page 49: ...p DI Plot for multiple hotfolder proceed like 1 Set the root directory for the hotfolders Example Parameter name Function 1 Input path The input folder will be the root folder for all hotfolders 2 Scan Source Sub Directories Activate it to enable the program to scan the subfolders 3 Source File Treatment Set to ERASE after processing ...

Page 50: ...s Hotfolder5 pxs Note The link between the hotfolder directory and the template is by using the same name Parameter name Function 1 Setup File Name Set this name equal the name of the hotfolder 2 Positioning Double Pages Printing different jobs on both sides 2 Positioning Single Pages Job will be printed on the front side back side is empty 2 Positioning Work and Printing same job on both sides 3 ...

Page 51: ... source sub directories 1 The software checks all hotfolder subdirectories Open Source File Treatment and set the options to Erase 2 Open the menu Parameters Time Interval Hotfolder Set the Hotfolder Interval Start to the start date 1 1 98 by pressing the button 1 1 98 1 All jobs are processed younger than 1 1 98 which are basically all ...

Page 52: ...ion Manual Configuration DJet Software DJet DI746718 21 EN 7 4 Name Schemes for Hotfolder Mode The software needs to know the file name convention for the front and back side TIFF files created by the prepress workflow Select here the correct workflow name scheme ...

Page 53: ...1A Y TIF Jobname 1B Y TI Jobname 1A K TIF Jobname 1B K TIF OR OR Jobname 2A C TIF Jobname 2B C TIF Jobname 2A M TIF Jobname 2B M TIF Jobname 2A Y TIF Jobname 2B Y TIF Jobname 2A K TIF Jobname 2B K TIF OR OR Jobname 2C C TIF Jobname 2D C TIF Jobname 2C M TIF Jobname 2D M TIF Jobname 2C Y TIF Jobname 2D Y TIF Jobname 2C K TIF Jobname 2D K TIF etc etc Composite TIFFs Front side Back side Jobname 1A C...

Page 54: ...es front back Delta file holds 1 page Front side Back side Name_Schoen_1 DeltaExport Nname_Wider_1 DeltaExport Name_Schoen Wider_1 DeltaExport Name_Schoen Wider_2 DeltaExport Name_Schoen Wider_1 DeltaExport Name_Schoen Wider_1 DeltaExport Page 1 Page 2 Name_S01 DeltaExport Name_W01 DeltaExport Heidelberg Metadimension V1 xx Front side Back side Jobname_S01 pdf_01_F tif Jobname_W01 pdf_01_F tif Job...

Reviews: