background image

23

Viewing Lamp Usage and Other Information

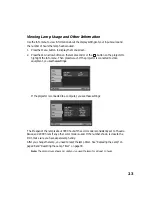
Use the Info menu to view information about the display settings of your input source and 
the number of hours the lamp has been used.

1. Press the 

Menu

 button to display the menu screen.

2. Press the down arrow button on the remote control or the 

 button on the projector to 

highlight the 

Info

 menu. Then press 

Select

. If the projector is connected to video 

equipment, you see these settings:

If the projector is connected to a computer, you see these settings:

The life span of the lamp is about 3000 hours if the color mode is consistently set to 

Theatre 

Black

, and 2000 hours if any other color mode is used. If the number shown is close to the 

limit, make sure you have a spare lamp handy.

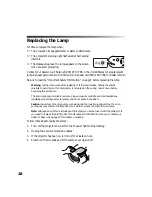
After you change the lamp, you need to reset the lamp timer. See “Replacing the Lamp” on 
page 28 
and “Resetting the Lamp Timer” on page 30.

Note: 

The Lamp Hours shows 0H until you’ve used the lamp for at least 10 hours.

Summary of Contents for CPD-17904

Page 1: ......

Page 2: ...ized modifications repairs or alterations to this product or excluding the U S failure to strictly comply with Seiko Epson Corporation s operating and maintenance instructions Seiko Epson Corporation shall not be liable for any damages or problems arising from the use of any options or any consumable products other than those designated as Original Epson Products or Epson Approved Products by Seik...

Page 3: ...ble Requirements 11 Optional Accessories 12 Using the Projector 13 Choosing a Location 13 Adjusting the Picture 14 Adjusting the Volume 16 Turning Off the Picture and Sound 16 Freezing the Action 16 Using the Projector s Menu System 17 Changing Menu Settings 17 Adjusting the Appearance of the Picture 18 Customizing Projector Operation 20 Repositioning the Picture 22 Viewing Lamp Usage and Other In...

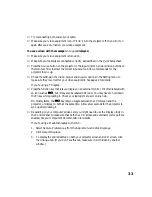
Page 4: ... 30 Transporting the Projector 30 Problem Solving 31 What To Do When the Lights Flash 31 Solving Picture Problems 32 Solving Remote Control Problems 36 Where To Get Help 36 Specifications and Notices 37 General 37 Projection Lamp 37 Remote Control 37 Dimensions 38 Electrical 38 Environmental 38 Safety 38 Compatible Video Formats 39 FCC Compliance Statement 40 Declaration of Conformity 41 Epson Ame...

Page 5: ...lug can be easily unplugged Don t insert the plug into an outlet with dust present and insert the plug firmly into the outlet Failure to do so could result in sparks or fire Don t overload wall outlets extension cords or integral convenience receptacles This can cause fire or electric shock Don t block the slots and openings in the projector case They provide ventilation and prevent the projector ...

Page 6: ...ead to projector damage Don t store the projector outside of the required temperature range of 14 to 140 F 10 to 60 C or in direct sunlight for long periods of time Doing so may cause damage to the case Remote Control Information You can operate the projector by remote control via a line of sight infrared IR receiver at the front and rear of the projector The projector may not respond to remote co...

Page 7: ...n MicroSaver anti theft device Toll free two year priority technical support Registration and Warranty The Epson PowerLite Home 10 projector comes with a basic two year carry in warranty For details see page 41 In addition for customers who register their projector Epson offers free Extra CareSM Home Service In the unlikely event of an equipment failure you won t have to wait for your unit to be r...

Page 8: ...ts Lens cover Focus lever Zoom lever Adjustable foot Speaker Remote control holder S video port Video port composite video Input B computer Input A component video AC power inlet Infrared receiver Audio ports Kensington security lock Control port for service use only ...

Page 9: ...n Selects a menu item or advances to the next menu Source buttons Switch between equipment connected to the projector Color Mode button Selects the Color Mode Power button Turns the projector on and off Memory button Recalls settings made in the projector s menus Aspect button Changes the picture s aspect ratio Arrow and Select buttons Navigate menus and select menu items Volume buttons Adjust vol...

Page 10: ...d carefully to avoid bodily injury Cautions Must be observed to avoid damage to your equipment Notes Contain important information about your projector Tips Contain helpful projection tips Getting More Information Need additional help Take advantage of Epson s automated support services 24 hours a day at http support epson com Use this site to download FAQs or product information and e mail your q...

Page 11: ...irements The projector does not come with any cables However you may already have the ones you need or you can purchase them from Epson as described in the next section To receive a composite video signal you need an RCA video cable One is usually provided with your video equipment To receive an S video signal you need an S video cable One is usually provided with your video equipment To receive a...

Page 12: ...ber Replacement lamp V13H010L29 Air filter replacement V13H134A04 Remote control V12H007T12 Customized carrying cases Samsonite wheeled soft case Samsonite soft shoulder bag ELPKS35 ELPKS43 Ceiling mount Suspension adapter False ceiling plate ELPMB42 ELPMBAPL ELPMBFCP Kensington security lock ELPSL01 Projection screens 50 inch portable screen 60 inch portable pop up screen 80 inch portable pop up ...

Page 13: ...ntified below from the projector s Setting menu Table For temporary front projection place the projector on a low table in front of the screen If possible place the projector directly in front of the screen facing the screen squarely The base of the lens should be about level with the bottom of the screen Shelf You can also place the projector on a high shelf behind you Attach the three rubber fee...

Page 14: ...d turn it on Be sure to follow these guidelines when turning the projector on or off Turn your video equipment on or off before you turn your projector on or off If you re attaching the projector to a computer turn the projector on or off first Press the P Power button on the remote control to turn the projector on or off Never unplug the projector when the P power light on the projector s control...

Page 15: ...ojecting movies or images with dark scenes Theatre Black For projecting images in a dark room lamp brightness decreases and image contrast increases 5 To change the picture s aspect ratio ratio between length and height press the Aspect button on the projector or remote control Choose from these settings Normal Maintains the aspect ratio of the projected image on a 16 9 wide screen format screen w...

Page 16: ...e screen goes dark To turn the picture and sound back on press the A V Mute button again Use your video device s controls to pause the video If you don t pause it it continues to play even though you don t see or hear it When you press the A V Mute button again playback won t resume where you stopped it Freezing the Action To freeze the action temporarily on the screen press the Still button on th...

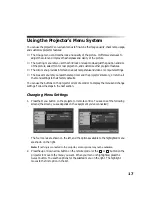
Page 17: ...y or return all the menu settings to their factory defaults You can use the buttons on the projector or remote control to display the menus and change settings Follow the steps in the next section Changing Menu Settings 1 Press the Menu button on the projector or remote control You see one of the following screens the screen you see depends on the equipment you ve connected The four menus are show...

Page 18: ...d by a green light while disabled ones are gray If an option has a submenu press the Select button to display it then select the setting you want If you see a line menu or slider bar press the left or right arrow button on the remote control or the or button on the projector to change the setting 5 Press the Esc button to return to the previous menu 6 Press the Menu button to exit the menu system ...

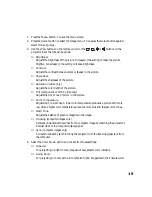
Page 19: ...deo only Adjusts the tint or hue of colors in the picture Color Temperature Adjusts red or blue tones A lower color temperature produces a picture with more red while a higher color temperature produces more blue and sharper color tones Flesh Tone Adjusts the balance of green to magenta in the image Tracking computer images only Removes unwanted vertical lines from a computer image by matching the...

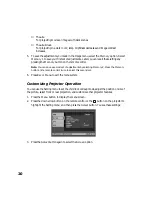
Page 20: ...electing Memory 2 Press the Memory button on the remote control twice to select this second set 6 Press Esc or Menu to exit the menu system Customizing Projector Operation You can use the Setting menu to set the child lock or sleep mode adjust the position or size of the picture select front or rear projection and customize other projector features 1 Press the Menu button to display the menu scree...

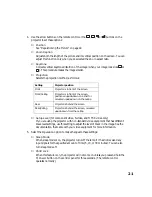
Page 21: ... setting to adjust the level of black in the image See the documentation that came with your video equipment for more information 5 Select the Operation option to make changes to these settings Sleep Mode When sleep mode is on the projector turns off the lamp if it has not received any input signals for the specified amount of time 5 10 or 30 minutes You can also turn sleep mode off Child Lock Whe...

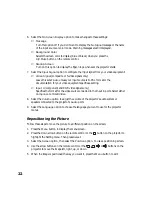
Page 22: ... and RGB video signals only Specifies the format for the video source connected to the Input A ports Select either Component or RGB Video 8 Select the Volume option to adjust the volume of the projector s audio system or speakers connected to the projector s Audio ports 9 Select the Language option to choose the language you want to use for the projector menus Repositioning the Picture Follow thes...

Page 23: ...jector is connected to video equipment you see these settings If the projector is connected to a computer you see these settings The life span of the lamp is about 3000 hours if the color mode is consistently set to Theatre Black and 2000 hours if any other color mode is used If the number shown is close to the limit make sure you have a spare lamp handy After you change the lamp you need to reset...

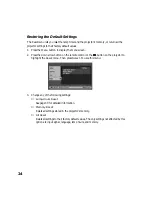
Page 24: ...arrow button on the remote control or the button on the projector to highlight the Reset menu Then press Select You see this menu 3 Change any of the following settings Lamp Hours Reset See page 30 for detailed information Memory Reset Resets all settings stored in the projector s memory All Reset Resets all settings to their factory default values The only settings not affected by this option are...

Page 25: ...ecifically explained in this User s Guide The only parts you should replace are the lamp and air filter If another part needs replacing contact your dealer or a qualified servicer Follow the instructions in this section to clean the lens and projector case change the remote control s battery clean and replace the air filter replace the lamp and store or transport the projector Cleaning the Lens Cl...

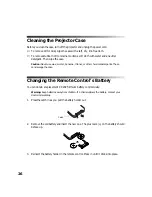
Page 26: ...ene thinner or other chemical detergents These can damage the case Changing the Remote Control s Battery You can obtain a replacement CR2025 lithium battery commercially Warning Keep batteries away from children If a child swallows the battery contact your doctor immediately 1 Press the catch in as you pull the battery holder out 2 Remove the old battery and insert the new one The plus mark on the...

Page 27: ...a small vacuum cleaner designed for computers and other office equipment to clean the filter as shown If you don t have one gently clean the filter using a very soft brush such as an artist s camel hair brush If the dirt is difficult to remove or the filter is broken replace it Contact your dealer or call Epson at 800 873 7766 and ask for part number V13H134A04 In Canada call 800 463 7766 for deal...

Page 28: ...it down before beginning this procedure The lamp component contains mercury Please consult your state and local regulations regarding proper disposal or recycling and do not place in the trash Caution Never touch the lamp with your bare hands the invisible residue left by the oil on your hands may shorten the lamp life Use a cloth or gloves to handle the new lamp Note Although an air filter is inc...

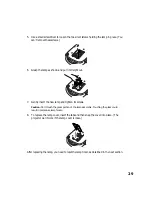
Page 29: ...nsert the new lamp and tighten its screws Caution Don t touch the glass portion of the lamp assembly Touching the glass could result in premature lamp failure 8 To replace the lamp cover insert the tabs and then snap the cover into place The projector won t work if the lamp cover is loose After replacing the lamp you need to reset the lamp timer as described in the next section ...

Page 30: ... to 90 relative humidity Attach the lens cover and retract the feet Remove the battery from the remote control Package the projector in its original packaging or equivalent as described in the following section Transporting the Projector Note Epson shall not be liable for any damages incurred during transportation The projector contains many glass and precision parts If you need to transport it fo...

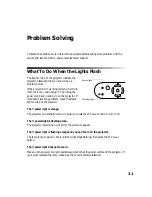
Page 31: ...sn t solve the problem check the status lights on top of the projector The Ppower light is orange The projector is in standby mode Unplug it or press the P Power button to turn it on The P power light is flashing green The projector is warming up Wait for the picture to appear The Ppower light is flashing orange and you can t turn on the projector The lamp is cooling down Wait until the light stop...

Page 32: ...ht stops flashing unplug the projector Then take the lamp out to make sure it s not broken Warning Let the lamp cool before taking it out If the lamp is broken handle the shards carefully to avoid injury If your projector is mounted on the ceiling take it down before attempting to remove the lamp The warning light is flashing red at one second intervals The lamp cover may be loose or off Make sure...

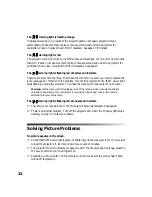
Page 33: ...the function key that lets you display on an external monitor It s often labeled with an icon such as but it may also be labeled CRT LCD You may have to hold down the Fn key while pressing it Check your laptop s manual or online help On most systems the key lets you toggle between the LCD screen and the projector or display on both at the same time Allow a few seconds for the projector to sync up ...

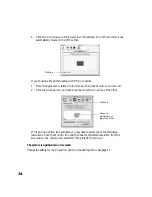
Page 34: ...Arrange icon and then drag one monitor icon on top of the other If the Arrange option isn t available you may need to select one of the Simulscan resolutions Click the Monitor icon and then select a Simulscan resolution from the Resolution box Allow a few seconds for the projector to sync up The picture is upside down or reversed Change the setting for the Projection option in the Setting menu See...

Page 35: ...y condensation If you ve just moved the projector from a cold environment wait a couple of minutes before using it Adjust the Sharpness setting on the Image menu see page 19 If you re projecting from a computer you may also need to adjust the Tracking and Sync settings You see vertical stripes or the picture still looks blurry after trying the solutions in the previous section If you re projecting...

Page 36: ...7661 and enter the PIN on the Epson PrivateLine Support card that came with your projector This is the fastest way of speaking to a live representative and it s free This service is available 6 AM to 6 PM Pacific Time Monday through Friday for the duration of your warranty period You may also speak with a projector support specialist by dialing one of these numbers U S 562 276 4394 6 AM to 6 PM Pa...

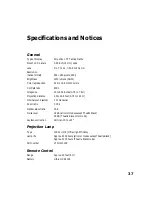
Page 37: ...300 inches 0 76 to 7 6 m Projection distance 2 5 to 46 8 feet 0 76 to 14 3 m Internal sound system 1 W monaural Zoom ratio 1 1 54 Optical aspect ratio 16 9 Noise level 38 dB all color modes except Theatre Black 29 dB Theatre Black color mode Keystone correction Vertical 15 to 15 Projection Lamp Type 130 W UHE Ultra High Efficiency Lamp life Approx 2000 hours all color modes except Theatre Black Ap...

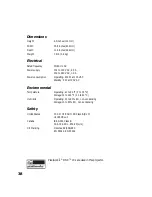
Page 38: ...ating 200 W at 100 VAC Standby 5 W at 100 VAC Environmental Temperature Operating 41 to 95 F 5 to 35 C Storage 14 to 140 F 10 to 60 C Humidity Operating 20 to 80 RH non condensing Storage 10 to 90 RH non condensing Safety United States FCC 47CFR Part 15B Class B DoC UL1950 Rev 3 Canada ICES 003 Class B CSA C22 2 No 950 95 cUL CE Marking Directive 89 336 EEC EN 55022 EN 55024 PixelworksTM DNXTM ICs...

Page 39: ...rrectly see your computer s documentation Resized to native resolution Mode Refresh Rate Hz Resolution HDTV 720p HDTV 1080i HDTV 1080i SDTV 480i SDTV 480p SDTV 575p SDTV 575i 60 60 50 60 60 50 50 1280 720 1920 1080 1920 1080 640 480 640 480 768 576 768 576 VGAEGA 70 640 350 VGA 60 VESA 72 VESA 75 VESA 85 60 72 75 85 640 480 640 480 640 480 640 480 SVGA 56 SVGA 60 SVGA 72 SVGA 75 SVGA 85 56 60 72 7...

Page 40: ... the following measures Reorient or relocate the receiving antenna Increase the separation between the equipment and receiver Connect the equipment into an outlet on a circuit different from that to which the receiver is connected Consult the dealer or an experienced radio TV technician for help WARNING The connection of a non shielded equipment interface cable to this equipment will invalidate th...

Page 41: ... or Canada conforms to the manufacturer s specifications and will be free from defects in workmanship and materials for a period of two 2 years from the date of original purchase except that the warranty period is 90 days for projector lamps For warranty service you must provide proof of the date of original purchase What Epson Will Do To Correct Problems Should your Epson projector require servic...

Page 42: ...le for costs incurred THE WARRANTY AND REMEDY PROVIDED ABOVE ARE EXCLUSIVE AND IN LIEU OF ALL OTHER EXPRESS OR IMPLIED WARRANTIES INCLUDING BUT NOT LIMITED TO THE IMPLIED WARRANTIES OF MERCHANTABILITY OR FITNESS FOR A PARTICULAR PURPOSE SOME LAWS DO NOT ALLOW THE EXCLUSION OF IMPLIED WARRANTIES IF THESE LAWS APPLY THEN ALL EXPRESS AND IMPLIED WARRANTIES ARE LIMITED TO THE WARRANTY PERIOD IDENTIFIE...

Page 43: ... ratio 7 37 Control panel projector 9 D Default settings resetting 24 Desktop adapter Macintosh 12 Documentation 10 E Electrical specifications 38 Epson accessories 12 36 Home Service 7 PrivateLine Support 36 technical support 10 36 F Filter see Air filter Focus lever 8 15 Freeze image 16 H HDTV images video formats 39 Help 36 Home Service 7 K Kensington anti theft device 12 Keystone correction 15...

Page 44: ...ing 30 R Rear projection 13 to 14 21 Registration 7 Remote control buttons 9 changing battery 26 problems 6 36 Replacing lamp 28 to 29 Resetting lamp timer 30 Resolution 37 S Safety approvals 38 Safety instructions 5 to 6 Sleep Mode 21 Sources switching 9 33 Specifications compatible video formats 39 electrical 38 environmental 38 general 37 lamp 37 remote control 37 Storing projector 30 Support s...

Page 45: ......

Page 46: ......

Page 47: ......

Page 48: ......

Reviews: